Guide H-322
Revised by Bernd Maier
College of Agricultural, Consumer and Environmental Sciences, New Mexico State University
Author: Extension Viticulture Specialist, Department of Extension Plant Sciences, New Mexico State University. (Print friendly PDF)
Introduction
Grape growers often want to increase the number of vines in their vineyards, or develop new plantings by using their own cuttings. Through propagation, growers can select healthy vines for making cuttings, potentially select a particular strain of a cultivar, and also save money.
In areas like the eastern United States where there is an abundance of rainfall and high humidity, many growers start new vineyards by planting cuttings directly in the vineyard. In New Mexico, where we do not encounter such conditions, it is best to grow the cuttings for one year in a nursery and then plant them in a permanent location the following year.
This guide will explain the rooting of hardwood vine cuttings. There are many other methods for producing grape vine plants that are not considered here. This guide concentrates on the easiest and likely most successful method of rooting cuttings.

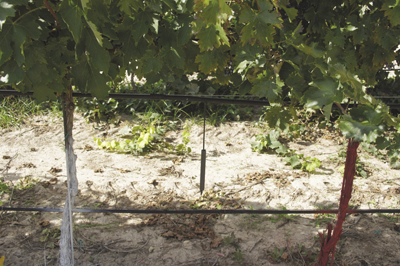
Figure 1. When scouting your vineyard for virus- and disease-infected plants, mark infected plants red for a negative selection or mark plants white if they are symptom free for a positive selection.
Selecting the Vines
The best time for selecting the vines for propagation is at harvest or just before harvest. At this time, it is possible to select vines producing high-quality fruit with high yield and good vigor. Selected vines should be well cropped, but should not appear to be over-cropped since this will prevent the wood from being fully matured, and the cuttings may root poorly as a result.
In recent years, virus-infected vines have become a large concern for grape growers. It is important to scout the vineyard for possibly infected vines and then mark those vines so that no cuttings will be taken from them. Vines can be marked in two ways: for a positive selection (virus-free), mark plants at the trunk with white paint and take cuttings only from those plants; for a negative selection (infected), mark plants at the trunk with red paint and do not take cuttings from those plants (Figure 1). Negative selections would also include vines that are a different cultivar than the cultivar you wish to propagate. With a negative selection, it is best to prune the plants before pruning for cuttings; cut the wood of the negative selections into very short pieces so they will not be propagated (to avoid confusing them with cuttings that will be propagated).
Time for Cuttings
Cuttings can be taken at any time during the dormant season, but in New Mexico it is best to take cuttings in December or January. Dry, cold winter weather often leads to desiccation (drying out) of the wood later during the dormant season, and the rate of rooting success is significantly lowered. It is therefore best to plant cuttings in a nursery for one year to allow them to root and then plant them into the vineyard in the second year.
Making the Cuttings
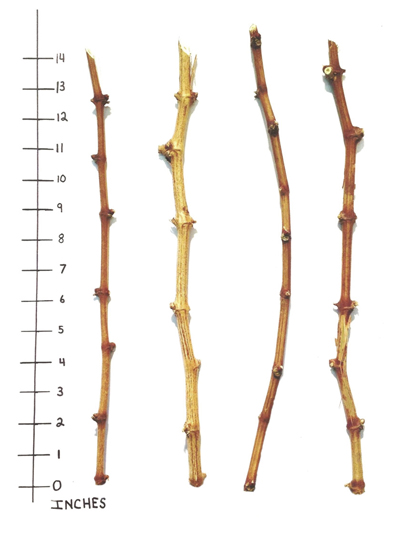
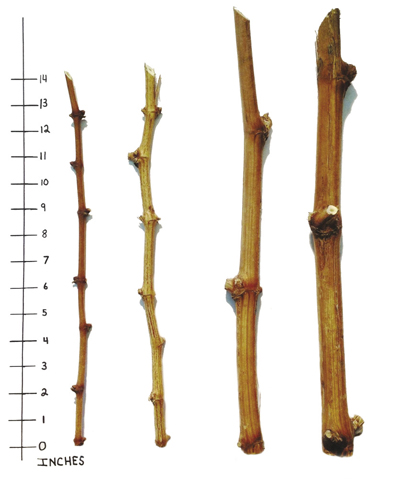
Cuttings are prepared from the previous year’s growth of one-year-old wood. For practical purposes, it is easiest to make all cuttings the same length; 14–16 inches is ideal. A cutting of that length should have at least 3 buds, but not more than 6–7 buds (Figure 2). The canes from which the cuttings are chosen should also not be overly vigorous (Figure 3). The wood at the end of a cane is often not well matured and is therefore not recommended for use as a cutting.
Once cuttings are stored, it is sometimes difficult to tell the top of a cutting from the bottom. To help tell the difference, make a diagonal or slanted cut at the top and a straight cut across the bottom. At this time, all tendrils and lateral shoots should be removed.

Figure 2. Cuttings for propagation should be 14–16 inches in length, with at least 3 buds but not more than 6–7 buds.

Figure 3. The two cuttings on the left are examples of good cuttings for propagation, while the two on the right are too long and vigorous, with too few buds.
Storing the Cuttings
Cuttings should be properly stored before temperatures are warm enough for them to be planted in the nursery. Tie the cuttings in bundles of a size that is convenient for your operation. If you are making cuttings from more than one variety, make sure all the bundles are labeled. Cuttings should be stored in a cold place at temperatures slightly above freezing.
To keep cuttings moist, use moist wood shavings, sawdust, or peat moss. First, wet them well and then drain them enough to remove excess moisture. Generally, moisture is adequate when squeezing a handful of peat moss or shavings leaves your hand damp but not wet.
Lay a piece of plastic on a flat surface, spread a thin layer of shavings, place the cuttings on the shavings, and then add another layer of shavings. Roll the package up, folding the sides toward the middle. When the bundle is complete, tie the package and label it clearly.
The packages can be stored in a refrigerator or buried on the north side of a building where water from storm drains does not collect.
If you prefer, cuttings can be buried upside down either in bundles or the wrapped packages. If there is good drainage, you can bury them on the north side of a building—the coldest side. As the soil warms closer to the surface, it aids in callusing the bottoms of cuttings, which will be located near the surface.
If there are a number of cuttings to be stored and you do not have access to a walk-in cooler or a large refrigerator, pits in the soil work well. Use the procedure mentioned above, but take some extra precautions because of the extreme cold often encountered in New Mexico and cover the cuttings with several inches of soil. As an extra precaution against freezing, place loose straw over the filled pit to further insulate cuttings against the cold. Remove the straw when the possibility of severe cold weather has passed.
If you have access to a walk-in cooler, cuttings can be stored in a deep box, packing them well in the drained shavings. Often, though, large bundles are made using plastic and moist shavings instead of bins or boxes.
If there is no suitable storage for the cuttings, it is possible to place the cuttings into the nursery immediately. The rooting percentage might be slightly lower.
Check cuttings periodically to ensure that the shavings and cuttings are still moist.
Removing the Cuttings from Storage
In the spring after the soil shows signs of warming, above 55°F, cuttings can be placed in the nursery. At no time should cuttings be allowed to dry out.
Locating the Nursery
The nursery must be located where irrigation water is easily accessible. The soil should be free of weeds and weed seed as much as possible, well-drained, and should not receive a lot of runoff water from buildings. If needed, work compost or well-rotted manure into the soil to increase nutrients and organic matter. Some shade is acceptable, but the site should have plenty of sunlight for 8–10 hours a day.
The soil can be sterilized by solar heating with a black plastic covering—a process called “solarization.” Cultivate the site well and water it well. When the soil is drained but still moist, cover the area with 4 mil black plastic sheeting; moist heat is much more effective for sterilizing the soil. Seal the cover around the edges with soil; this will help retain the heat, but more importantly the cover will remain in place during high winds. The minimum time for a good solarization is two weeks, but if time allows, leave it for a month or more. The heat generated under the plastic will be sufficient to kill most of the weed seeds in the soil, as well as common
pathogenic organisms.
Planting in the Nursery
Cuttings should be soaked in water for a several hours before placing them in the nursery. It is not necessary to use any type of root-promoting substance; in fact, these materials may actually reduce grape rooting.
Plant the vines in prepared soil in rows in the nursery. Rows should be spaced far enough apart so they can be easily tilled. Place individual cuttings about 4 inches apart in the row, making sure cuttings have the slanted cut up.
Use whichever irrigation method is preferred. Sprinklers, furrow, flood, or drip—all work well. The important thing is to give cuttings adequate moisture so they will produce good roots.
Purchased Cuttings or Rootings
When dealing with purchased cuttings or rootings, check them as soon as you receive them to make sure they have not suffered from drying out. If necessary, re-wet the sawdust or peat moss if you are not yet ready to plant.
Cuttings or rootings can be stored either by placing the bundles in a cold room or by burying them on the north side of a building in a place that is well drained.
Propagation can be an excellent choice for grape growers to produce new plants. Locally adapted cultivar strains and difficult-to-source cultivars can be increased in this manner. Care should be taken that only productive and healthy plant material is used to propagate.
For more on this topic, see the following publications:
H-329: Grape Powdery Mildew
https://pubs.nmsu.edu_h/h-329/
H-331: Trellis End Post Assembly Designs for Vineyards
https://pubs.nmsu.edu/_h/H-331/
H-332: Managing Grape Leafhoppers on New Mexico Grape Vines
https://pubs.nmsu.edu/_h/H332/
H-334: Managing Weeds in Grapes in New Mexico
https://pubs.nmsu.edu/_h/H334/
Original authors: Esteban Herrera, Extension Horticulturist, NMSU; and Paul La Vine, Emeritus Viticulturist, University of California.

Bernd Maier is the Extension Viticulture Specialist at New Mexico State University. He is a veteran of the New Mexico viticulture industry with over 25 years of experience in the state. His current research includes meteorological studies and remote sensing with respect to grape varieties for Northern and Southern New Mexico, trellis system and irrigation evaluation to enhance grape quality, and mechanization.
To find more resources for your business, home, or family, visit the College of Agricultural, Consumer and Environmental Sciences on the World Wide Web at pubs.nmsu.edu
Contents of publications may be freely reproduced for educational purposes. All other rights reserved. For permission to use publications for other purposes, contact pubs@nmsu.edu or the authors listed on the publication.
New Mexico State University is an equal opportunity/affirmative action employer and educator. NMSU and the U.S. Department of Agriculture cooperating.
Revised September 2015


