Guide L-117
by Sam Smallidge
College of Agricultural, Consumer and Environmental Sciences, New Mexico State University
Author(s): Professor and Extension Wildlife Specialist, Extension Animal Sciences and Natural Resources, New Mexico State University . (Print Friendly PDF)
Introduction
Trapping is an effective means to control pocket gophers (Thomomys and Geomys spp.). Trapping has low risk of exposure to potentially dangerous chemicals, removes concern about primary or secondary poisonings associated with some rodenticides, is certain to remove problem animals, can be used in organic crops,2 has low potential for non-target captures,13 and may be cost-effective for agricultural applications. Despite these recognized advantages, trapping has been considered too time-consuming and costly for larger areas, such as agricultural fields. However, research has shown that trapping is more cost-effective than fumigation when costs are totaled over time.5
Trapping pocket gophers requires an investment in equipment, time, and commitment to follow through a trapping period. A fundamental requirement is vigilance in monitoring pocket gopher activity to reach management objectives, regardless of the methods used. Some people experience difficulties achieving initial success, but these difficulties may be addressed by following a few basic guidelines. Trapping is a straightforward process—it requires locating an active pocket gopher tunnel, excavating the tunnel, and making and checking trap-sets. A trap-set is a placement of one or more traps at an individual location in the burrow. Following the basic guidelines outlined in this publication and giving yourself time to gain experience will result in success.
Information About Trapping
Capture efficiency of trapping, or the number of captures per trap-sets, ranges from 8–43% in reforested areas12 and 10–80% in croplands.1,5 Capture efficiency varies depending on environmental conditions, individual trapper abilities, and pocket gopher numbers, activity, and distribution. Research indicates that novice pocket gopher trappers who received 30 minutes of formal training increased their capture efficiency to a proficient level after approximately 24 aggregated hours of trapping experience.1 Keep expectations low when first learning to trap, and your proficiency will improve with experience.
Trapping’s influence on pocket gopher population control (efficacy) ranged from 81–91% in reforested areas,12 and 53%, 86%, and 95% in croplands after initial, second, and third trapping sessions, respectively.5 Other research observed that two trapping sessions separated by one week in alfalfa fields resulted in 92% efficacy.2 Using a perimeter trapping strategy to protect forage crops reduced entry of pocket gophers into fields by greater than 75%.10 This was accomplished by trapping pocket gophers from a field and establishing a buffer zone around its perimeter, and trapping any pocket gopher that appeared within the buffer zone. This strategy may be employed on a smaller scale around lawns and gardens. Optimizing pocket gopher control may be best achieved by implementing an integrated pest management (IPM) program7,8 by combining methods such as cultural practices, trapping, fumigation, and toxic baits, among others.
General steps when learning to make a set:
- Working from a fresh mound, probe to locate the tunnel in which the set will be made.
- Excavate the hole to access the tunnel, ensuring the tunnel is no wider than the jaws of a set trap.
- Set trap(s) and place all the way in the tunnel.
- Bed the trap (stabilize with downward pressure) and secure the trap with a stake.
Getting Started
Equipment needed for trapping pocket gophers can be found at home and at hardware stores (Figure 1). Basic equipment includes:
- Gloves
- Shovel
- Tunnel probe
- Narrow trowel or soil knife
- Stakes
- Traps with tethers
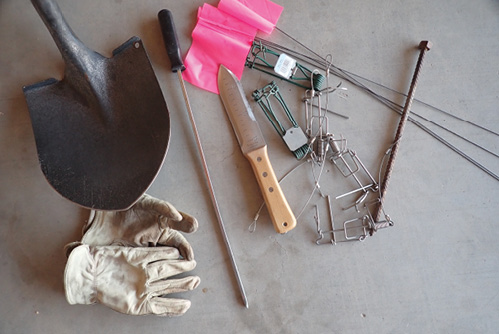
Figure 1. Basic pocket gopher trapping equipment includes gloves, shovel, tunnel probe, narrow trowel (or soil knife), stakes, and traps with tethers.
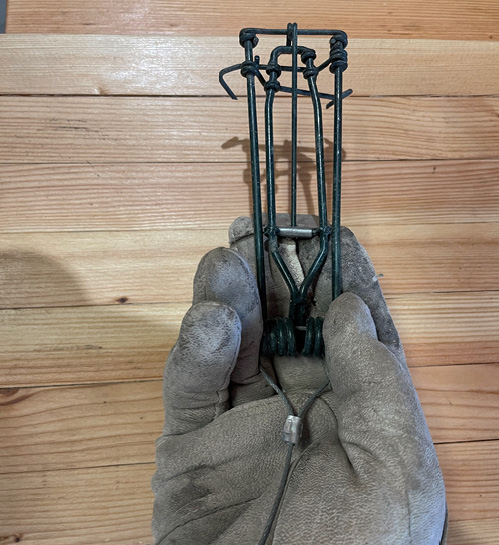
Start with two or four traps to begin learning; purchasing more may be appropriate for agricultural settings. Commercially available pocket gopher traps (Table 1) are designed to work in pocket gopher burrow systems. Some trap designs may offer advantages depending on needs and preferences (i.e., easier to set). Follow instructions and recommendations of trap manufacturers regarding setting and maintenance.
|
Table 1. Examples of Commercially Available Pocket Gopher Traps and Their Approximate Cost |
|
|---|---|
|
Trap brand |
*Approximate cost per trap ($) |
|
DK-1 |
8.00 |
|
Gophinator |
10.00 |
|
Macabee |
12.50 |
|
Sweeney’s |
12.00 |
|
Victor Easy Set |
10.50 |
|
DK-2 Getter Box |
14.00 |
|
Gonzo Dead End |
17.00 |
|
Cinch (three sizes available) |
23.00 |
|
Original Black Hole |
22.50 |
|
Victor, The Black Box |
20.50 |
|
GopherHawk |
31.00 |
|
*2024 online pricing; discounts may be available when purchased in bulk. |
|
Use tethers to secure traps to stakes and help ensure traps are not lost. Bailing wire or aluminum cable tethers work well; avoid non-metallic tethers. Surveyor’s (pin) flags work well as stakes for pocket gophers. However, be aware that marauding cats, skunks, coyotes, and other animals can easily pull these out of the ground and transport a trapped gopher to an unknown location for consumption. If this happens, use a heavier type of stake, such as rebar or a wooden stake to prevent further trap loss.
An inexpensive 10-inch or longer Phillips-head screwdriver makes for a readymade probe; other smooth metal rods strong enough to withstand being pushed through soil may also be used. Avoid rebar, which may be too heavy to detect tunnel voids, and fiberglass or wood probes because they may splinter during use and cause injury. A soil knife or narrow trowel is useful for excavating tunnels without widening them excessively. For instance, the soil knife shown in Figure 1 is 1 3/4 inches wide. A shovel is useful for quickly accessing the main tunnel once it is located with the probe. Include a pair of gloves for hand protection. Use of gloves or no gloves does not appear to affect pocket gopher visitation.7
Steps to Making a Trap-Set
I) Work from a fresh mound
Working from a fresh mound increases the chances the tunnel is active and increases the chances the pocket gopher is nearby. Pocket gophers backfill existing tunnels with soil from new tunnels, so applying control methods in a backfilled tunnel is not effective. On older mounds, if tunnels are open, pocket gophers may be trapped. Typically, soil of older mounds is lighter in appearance than newer mounds due to loss of soil moisture.
Leveling mounds helps identify how many pocket gophers may be present and where to focus trapping efforts. Begin by leveling all the mounds in the target area using a garden rake (Figure 2). During the growing season, return to the target area one or two days later and locate fresh mounds. In New Mexico, the growing season (when plants are growing) is typically July through September. In irrigated systems, the growing season is when plants are actively growing. Depending on the time of year and environmental conditions, pocket gopher mounding activity may be intermittent, with one or two weeks between mound-building activities.11 As such, track mound-building activity for two weeks at the conclusion of the final trapping period.

Figure 2. A rake is one way to level mounds.
Outside of the growing season, pocket gopher surface activity decreases, and it may take several days for a fresh mound to appear. The appearance of new mounds indicates when to return to an area to re-trap. As your confidence and proficiency improve, you can skip mound leveling before initiating trapping. In some agricultural circumstances, leveling mounds may be too costly and an inefficient use of time. If desired, mounds can be leveled with a tractor-mounted box scraper or drag.
A typical mound features a flat side. The pocket gopher pushes soil up to the surface from an ascending tunnel, and as the soil piles up and falls down the far side, it forms a fan-shaped mound; therefore, the tunnel proceeds away from the flat side of the mound. In some cases, the mound will not have an obvious flat side. Pocket gopher burrows are closed systems, and burrow openings are plugged with soil. The tunnel plug is easy to identify on a fresh mound (Figure 3), which aids in probing to find the tunnel.
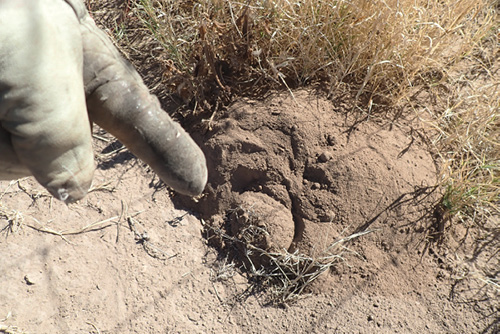
Figure 3. The plug is easily identified on a fresh mound.
Locating the tunnel is necessary to make a set. There are two types of tunnels, the main tunnel and lateral tunnels. The lateral tunnel (Figure 4) runs from the mound to the main tunnel. Lateral tunnels are usually less than about 18 inches long before intersecting with the main tunnel. The main tunnel is long, with multiple lateral tunnels branching from it. Using a probe is a fast and efficient approach for locating tunnels.

Figure 4. Main and lateral tunnels of a pocket gopher burrow system.
The probe point should be slightly blunt to ensure positive feedback when it hits the bottom of the tunnel. Envision pushing the probe into the soil at a constant pressure and then entering the void of a tunnel, creating a sudden drop followed by a stop. A sharp point or thin blade may not provide the necessary positive feedback.
Start probing near the tunnel plug and move along at about 2- to 4-inch intervals until you no longer feel the lateral tunnel (Figure 5). Return to the last known location of the lateral tunnel and probe in a perpendicular direction to validate you are in the main tunnel. If the mound does not have a flat side, begin probing inside and near the mound edge every few inches to locate tunnels. Similarly, you can probe near the center of these mounds.
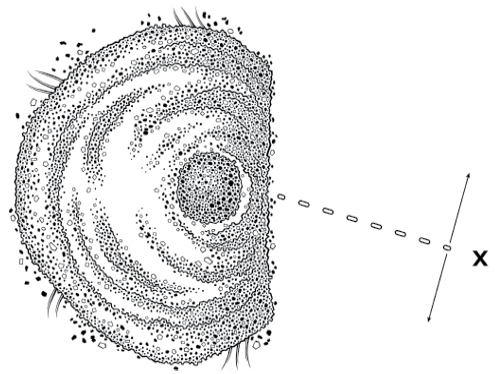
Figure 5. Start probing near the tunnel plug and probe outward until you no longer find the tunnel. Move back to the last known spot and probe perpendicular to the lateral tunnel; this is the main tunnel.
There are two types of sets, mound and main tunnel. The mound set places a trap in the lateral tunnel and the main tunnel set places two traps in the main tunnel. When making a main tunnel set, use a shovel to dig up the intersection of the lateral tunnel and main tunnel. A main tunnel set requires two traps, one placed in each direction of the main tunnel to trap a pocket gopher coming from either direction. Inspect the sides of the hole with your hands and a trowel for hidden tunnels that may also converge at this point. Occasionally, more than two tunnels converge, making it necessary to place more than two traps.
Mound sets require only one trap and do not require locating the main tunnel. To make a mound set, probe along the lateral tunnel to determine its direction in relation to the mound. Run the probe through the center of the plug to determine the angle at which the tunnel descends. Place the probe in the direction and angle of the lateral tunnel as a guide to excavating the plug (Figure 6).
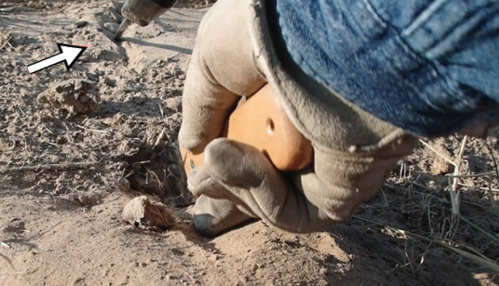
Figure 6. Place the probe (arrow) as a guide to indicate the direction and angle of the lateral tunnel while excavating the plug.
Carefully excavate the plug, which is typically 4–6 inches in length. If the plug persists for 8 inches or more, the tunnel might be backfilled. In this instance, probe to the main tunnel to make a set, or move to the next closest mound and start again. After excavating the plug, place the trap and secure the tether with a stake. Trapping lateral tunnels may be less efficient at capturing pocket gophers in warmer periods, or for older, more experienced pocket gophers.7 Expect to make both main and lateral tunnel sets when trapping.
II) Tunnel no wider than the jaws of a set trap
The jaws of a set trap should touch or nearly touch the walls of the tunnel when placed. This ensures that the pocket gopher must go over the trap—and not around it—as it travels through the tunnel. Jaw widths of set traps usually range from about 2 1/2 to a little more than 3 inches (Figure 7).
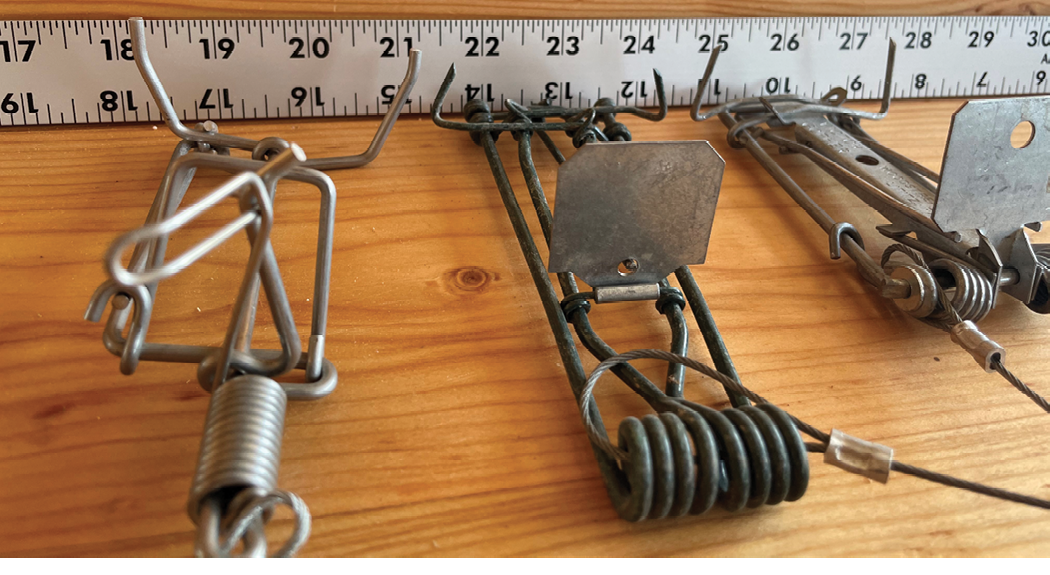
Figure 7. The jaw widths of set traps range from about 2 1/2 to a little more than 3 inches. It may be necessary to widen the tunnel slightly to fit the trap. Frequently traveled or older tunnels may be larger than some trap widths.
The more the tunnel width exceeds the jaw width of a set trap, the greater the chance for a miss or finding the trap buried. If the tunnel is much larger than the set trap’s width, open more of the area to find a narrower section to make the set, or switch to a different brand of trap. It is often necessary to widen the tunnel for the set trap to fit. Use the set trap and a narrow trowel to widen the tunnel. Hold the frame of the trap with your thumb and ring fingers and keep your index and middle finger behind the pan to prevent it from firing (Figure 8). Push and pull the set trap in and out of the opening to widen the tunnel. Remove displaced soil and ensure the trap fits all the way into the tunnel.

Figure 8a. Place fingers behind the pan to keep the trap from firing during placement.
III) Trap all the way in the tunnel
Traps should be placed far enough into the tunnel to capture the pocket gopher as it approaches the tunnel breach (Figure 9). Pocket gophers may begin plugging the breach without engaging the trap if the trap is not set far enough into the tunnel. Traps only need to be about 1/2 inch past the dashed sightlines as shown in Figure 9. Notice the trap on the far right in Figure 9 is not placed far enough into the tunnel and may not result in a capture if a pocket gopher were to approach from that direction. Use a narrow trowel to remove a small amount of soil from the tunnel floor near its openings before placing a trap. Place the traps all the way into the tunnel and push down gently to bed the trap in the floor of the tunnel. Remember, keep the tunnel narrow so the trap just fits into the tunnel.
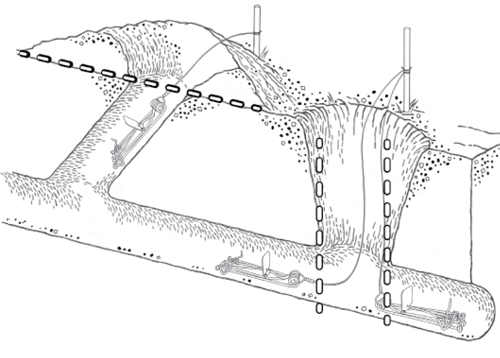
Figure 9. Traps should be placed far enough into the tunnel so the pocket gopher must go over the trap—and not around it—to reseal the tunnel breach. The trap on the far right should be placed deeper into the tunnel.
IV) Bed the trap.
While making the final placement of the trap, apply gentle pressure on the frame so it embeds in the loose soil underneath (Figure 10). Bedding the trap in this manner keeps it stable as the pocket gopher enters the trap. Make sure the trap beds parallel to the tunnel floor; applying too much pressure at the rear of the trap may raise the front of the trap and reduce its effectiveness. Avoid applying too much pressure and embedding the trap too deep in the soil since this may affect trap function.

Figure 10. Place gentle downward and forward pressure to bed the trap in the loose soil while keeping the trap frame parallel to the floor of the tunnel.
Using Attractants and Covered vs. Uncovered Trap Sets
The decision to use an attractant or make covered or uncovered trap-sets is nuanced. Research on the use of attractants (e.g., peanut butter, anise oil, and others) indicated no direct effect on capture rates of pocket gophers.6,2 When no attractant was used, more gophers were caught in uncovered sets compared to covered sets,2 indicating no advantage to using attractants when sets are uncovered.1 In other words, open tunnels act as the attractant.
Covered trap sets, when baited with peanut butter, caught heavier pocket gophers than uncovered trap sets baited with peanut butter.2 This suggests that heavier gophers, typically older and more experienced individuals, may be more cautious when approaching open tunnels and therefore less likely to be caught. It may be beneficial to bait and cover sets during follow-up trapping of areas previously trapped, or toward the end of a sustained trapping period, to catch wary individuals.3 Removing larger females may benefit control efforts because they are more fecund (capable of producing offspring) than smaller females.
In warmer weather, during late spring and early summer, there appeared to be a slight benefit, estimated at 8% to covering sets and baiting with peanut butter.2, 6 If you are interested in maximizing capture rates during warmer weather, covering sets and baiting with peanut butter may produce improved results.6 During cooler weather, uncovered sets appear as effective as covered sets.4
Place bait so the pocket gopher must enter the trap to approach the bait. Place about 1/4 teaspoon of peanut butter behind the trap in the hole dug to access the main tunnel. In agricultural fields where larger gopher populations are probable, the time needed to cover sets may be better spent in setting more traps, especially during initial trapping periods. Covering sets in residential areas or when children, pets, or livestock are present helps address safety concerns. Use 3/4-inch plywood to cover sets when horses are present in pastures. Place the bait and cover the set, using soil around the edges to seal out light and air. Covers can be any flat, semi-rigid material that is able to block light and air from penetrating the tunnel (e.g., cardboard, plywood, or tar paper).
Additional Considerations
Because pocket gophers are territorial, once a pocket gopher is caught, the burrow system should be vacant. During the breeding season, and when young are still living in their maternal burrow system, multiple catches are possible. Leveling mounds and checking occasionally for the reappearance of fresh mounds can help detect pocket gopher activity. Another approach is to open the burrow system in two locations and check to see if they have been plugged after about 48 hours.8
Pocket gophers do not hibernate, and it is possible to trap them year-round in areas where weather and soil conditions permit. Expect substantial differences in frequency of captures during winter when pocket gophers tend to be less active near the soil surface. Pocket gophers are susceptible to trap shyness and learn quickly from our mistakes. Trapping may not be the most effective approach in dry or heavy clay or gravelly soils because excavating tunnels may be difficult.4
If you check a set during the growing season and it is a miss, is untouched, or is buried after 24 to 48 hours, pull the set and move it to the next closest mound. In agricultural settings, check sets after 24 hours. If it is a confined space (e.g., a small back yard) and you are unable to locate another mound, clean up the existing set, switch to a different trap type if possible, and change the nature of the set by baiting and covering it when making a second attempt at capturing the pocket gopher.
Summary
Trapping pocket gophers is an effective and environmentally safe approach to limiting damage and controlling populations. While traps are designed to kill quickly, they sometimes fail. Careful placement of traps increases the probability they will function as intended. Dedicate adequate time to gain experience and achieve your management goals. A weekend may be enough for smaller areas or populations, while a growing season or more may be needed for larger areas or populations. Persistence and working from a fresh mound and active tunnel, maintaining the tunnel so the trap jaws extend across it, placing the trap all the way in the tunnel, and bedding it to limit movement should all lead to success. Following these general guidelines and adapting them to your personal preference and experience level will improve success when trapping pocket gophers.
Steps to making a main tunnel set:
- Begin probing near the tunnel plug and follow the lateral tunnel at 2- to 4-inch intervals to the main tunnel.
- Use a shovel or other digging tool to excavate a hole to expose the main tunnel.
- Clean up soil that may impede trap placement. Remove soil from the tunnel mouth that fell in while excavating the hole. Do not widen the tunnel during this process. Inspect the sides of the hole with your hands and a trowel for hidden tunnels that may also converge at this point.
- Compare the tunnel width to the width of the jaws on the set trap. If jaw width is greater than tunnel width, widen the tunnel by pushing and pulling the set trap in and out of the opening. Hold the trap with one or two fingers behind the trap pan to prevent it from tripping while widening the tunnel (Figure 8). If the tunnel is wider than the set trap, use a different brand of trap, or open the hole to find a narrower portion of the tunnel. Clean up any soil from the tunnel mouth that is displaced during this procedure.
- Place set trap all the way in the tunnel, about 1/2 inch past the vertical sightline of the tunnel opening (Figure 9).
- Bed the trap with gentle downward pressure, ensuring the trap remains parallel to the tunnel floor (Figure 10).
- Stake the trap. If desired, bait and cover the set.
Steps to making a mound set:
- Begin probing near the tunnel plug at 2- to 4-inch intervals and follow the lateral tunnel to determine its direction in relation to the mound.
- Run the probe through the center of the plug to determine the angle of tunnel descent.
- To guide excavation, insert the probe into the ground in the direction and angle of the lateral tunnel (Figure 6). Carefully excavate the plug.
- Compare the tunnel width to the width of the jaws on the set trap. If jaw width is greater than tunnel width, widen the tunnel by pushing and pulling the set trap in and out of the opening. Hold the trap with one or two fingers behind the trap pan to prevent it from tripping while widening the tunnel (Figure 8). If the tunnel is wider than the set trap, use a different brand of trap, or switch to a main tunnel set. Clean up any soil from the tunnel mouth that is displaced during this procedure.
- Place trap all the way in the tunnel, about 1/2 inch past horizontal ground level of the tunnel opening (Figure 9).
- Bed the trap with gentle downward pressure, ensuring the trap remains parallel to the tunnel floor (Figure 10.
- Stake the trap. Typically, fresh air from the open tunnel is the attractant.
Literature Cited
- Baldwin, R.A. (2014). Determining and demonstrating the importance of training and experience for managing pocket gophers. Wildlife Society Bulletin, 38(3), 628–633. https://doi.org/10.1002/wsb.439
- Baldwin, R.A., & Orloff, S.B. (2014). Understanding trapping as a tool to manage pocket gophers. P roceedings of the Vertebrate Pest Conference, 26 (pp. 188–190). https://doi.org/10.5070/V426110541
- Baldwin, R.A., Meinerz, R., & Orloff, S.B. (2013). An update on tools for effective management of pocket gophers in alfalfa. Proceedings of the Annual Western Alfalfa & Forage Symposium, 43, (pp. 119–124).
- Baldwin, R.A., Meinerz, R., & Orloff, S.B. (2014). The impact of attractants on pocket gopher trapping. Current Zoology, 60(4), 472–478. https://doi.org/10.1093/czoolo/60.4.472
- Baldwin, R.A., Meinerz, R., & Orloff, S.B. (2016). Burrow fumigation versus trapping for pocket gopher ( Thomomys spp.) management: A comparison of efficacy and cost effectiveness. Wildlife Research, 43(5), 389–397. http://dx.doi.org/10.1071/WR16037
- Baldwin, R.A., Marcum, D.B., Orloff, S.B., Vasquez, S.J., Wilen, C.A., & Engeman, R.M. (2013). The influence of trap type and cover status on capture rates of pocket gophers in California. Crop Protection, 46, 7–12. https://doi.org/10.1016/j.cropro.2012.12.018
- Baldwin, R.A., Chapman, A., Kofron, C.P., Meinerz, R., Orloff, S.B., & Quinn, N. (2015). Refinement of a trapping method increases utility for pocket gopher management. Crop Protection, 77, 176–180. https://doi.org/10.1016/j.cropro.2015.08.003
- Engeman, R.M., & Witmer, G.W. (2000). Integrated management tactics for predicting and alleviating pocket gopher ( Thomomys spp.) damage to conifer reforestation plantings. Integrated Pest Management Reviews, 5(1), 41–55.
- Engeman, R.M., Campbell, D.L., & Evans, J. (1993). A comparison of 2 activity measures for northern pocket gophers. Wildlife Society Bulletin, 21(1), 70–73. https://www.jstor.org/stable/3783364
- Proulx, G. (1997). A northern pocket gopher (Thomomys talpoides) border control strategy: Promising approach. Crop Protection, 16(3), 279–284. https://doi.org/10.1016/S0261-2194(96)00089-0
- Richens, V.B. (1965). An evaluation of control on the Wasatch pocket gopher. Journal of Wildlife Management, 29(3), 413-425. https://doi.org/10.2307/3798038
- Smeltz, M.D. (1992). Summary of a USDA Forest Service pocket gopher trapping contract. Proceedings of the Vertebrate Pest Conference, 15, (pp. 296–298).
- Witmer, G.W., Marsh, R.E., & Matschke, G.H. (1999). Trapping considerations for the fossorial pocket gopher. In G. Proulx (Ed.), Mammal Trapping. Sherwood Park, Alberta, Canada: Alpha Wildlife Research & Management Ltd.

Sam T. Smallidge is the Extension Wildlife Specialist at New Mexico State University. He has degrees in wildlife and range management. His Extension program focuses on wildlife damage management, wildlife enterprises, and wildlife ecology and management education for youth and adults.
To find more resources for your business, home, or family, visit the College of Agricultural, Consumer and Environmental Sciences on the World Wide Web at pubs.nmsu.edu.
Contents of publications may be freely reproduced, with an appropriate citation, for educational purposes. All other rights reserved. For permission to use publications for other purposes, contact pubs@nmsu.edu or the authors listed on the publication.
New Mexico State University is an equal opportunity employer and educator. NMSU and the U.S. Department of Agriculture cooperating.
July 2025 Las Cruces, NM