Cactus Concoctions: How to Prepare and Use Prickly Pear Cactus Fruit and Pads
Guide E-217
Patricia Aaron, Cindy Davies, Nancy Flores, and Brian Nummer
College of Agricultural,Consumer and Environmental Sciences, New Mexico State University
Respectively, Former Extension Home Economist, Bernalillo County Extension Office, New Mexico State University (NMSU); County Program Director/Extension Home Economist, Bernalillo County Extension Office, NMSU; Extension Food Technology Specialist, Department of Extension Family and Consumer Sciences, NMSU; and Extension Food Specialist, Utah State University. (Print Friendly PDF)
Prickly Pear Cactus and Fruit
There are about 1,000 species of the succulent prickly pear cacti that have adapted to various climates. They are found from the Canadian rangeland to southern South America (Ribbens, 2008) and are prolific in the American Southwest states of Nevada, Arizona, Utah, and New Mexico. Prickly pear cactus (Opuntia species) has value as a landscaping plant and livestock feed supplement. Pre-historic native people in Mexico and Central America harvested wild prickly pear cactus pads (nopal in Spanish) and fruit (tuna in Spanish; Figure 1), and eventually developed horticultural practices to cultivate it as a food crop. Cactus pads and fruit were roasted to make them edible and extract juice (Anaya-Pérez, 2001). Additionally, the fruit has been used in such treats as drinks, desserts, and jellies. Although the juice of a prickly pear fruit has a tart flavor, the acidity ranges from 5 to 7 pH, which indicates that the fruit should be handled as a low-acid food that requires either pressure processing or acidification and water bath processing to properly can juice or fruit products. Both the fruit and the pads have nutritional benefits. A 100-gram serving of prickly pear fruit provides 220 mg potassium, 14 mg vitamin C, 56 mg calcium, and 4 g fiber (USDA, 2016). Additionally, the fruit pulp contains 29% glucose and 24% fructose (Salim et al., 2009).
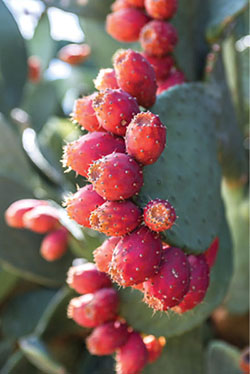
Figure 1. Closeup of prickly pear fruit, or tuna (photo by Lynda Disher, shutterstock.com).
Harvesting Prickly Pear Fruit
Equipment list• Long-sleeve shirt and long pants
• Eyewear
• Gloves
• Boots or protective footwear
• Long-handled tongs
• Harvesting container or paper bags
• Sink with dish dryer rack or perforated tray
• Sturdy containers with lids
• Home freezer
Wear protective clothing when harvesting prickly pear fruit, including eyewear, gloves, long sleeves, pants, and boots or protective footwear (Figure 2). Additionally, if you are harvesting fruit in an open desert area, be aware of dangers in the environment, such as possible rough terrain and wildlife hazards that may be present in the area, including snakes, coyotes, skunks, and other creatures that may become aggressive when disturbed in their native environment.
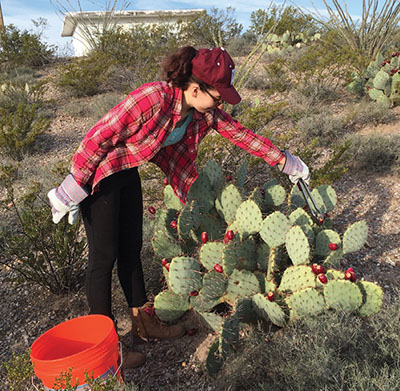
Figure 2. Wear protective clothing when harvesting red prickly pear fruit.
Depending on your location, September may be the best month to select prickly pear fruit that is deep red to burgundy in color and in good condition, without visible damage from insect or bird feeding. Fruit should be firm and should easily remove from the cactus pad using tongs, but it may give some resistance when not fully mature. Place fruit in a clean plastic container that can be easily moved from place to place during harvest. A clean paper bag can also be used to collect prickly pear fruit; fill the bag only about half full, then shake it vigorously to make spines fall off the fruit. Fruit can be transferred to a plastic container, then rinsed multiple times in the container to remove dirt and any debris, with a final rinse on a perforated tray or dish dryer rack over the sink (Figure 3).
Wash and air dry prickly pear fruit, then store them in a sturdy container with a lid in the freezer. Handle fruit with tongs because frozen fruit will still have spines or prickles. Once fruit is frozen hard it can remain in the freezer until ready for use (up to 12 months) in clean sealable containers labeled with product information and harvest date.
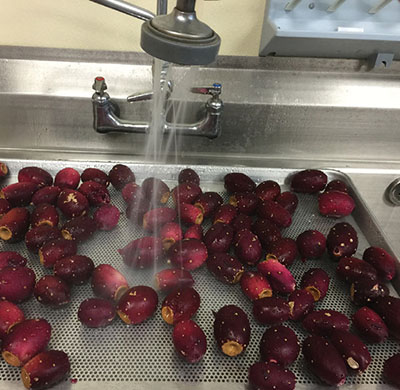
Figure 3. Washing collected prickly pear fruit.
Prickly Pear Fruit Juicing Methods
Below are four different methods to collect juice from prickly pear fruit. The method you use depends upon time and equipment on hand. Juice from immature fruit contains more pectin and should be collected separately.
Boiling Water Method
Equipment list
• Gas stove or grill
• Vegetable brush
• 5-quart pot with lid
• Two long-handled tongs
• Sharp paring knife
• Cutting board
• Potato masher
• Large spoon
• Large colander with bowl
• Woven muslin cloth, cheesecloth, or coffee filters
• Sealable containers
• Home freezer
1. Use tongs to handle fruit. Using the high flame on a gas stove or grill, singe the spines off of fresh whole prickly pear fruit. Expose as much of the outside of the fruit to the flame as possible.
2. Brush fruit with a vegetable brush under running water to remove singed skin.
3. Use clean tongs to place fruit on a cutting board. Using a sharp knife, cut fruit in half and place in a large pan with enough water to cover. Boil 20 minutes or until tender.
4. Line a colander with two layers of closely woven muslin cloth, cheesecloth, or coffee filters. Place the lined colander over a bowl to collect juice. Crush fruit with a potato masher or large spoon.
5. Transfer collected juice to a clean sealable container that is labeled with product information and preparation date. Juice can be used immediately or frozen for up to 12 months.
Steamer/Juicer Method
Equipment list
• Two long-handled tongs
• Two jelly roll pans
• Juicer or steamer apparatus
• Sealable containers
• Home freezer
1. Transfer whole frozen fruit, with spines, directly into the juicer or steamer (a steam juicer uses steam to extract juice directly from fruits or vegetables). Follow manufacturer’s directions to collect juice in a clean container.
2. Juice can be used immediately or frozen for up to 12 months in a sealed bag or container that is labeled with product information and preparation date.
Overnight Juicing Method
Equipment list
• Two long-handled tongs
• Cutting board
• Potato masher
• Large spoon
• Large colander with bowl
• Woven muslin cloth, cheesecloth, or coffee filters
• Sealable containers
• Home freezer
1. Line a colander with two layers of closely woven muslin cloth, cheesecloth, or coffee filters. Place the lined colander over a bowl to collect juice.
2. Using tongs, pack frozen fruit into the lined colander.
3. Place the colander and bowl in a refrigerator overnight (or 8–12 hours). The juice will be expelled freely from the fruit as it thaws.
4. Crush thawed fruit with a potato masher or large spoon to expel any remaining juice.
5. Transfer collected juice to a clean sealable container that is labeled with product information and preparation date. Juice can be used immediately or frozen for up to 12 months.
Quick Thaw Method
Equipment list
• Two long-handled tongs
• Sharp paring knife or scissors
• Cutting board
• Potato masher
• Large spoon
• Two large bowls
• Large colander or strainer with bowl
• Woven muslin cloth, cheesecloth, or coffee filters
• Sealable containers
• Mechanical juicer machine (optional; see step 4)
• Home freezer
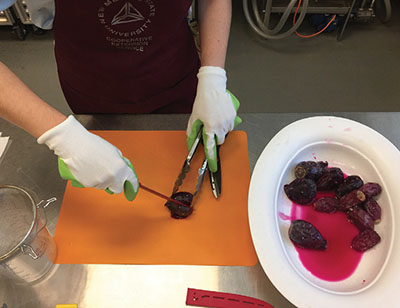
1. Remove whole fruit from the freezer and place loosely in a bowl of room-temperature (75–80°F) water for about 2 1/2 hours, or until fruit is slightly thawed with firm pulp and outer skins that are loose and soft.
2. Line a colander or strainer with two
layers of closely woven muslin cloth, cheesecloth, or coffee filters. Place the lined colander over a bowl to collect juice.
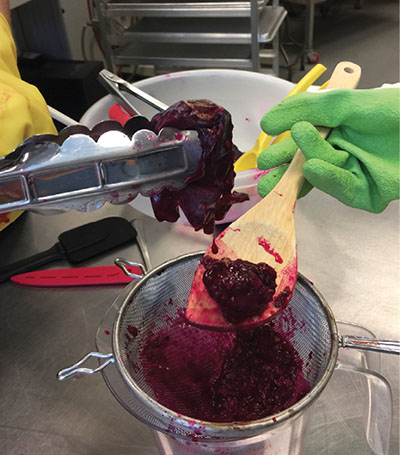
3. Use clean tongs to place thawed fruit on a cutting board. Use a sharp knife or scissors to slice one end of the fruit or slice the skin. Use tongs to squeeze pulp from the outer skin and into the lined colander (Figures 4a and 4b). Discard skin.
4. Crush fruit pulp with a potato masher or large spoon to separate juice from pulp and seeds. Juice can also be extracted using a mechanical juicer machine. Cut thawed fruit in half and place into the machine, then follow manufacturer’s directions to collect juice in a clean container. Juice should be strained through a filter to remove any prickles or spines.
5. Transfer collected juice to a clean sealable container that is labeled with product information and preparation date. Juice can be used immediately or frozen for up to 12 months.
Storing Juice
Juice can be stored in a resealable bag or container that is labeled with product information and preparation date. The juice will store refrigerated for 3 days. Frozen juice will store for up to 12 months.
Figures 4a (top) and 4b (bottom). Use tongs to squeeze slightly froze fruit pulp from the outer skins, then place in a lined colander.
Recipes Using Prickly Pear Juice and Pads
Prickly Pear Simple Syrup (40% sugar)
Yield: 5 cups
Ingredients
2 1/2 cups water
3 1/4 cups sugar
2 1/2 cups prickly pear juice
1 teaspoon lemon juice
Equipment list
• Measuring cups
• Measuring spoons
• 2-quart pot
• Large slotted spoon
• Large spoon
• Resealable container with a volume of at least 5 cups (40 fl oz)
Combine water and sugar in a 2-quart pot. Heat over medium heat and bring to a boil. Add prickly pear juice and lemon juice and stir for one minute, then remove from heat. Use immediately or store in a refrigerator (up to 5 days) or freezer (up to 12 months) in a sealed container. This heavy syrup can be used in canning or in drink recipes.
Nutritional information: A 4-ounce (1/2-cup) serving provides 160 calories, 42 g carbohydrates, 41 g sugar, 1 g fiber, 2 mg calcium, and 2 mg potassium.
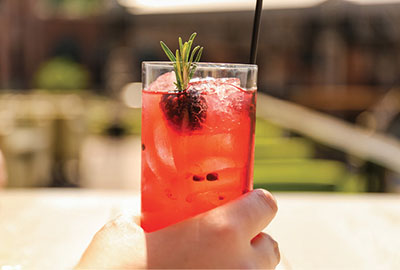
Figure 5. New Mexico pink lemonade (photo by Taylor Grote, Unsplash.com).
New Mexico Pink Lemonade
Yield: 24 ounces
Ingredients
1/2 cup water
1/2 cup sugar
1 cup lemon juice (fresh juice from about 6 lemons)
1/8 cup prickly pear simple syrup (see recipe above)
1 cup cold water
Fresh mint leaves (optional)
Lemon slices (optional)
Equipment list
• Measuring cups
• Measuring spoons
• 1-quart pot
• Large slotted spoon
• Large spoon
• Pitcher or 32-ounce container
• Two 12-ounce glasses
Combine 1/2 cup water and sugar in a 1-quart pot. Heat over medium heat. Stir with a slotted spoon and bring to a boil. Remove from heat and cool sugar syrup to room temperature. Combine cooled sugar syrup, lemon juice, prickly pear syrup, and 1 cup cold water in a large (32-ounce) pitcher. Stir well with a spoon and serve over ice to make two 12-ounce servings (Figure 5). Garnish with lemon slices and mint leaves if desired.
Nutritional information: A 12-ounce serving provides 160 calories, 48 g carbohydrates, 43 g sugar, 5 mg sodium, and 0 g fiber.
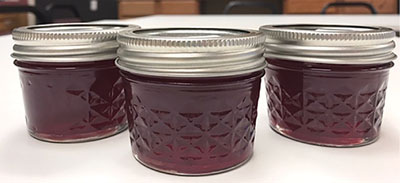
Figure 6. Canned prickly pear jelly.
Prickly Pear Jelly (low sugar)
Yield: about five half-pint (8-ounce) jars
Ingredients
4 cups prickly pear fruit juice (fresh or frozen juice)
1 package (3 tablespoons) low-sugar powdered pectin
2 tablespoons bottled lemon juice
3 cups sugar
Equipment list
• Measuring cups
• Measuring spoons
• 5-quart pot
• Large slotted spoon
• Large metal spoon
• Ladle
• Jar lifter
• Jar bubbler
• Jar funnel
• Cloth towel
• Five 8-ounce canning jars with bands and lids
Read and follow instructions for pectin carefully. Combine prickly pear juice and pectin in a 5-quart pot. Bring to a rolling boil, stirring constantly with a large slotted spoon. Add lemon juice and sugar. Bring to a hard boil and boil 3–4 minutes. After testing for doneness (see Tests for Jelly Doneness section below), remove from heat and allow to stand about 1 minute. Bubbles will rise to the top. Use a large metal spoon to skim foam off the jelly surface. Use the ladle to fill hot, clean jars one at a time, leaving 1/4-inch headspace. Apply lid and screw band to each filled jar. Process for 10 minutes in a boiling water bath for altitudes of 1,000–6,000 ft, or process 15 minutes at altitudes of 6,000–10,000 ft. Check with your local county Extension office (https://aces.nmsu.edu/county/) to determine altitude. (For detailed canning instructions, see NMSU Extension Guide E-314, Making Jam, Jelly, and Sweet Spreads at Home [https://pubs.nmsu.edu/_e/E314.pdf]). Use the jar lifter to remove jars from the water bath onto a clean, dry cloth towel and allow to cool overnight (12–15 hours; Figure 6). Remove screw bands and dry off lids. Replace bands with clean, dry screw bands. Store in a cool, dry place up to 12 months.
Nutritional information: A 1-tablespoon serving provides 25 calories, 7 g carbohydrates, 7 g sugar, 5 mg sodium, 1 mg potassium, and 0 g fiber.
Tests for Jelly Doneness
The art to making great jelly is knowing when the gel is set up. This can be determined by one of the three methods listed below (National Center for Home Food Preservation, 2015).
Temperature test. Before cooking the jam/jelly, measure the temperature of boiling water with a jelly, candy, or other cooking thermometer. Cook the jam/jelly mixture to a temperature 8°F higher than the boiling point of water. At that point, the concentration of sugar should form a satisfactory gel. For example, if water boils at 203°F at 5,000 ft elevation, cook jam/jelly to 211°F. This is the most dependable test.
Spoon or sheet test. Use a metal spoon to remove some of the liquid portion of the jam/jelly from the pot. Turn the spoon sideways so the jam/jelly flows off the spoon. As it reaches the proper thickness, individual drops will run together into a “sheet” that breaks cleanly off the edge of the spoon (Figure 7). Although widely used, this test is not entirely dependable.
Freezer test. Remove the jam/jelly mixture from the heat during this test. Pour a small amount of boiling jam/jelly on a cold plate and place it in the freezer for a few minutes. If the mixture gels, it should be done and ready to jar.

Figure 7. Using the spoon test to check jelly doneness.
Prickly Pear Sweet Pickle Brine
Yield: 4 to 5 cups
This brine can be used to replace brine in other pickle recipes; it will impart a unique pink color and distinct watermelon-kiwi flavor.
Ingredients
4 cups prickly pear fruit juice (fresh or frozen)
4 cups white vinegar (5% acidity)
6 cups sugar
4 teaspoons pickling salt
Equipment list
• Measuring cups
• Measuring spoons
• 5-quart pot
• Large slotted spoon
• Ladle
• Jar funnel
• Cloth towel
• Four to five 8-ounce canning jars with bands and lids
In a 5-quart pot, combine juice, vinegar, sugar, and pickling salt. Stir with a slotted spoon. Bring the brine mixture to a boil, then pour into clean jars. Apply clean lids and ring bands. Store brine in the refrigerator for up to 2 weeks. Or, pour hot brine over prepared fruit or vegetables and thermally process according to a pickle recipe. (For pickle recipes, see NMSU Extension Guide E-318, Preparing and Canning Pickled and Fermented Foods at Home [https://pubs.nmsu.edu/_e/E318.pdf]).
Nutritional information: A 1-ounce brine serving provides 35 calories, 9 g carbohydrates, 8 g sugar, and 200 mg sodium.
Jicama Pickles in Prickly Pear Sweet Brine (refrigerated)
Yield: about eight half-pint (8-ounce) jars
Ingredients
4 pounds (about 10 cups) jicama, peeled, sliced, and cut into strips
5 cups prickly pear sweet brine (see recipe above)
Equipment list
• Measuring cups
• 5-quart pot
• Large slotted spoon
• Jar lifter
• Jar bubbler
• Jar funnel
• Cloth towel
• Eight 8-ounce canning jars with bands and lids
Make sweet prickly pear pickle brine (see recipe above) and bring to boil. Cut jicama into julienne strips, 1/4 inch wide by 3 or 4 inches long. Pack tightly into clean jars. Pour hot brine over sliced jicama and apply clean lids and ring bands. Allow jars to cool before refrigerating. Jars can be safely stored for up to 2 weeks in the refrigerator.
Nutritional information: A 1-ounce serving provides 25 calories, 6 g carbohydrates, 4 g sugar, 1 g fiber, 2 mg calcium, and 23 mg potassium.
Cactus Pads or Nopalitos
Whole, intact prickly pear cactus pads are called nopales in Spanish (Figure 8). Once the spines and tough skin are removed the pads are called nopalitos, and these can be eaten raw or cooked (Figure 9). Nopalitos are a staple ingredient in Latin American cuisine, consumed with cabbage and onions on tortillas or used as a condiment. Nopal cactus pads can be harvested during the spring months. Use tongs to collect new, young, tender pads 1 to 3 inches in length. Conveniently, many Hispanic grocery stores also provide whole nopales in the produce section. Follow the recipe below to prepare unique, healthy Latin American dishes.
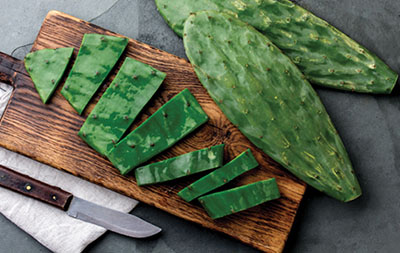
Figure 8. Fresh prickly pear cactus pads, or nopales (photo by Larisa Blinova, shutterstock.com).
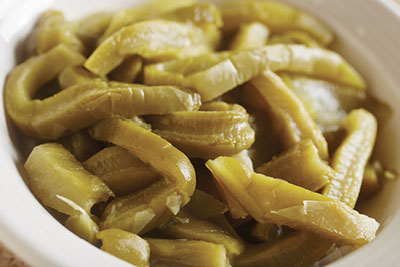
Figure 9. Cooked nopalitos (photo by Brian Yarvin, shutterstock.com).
Nopalito Cactus Condiment (New Mexico State University Cooperative Extension Service, 2017)
Yield: about 2 cups
Ingredients
1/2 cup chopped onion
2 cups chopped fresh nopalito strips
1/2 cup water
1 teaspoon olive oil
1/2 teaspoon red chile piquin or other hot chile spice (optional)
Equipment list
• Medium sauce pan with lid
• Large skillet with lid
• Sharp knife
• Cutting board
• Tongs
Chop onions and nopalitos. Place chopped nopalitos with water in a sauce pan and boil for 20 minutes. In a skillet, sauté onion in oil until transparent. Add cooked nopalitos and sauté 1 minute (optional: add red chile piquin along with nopalitos). Cover skillet with lid. Simmer until nopalitos are tender and well heated. Consume as a sauce or condiment. Place leftover food in a sealable container and allow to cool before refrigerating. This can be safely stored for up to 2 weeks in the refrigerator.
Nutritional information: A 1-ounce serving provides 25 calories, 1 g fat, 10 mg sodium, and 1 g fiber.
For Further Reading
E-314: Making Jam, Jelly, and Sweet Spreads at Home
https://pubs.nmsu.edu/_e/E314/
E-318: Preparing and Canning Pickled and Fermented Foods at Home
https://pubs.nmsu.edu/_e/E318/
E-323: Salsa Recipes for Canning
https://pubs.nmsu.edu/_e/E323/
References
Anaya-Pérez, M.A. 2001. History of the use of Opuntia as forage in Mexico [Paper 169; online]. In Cactus (Opuntia spp.) as forage, C. Mondragón-Jacobo and S. Pérez-González (Eds.). Rome: Food and Agriculture Organization of the United Nations. https://www.fao.org/docrep/005/Y2808E/y2808e05.htm
National Center for Home Food Preservation. 2015. Making jams and jellies—Testing jelly without added pectin [Online]. https://nchfp.uga.edu/how/can_07/jelly_point.html
New Mexico State University Cooperative Extension Service. 2017. New Mexico recipes/Recetas de Nuevo México. Las Cruces: Author.
Ribbens, E. 2008. Opuntia fragilis: Taxonomy, distribution, and ecology. Haseltonia, 14, 94–110.
Salim, N., C. Abdelwaheb, C. Rabah, and B. Ahcene. 2009. Chemical composition of Opuntia ficus-indica (L.) fruit. African Journal of Biotechnology, 8, 1623–1624.
U.S. Department of Agriculture. 2016. USDA national nutrient database for standard reference. Washington, D.C.: Author.

Cindy Schlenker Davies is the County Program Director and Extension Home Economist at NMSU’s Bernalillo County Extension Office. She earned her B.S. at Eastern New Mexico University and her M.A. at NMSU. Her Extension and public outreach work focuses on food processing and preservation and food safety.

Nancy Flores is the Extension Food Technology Specialist in the Department of Extension Family and Consumer Sciences at NMSU. She earned her B.S. at NMSU, M.S. at the University of Missouri, and Ph.D. at Kansas State. Her Extension activities focus on food safety, food processing, and food technology.
To find more resources for your business, home, or family, visit the College of Agricultural, Consumer and Environmental Sciences on the World Wide Web at pubs.nmsu.edu
Contents of publications may be freely reproduced, with an appropriate citation, for educational purposes. All other rights reserved. For permission to use publications for other purposes, contact pubs@nmsu.edu or the authors listed on the publication. New Mexico State University is an equal opportunity/affirmative action employer and educator. NMSU and the U.S. Department of Agriculture cooperating.
New Mexico State University is an equal opportunity/affirmative action employer and educator. NMSU and the U.S. Department of Agriculture cooperating.
March 2019 Las Cruces, NM