Guide C-314
Revised by Wendy Hamilton
College of Agricultural, Consumer and Environmental Sciences, New Mexico State University
Extension Grants and Contracts Development Specialist, College of Agricultural, Consumer and Environmental Sciences, New Mexico State University. (Print Friendly PDF)
Marking the Hemline
There are many ways to hem a garment. When choosing a hem style, ask: Will the hem let the garment hang as gracefully as designed? Will it hang evenly in a smooth line above the floor? Will the hem be inconspicuous, unless the stitching is intended to be decorative? Is the hem even and smooth without lumps or excess fullness? If you can’t answer “yes” to these questions, consider another method of hemming.
A new garment must be fitted and finished before marking the hemline. Let the garment hang for 24 hours on a cushioned hanger before marking the hem, especially if a large part of the garment is on the bias. If it is not a new garment, remove the old hem and press out the crease. If the garment will be shortened, there should be no problem. However, if the garment will be lengthened, make sure the original hem crease is not discolored or permanently pressed in. Paint on undiluted white vinegar with a narrow brush or cotton swab to help get an old crease out of permanent press fabrics.
The best way to mark a hem level from the floor is to have someone else mark the hemline while you are wearing the garment. Wear the same foundation garments and shoes you will wear with the garment. If the garment will be worn with a belt, wear the belt while marking the hem. Stand straight, arms down, and weight distributed on both feet. It may help to stand on a table so the hem is near eye level for the helper.
© Jelena Okjan | Dreamstime.com
Preparing the Hem
Place the garment on the ironing board, wrong side of the garment facing you.
If the garment will be shortened, you may need to reduce the bulk of the seam allowances within the hem by trimming them slightly narrower. Do not trim so narrow that the hem can’t be let down if needed. Fold up the hem on the marked line, placing pins at right angles to the edge every 2 to 3 inches (5 to 7.5 cm). Baste close to the fold.
Try on the garment to check that the length is correct and that the hemline is level all around. Clip the basting, repin, and adjust as necessary.

Determining the Depth of the Hem
Determine the correct depth for the hem based on the type of garment, flare of the hem edge, and weight of the fabric. Generally, skirts, dresses, and coats have wider hems (2 to 3 inches or 5 to 7.5 cm) than jackets, pants, and blouses (1 to 2 inches or 2.5 to 5 cm). Straighter edges have deeper hems (2 to 3 inches or 5 to 7.5 cm) than flared or circular edges (1/2 to 1 inch or 1.3 to 2.5 cm). Depending on the straightness or flare of the edge, sheer fabrics should have extremely wide hems or extremely narrow rolled hems. Very bulky fabrics may be faced with a less bulky material.
Make the hem an even depth all around by measuring with a seam gauge or ruler and marking with chalk, a soap sliver, or pins. Trim the excess so that the hem is an even depth all around. Be sure to open the hem so you don’t accidently cut the garment.
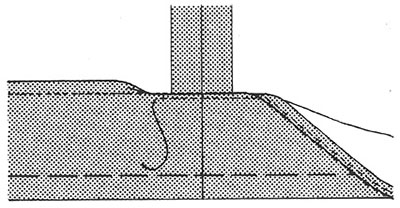
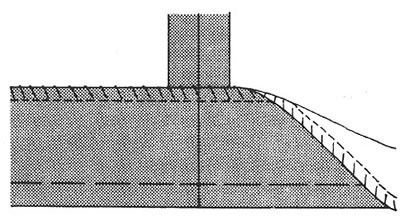
Ease any fullness, especially in curved hems, by stitching 1/4 inch (6 mm) from the cut edge using a machine stitch slightly longer than normal stitching for that fabric. Draw up the fullness by pulling the bobbin thread with a pin where needed. Be careful not to draw up the fullness so much that it pulls the hem tighter than the corresponding garment area. Place a piece of heavy paper between the hem and garment fabric to prevent an imprint, then press, shrinking out the ease in wool and other flexible fabrics. On non-flexible fabrics, press the ease as flat as possible. It is acceptable to have ripples caused by the fullness, but tucks or lap-overs should be avoided. Do not press the fold if you desire an unpressed hem edge.
Finishing the Hem Edge
The method of finishing the hem edge depends on the type of fabric in your garment, the type of garment being constructed, the kind of wear and care you expect the garment to receive, and your skills and preferences. Select a hem finish that will not change the appearance of the garment unless the hem is decorative. The finish should not add weight or bulk that will cause an imprint through to the right side. Also, the hem finish should prevent ravelling and maintain the same stretchability as the garment. A finish may give a more professional look, especially in unlined jackets and wraparound skirts.
Stitched and pinked. This finish is suitable for knits and fabrics that do not ravel or garments that do not need durability. Machine stitch 1/4 inch (6 mm) from the edge with regular-sized stitching or ease-sized stitching. Trim with pinking shears, being careful to avoid cutting the stitches.

Turned and stitched (also called clean finished). This is appropriate for lightweight fabrics and durable, washable medium-weight fabrics. Curves, such as a shirt tail, may need to be stay-stitched first. Turn 1/4 inch (6 mm) of the raw edge to the underside and press. Topstitch 1/8 inch (3 mm) from the fold.
Overcast. This is used for delicate, lightweight fabrics and ravelly, medium- and heavyweight fabrics. Stabilize the edge with a regular stitch or ease stitching 1/4 inch (6 mm) from the edge. Hand overcast, spacing stitches evenly, using the machine stitching as a guide.
Zigzagged. This may be used for most fabrics that ravel. The multiple stitch zigzag is preferred for knits, such as sweater knits that require stretch. Locate the zigzag stitching line 1/4 inch (6 mm) from the edge. Adjust the zigzag from medium-width and medium-length stitches as needed for your fabric, taking care not to stretch the edge or add bulk. It may be necessary to add ease stitching just below the zigzag. Trim excess fabric to the zigzag stitching.

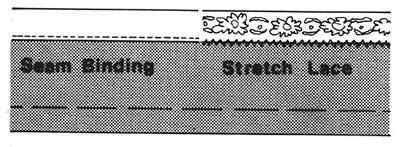
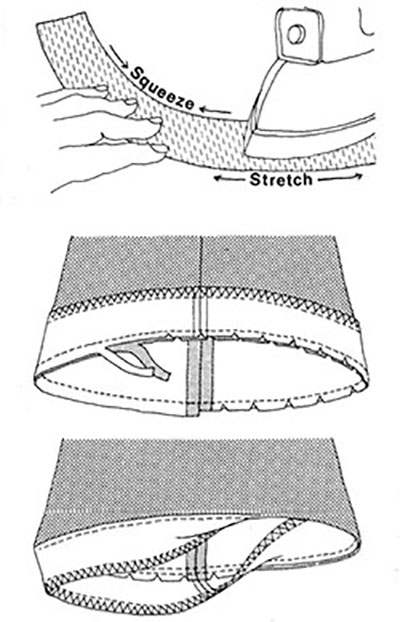
Seam binding and stretch lace. The woven edge seam binding is used for straight edge hems that ravel, while the stretch lace is used for curved hems and fabrics requiring stretch. Place seam binding or lace on the right side of the hem, lapping it 1/4 inch (6 mm) over the edge, including the ease stitching if it was used. Straight stitch seam binding or zigzag stitch lace close to the lower edge. Be careful not to stretch the lace during application to the hem edge. It should be able to stretch after it is in place.
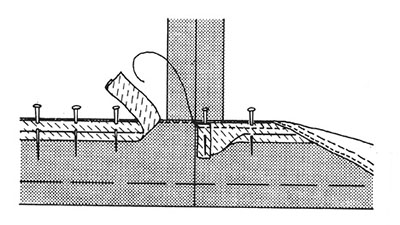
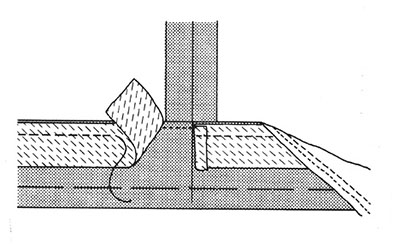
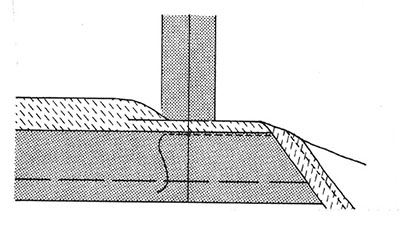
Bias tape. This finish is especially good for flared and circular skirts because it adjusts to curves and has some “give.” Commercial 1/2 inch (1.3 cm) bias tape is available in a variety of colors, or you can make your own bias tape from underlining-type fabric. Open one fold of the tape, placing the fold line just below the ease stitching on the right side of the hem. Fold and overlap at the ends of the bias tape. Machine stitch on the fold line. Press the tape up so the stitching is hidden and the folded edge is ready for hand sewing.
Hong Kong finish. The Hong Kong finish uses a bias strip and is suitable for seam edges as well as hem edges on bulky or heavy fabrics. It is also suitable for velvet and satin using a lightweight net or tulle for the binding.
Cut a 1 inch (2.5 cm) bias strip of underlining fabric or other lightweight woven fabric the length of the hem. Stitch to the hem, 1/8 inch (3 mm) from the edge. Fold the bias to the inside, over the raw edge of the hem, and press. From the right side, machine stitch next to the fold formed by the first row of stitching. The edge is now ready to be secured by hand sewing.
Faced Hems
A facing is used for a hem when the hem allowance is not wide enough to turn up, when the fabric is too bulky to turn up, when the skirt is circular in style, or when the hem has an unusual shape. The shaped facing is cut from a pattern or from a tracing of the hemline. Bias strips of underlining, or lining fabric 2 to 3 inches (5 to 7.5 cm) wide, or purchased bias hem facing may be used to face narrow hems and circular hems. Horsehair braid is used as a facing for full skirts in sheer fabrics.
Prepare the hem edge by marking the hemline and trimming the hem allowance to 5/8 inch (1.5 cm). If the hem is quite curved, the bias strip, or bias hem facing, should be shaped by steam pressing into a slight curve that follows the curve of the hem. When bias strips of underlining or lining are used, they should be joined to give the length needed, and 1/4 inch (6 mm) of the strip should be pressed under along the inner curved edge.
Beginning at a seam, place right side of facing to right side of garment, raw edges even. Pin in place. On ready-made facing, open out the fold. Turn the end back for a neat finish where the facing begins and ends. Stitch on the crease or 1/4 inch (6 mm) from the edge. Overlap the ends. Turn the facing to inside on the marked hemline. Press on the hemline, pressing the facing upward.
Securing the Hem
The last step, other than pressing, is securing the hem to the garment either by hand stitching, machine stitching, or fusing. Hand stitching is the time-honored and traditional way, and is still the best for many hems. Machine-stitched hems are appropriate for household items, children’s clothing, as a decorative touch on some garments, and where the hem will not be seen, such as on blouses, shirts, and linings. Fusible web can be used in place of hand or machine stitching for many hems, and it is the quickest way to secure a hem. Fusible webs are an inconspicuous method suitable for some soft knits.
Hand stitching. There are two ways of hemming by hand—inside hemming, also called catch stitching, and flat hemming, also called plain stitching. For inside hemming, the garment is folded back and stitches are taken between the garment and hem, leaving the very top edge of the hem free. In flat hemming, the edge of the hem is sewn flat to the garment. Inside hemming gives a more professional appearance and is generally preferred because there is less chance of the hem imprinting a ridge on the outside. Whether you use inside hemming or flat hemming will depend on your fabric’s tendency to unravel and the hem finish you’ve used on the edge. Generally, if your fabric is suitable for stitched and pinked, overcast, or zigzagged finish, inside hemming can be used. If your hem is turned and stitched or finished with seam binding or lace, flat hemming is more suitable.
The basic hand stitches used for hemming include the slanted-hemming stitch, the vertical-hemming stitch, the blind stitch, and the catch stitch. The blind stitch is used for inside hemming, the slanted- and vertical-hemming stitches for flat hemming, while the catch stitch may be used for either inside or flat hemming.
For either type of hemming, always start at a seam with the thread knot hidden inside the hem. Take tiny stitches in the garment, picking up only one thread or a part of a heavy thread. Stitches should be about 1/4 inch (6 mm) apart. Never pull thread tight. It is a good idea to lock hemming stitches every 12 inches (30 cm) or so by making a couple of stitches on top of each other and at right angles to each other on the hem side. Finish off the same way. Do not cut the thread off too close to the fabric.
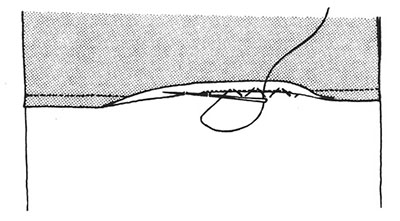
Blind stitch hemming is inconspicuous from both the right side and the hem side of a garment. First, finish the raw edge of the hem or facing without folding it. Then, 1/8 to 1/4 inch (3 to 6 mm) from the edge, alternate small, horizontal stitches in between the garment and the hem, leaving about 1/4 to 1/2 inch (6 mm to 1.3 cm) between stitches. Do not pull the stitches tightly. Stitches or indentations should not be visible from the right side. This stitch allows pressing without forcing the hem edge to cause a ridge visible from the right side. The blind stitch is used with a nonstretchy, nonravelling fabric. This hem is also called a tailor’s hem.
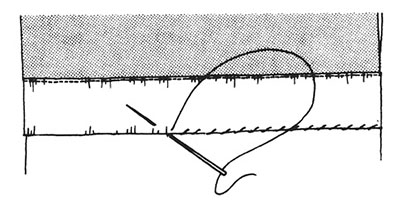
The slanted-hemming stitch is used when the hem is finished with a seam binding or stretch lace. Take a one- or two-yarn stitch in the garment, then bring the needle through the edge of the seam binding. The stitches pass over the seam binding edge at a slant. The stitch should be inconspicuous from the right side and not drawn or pulled too tightly. This is a quick but less durable method of hemming.
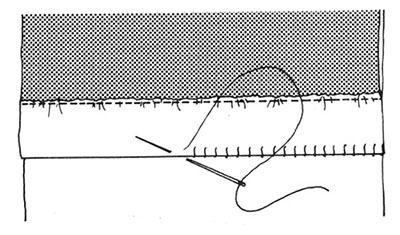
The vertical-hemming stitch is also used when the hem is finished with a seam binding or stretch lace. It is done like the slanted-hemming stitch except that the stitches pass over the seam binding vertically. This stitch is more durable and stable than the slanted-hemming stitch.
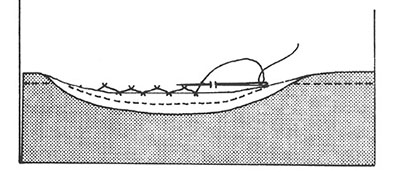
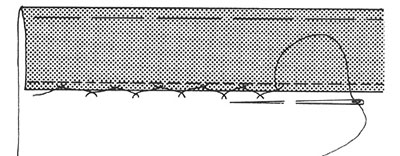
The catch stitch may be used like the blind stitch as an inside hemming stitch for nonravelling stretch fabrics, or it may be used over the edge as a flat hemming stitch. The stitch itself is taken in the opposite direction to the line of needle movement. Working in a left to right direction, in between or over the edge of the hem and the garment, 1/8 to 1/4 inch (3 to 6 mm) from the hem edge, take a small stitch in the hem. Then move diagonally to the right to take the next stitch in the garment. Alternate stitching in this zigzag fashion. Keep the stitches loose to retain flexibility of the hem edge.
Machine stitching. Although hand-sewn hems were long considered the only really acceptable hems, there are certain instances where a machine-sewn hem is actually preferable. Specific hems for some types of garments are suggested, but since each sewing machine on the market is different, check your owner’s manual for directions for each stitch.
Blind hemming by machine is a durable, fairly inconspicuous method especially suited to children’s clothing, sportswear in sturdy fabrics, and home decorating. Depending on your machine, the blind hemming stitch may be either a straight stitch or a stretch stitch. Check your sewing machine manual for the proper settings. Practice the stitch on a sample so you know where the straight stitches go and where the “bite” is taken. Use as narrow a bite as possible so that a minimum of thread shows on the right side.
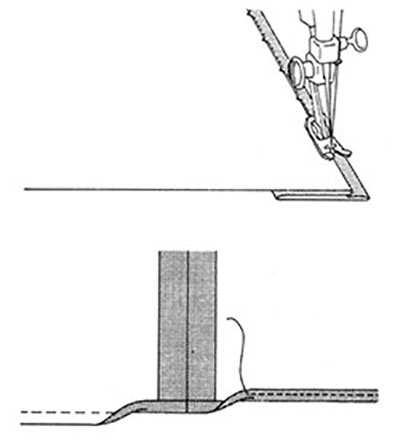
A narrow, rolled, machine-stitched hem is suitable where the hem will not be visible, such as on linings, tuck-in blouses, and shirts. After marking the hem, trim the hem allowance to 1/2 inch (1.3 cm). Stay-stitch edges 1/4 inch (6 mm) from edge. Press a 1/4 inch (6 mm) fold, then fold again 1/4 inch (6 mm) and press. Machine stitch along the hem edge. Some machines have an attachment for making the narrow rolled hem. Consult your sewing machine manual and practice the hem on a sample.
A narrow, topstitched hem is used with soft knits and fabrics that do not ravel. After marking the hemline, trim the hem allowance to 5/8 inch (1.5 cm). Topstitch 1/2 inch (1.3 cm) and 3/8 inch (1 cm) from the edge.
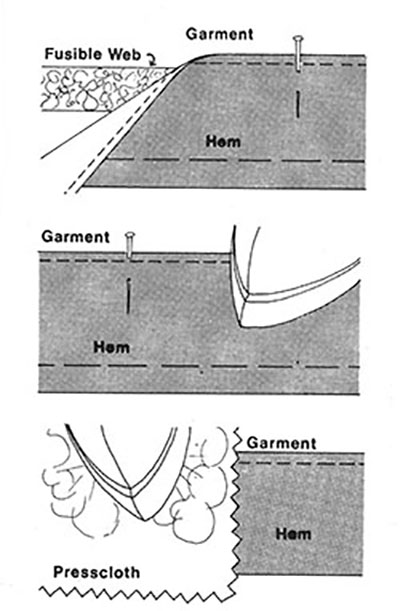
Fusible web. Using fusible web is a fast, inconspicuous way to secure a hem. A fusible web is a heat-sensitive adhesive that holds two layers of fabric together. It is applied by means of heat, moisture, and pressure for a specific number of seconds. Fusible webs are available in precut strips on rolls or in larger sheets from which you can cut strips.
Pressing the Hem
Because the heat sensitivity of fabrics differs, you need to follow the fusible web instructions and test the web on your fabric, making sure to set your iron according to the fusible web instructions. Check the bond strength and the appearance of the sample. Carefully prepare the hem, making any needed adjustments before applying the fusible web. If the hem is very curved, or has quite a bit of ease, choose another method of securing the hem. The fullness or excess ease will not permit the hem to fuse flat and smooth. Changes are possible but difficult after applying the web. To prevent stretching the hem, avoid sliding the iron during the fusing process. To prevent imprinting and to prevent the fusible web from sticking to the iron, keep the fusible web back from the cut edge of the hem at least 1/4 inch (6 mm).
On lightweight to medium-weight fabrics, use 3/4 to 1 inch wide (1.9 to 2.5 cm) strips of fusible web. With heavier fabrics, use a 2 inch (5 cm) strip of fusible web. Fusible webs are not satisfactory with sheer fabrics and laces.
Place fusible web between the garment and hem about 1/4 inch (6 mm) from the edge and pin, if necessary, to prevent slipping. Steam heat baste by steaming lightly between pins. Remove pins before fusing. Complete the fusing process, working on a small section at a time. Allow to dry and cool before handling.
After the hem has been secured to the garment, remove the basting along the fold. If a knife-edged hem is desired, press with a steam iron along the fold. Pound woolens with a pounding block. If an unpressed or soft-rolled hem is desired, do not touch the fold of the hem with the iron. Instead, hold the iron 2 to 3 inches (5 to 7.5 cm) from the hem fold and steam the fabric thoroughly. Pat lightly with a pounding block to shape the hem’s curve. Let steam evaporate completely before handling the garment.
For Further Reading
C-205: Selecting a Pattern Size for Perfect Fit
https://pubs.nmsu.edu/_c/C205/
C-208: Selecting Interfacings, Underlinings, and Linings
https://pubs.nmsu.edu/_c/C208/
C-234: Waistbands Made Easy
https://pubs.nmsu.edu/_c/C234/
References
Coats and Clark. 1973. Hems. Stitch in time, vol. 43, no. 1.
Coats and Clark. 1976. Coats and Clark sewing book: Newest methods A to Z. New York: Golden Press.
Reader’s Digest. 2011. New complete guide to sewing: Updated edition. New York: Reader’s Digest Association, Inc.
Simplicity Pattern Co. 1975. Simplicity sewing book. New York: Author.
Smith, A. 2009. The sewing book. New York: DK Publishing.
Original authors: Ardis W. Koester, Extension textiles and clothing specialist, Oregon State University Cooperative Extension Service (reprinted with permission.). Subsequently reviewed by Susan Wright, Extension consumer education and health specialist.

Wendy Hamilton is an Extension Evaluation and Accountability Specialist at New Mexico State University who provides expertise for program development and evaluation. She has worked at four land-grant universities, and has a diverse background in textiles and clothing, adult education, 4-H youth-at-risk, horticulture, evaluation, and grant writing.
Reprinted with permission of Oregon State University Cooperative Extension Service.
To find more resources for your business, home, or family, visit the College of Agricultural, Consumer and Environmental Sciences on the World Wide Web at pubs.nmsu.edu.
Contents of publications may be freely reproduced, with an appropriate citation, for educational purposes. All other rights reserved. For permission to use publications for other purposes, contact pubs@nmsu.edu or the authors listed on the publication.
New Mexico State University is an equal opportunity/affirmative action employer and educator. NMSU and the U.S. Department of Agriculture cooperating.
Revised June 2019 Las Cruces, NM