Guide C-234
Revised by Robin C. Mack-Haynes
College of Agricultural, Consumer and Environmental Sciences, New Mexico State University
Author: Extension Home Economist, Lea County Extension Office, New Mexico State University. (Print Friendly PDF)
Waistbands play an important part in the fit and appearance of skirts and pants. Waistbands smoothly encircle your waist, so they need to be made to your measurement.
There are several kinds of waistbands (Figure 1). Select one that is best suited to your fabric and your body curve.
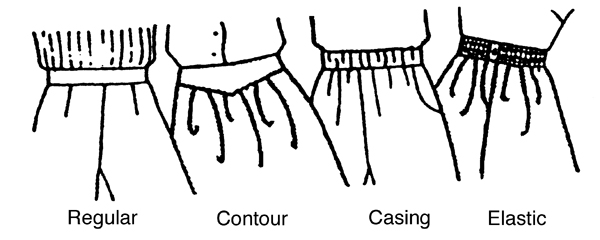
Figure 1. Left to right, regular, contour, casing, and elastic waistbands.
Regular—Cut on grain. Most patterns suggest using the lengthwise grain to go around you because it will be more stable. However, with fusible interfacing, this is not always necessary. Also, remember that some fabrics have a design or nap that requires the waistband to be cut in the same direction as the garment.
Contoured or Faced—Shaped to fit at your waist and below. Contoured waistbands are on the outside of the garment. Faced waistbands have a facing to the inside of the garment.
Decorative Elastic—May be used as a finish in place of a waistband.
Bias—Usually a narrow, 1/2-inch bias binding at the top of the skirt.
Casing—May be an extension of the skirt or a separate piece of fabric that encloses the elastic.
Standards
Regardless of the type of waistband you use, a good waistband will be constructed to meet the following standards:
- The waistband is smooth and free from bulk, and is even and wrinkle-free.
- The width is even or consistent according to the garment style.
- The waistband is on-grain and reinforced with interfacing to maintain shape.
- The overlap is even with the placket at the opening.
- The underlap is under the band at the opening.
- The corners are on the ends of the band square.
- The skirt or pant has been eased onto the band.
- The waistband is securely stitched.
- The fasteners are properly located and secured.
Interfacing
Waistbands use many sources to hold the shape of band and/or reinforce the fabric used. Depending on the desired look and the fabric, use one of the following as a suggestion:
- Fusible interfacing
- Nonwoven or woven interfacing
- Pre-cut interfacing or stiffening
- Grosgrain ribbon
- Self-fabric
- Waistbanding
- Belting
Fusible interfacing, nonwoven or woven interfacing, and pre-cut interfacing or stiffening work well for regular and contour waistbands. This interfacing may be applied using the fusible "glue" on the interfacing (Figure 2) or by basting the interfacing to the waistband fabric. Waistbands that are fitted will hold their shape better with grosgrain ribbon or other material. These products will reduce the bulk and make the waistline more comfortable. Grosgrain ribbon or other narrow strips of fabric are attached to the back side of the waistband using a lapped seam.

Figure 2. Applying fusible interfacing with an iron.
Waistbanding or belting can be used in any type of waistband. Because this waistbanding or belting may come in various weights, follow the manufacturer's directions to get the best results on your waistbands.
Fitting
It is important that a waistband be cut to fit you. Take your measurement over a shirt or blouse and decide how snug you want the waistband (Figure 3). Compare this measurement to the pattern. Make any necessary adjustments. Be sure to allow some ease, usually 1/4 to 1/2 inch.

Figure 3. Measuring for waistband fit.
Construction
Before you cut out the waistband, answer these questions:
- What finished width do I want the waistband to be?
- What is my waist measurement? How much ease do I want to allow?
- How much extension do I want on the underlap?
- For this fabric and design, which grain is best: lengthwise or crosswise?
- Can I cut the waistband on a selvage to reduce bulk?
- Do I need to match a plaid or stripe? If yes, where should the centers be? Will I need to add side seams to match both back and front?
- Because of nap or one-way design, do I need to lay the waistband pattern to the "top" in the same direction as other pieces?
- Before cutting, decide on the waistband length (based on your waist measurement), desired ease, an underlap extension of at least 1 inch, and width. Be sure to include seam allowances on all edges.
- The width of the waistband is determined by preference, the method of interfacing, and the method of finishing:
- The typical width measurement is twice the desired width plus two seam allowances (Figure 4).
- If you are using either a selvage, overlock stitch, or binding the back side to reduce bulk, the width measurement should be twice the desired width, plus one seam allowance, plus 1/8 inch.
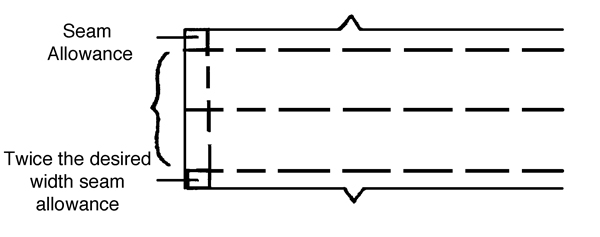
Figure 4. Typical width measurement for a waistband.
Applying a Regular Waistband to the Garment
As you apply the waistband to the garment, remember:
- The garment is usually eased 1/2 to 1 inch to the waistband.
- The overlap is flush with the placket.
- The placket can be found on the left side, left back, center front, or center back depending on garment design.
- The underlap should be at least 1 inch.
- The garment seams are finished and pressed.
- The average pattern is 1 inch larger in the front than in back.
- Measure the waistline of the garment if you are using more than the necessary ease. Decide whether you can ease more with the fabric being used OR whether you need to make adjustments in the garment (Figure 5).
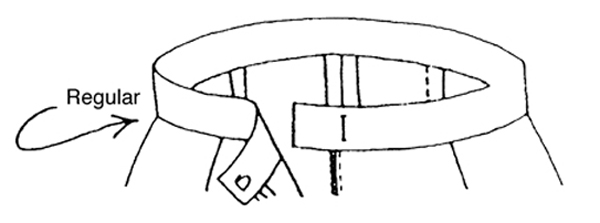
Figure 5. A regular waistband before alteration.
Now you are ready to attach the waistband to the garment.
1. Divide the skirt and waistband in fourths, using the center front, center back, and sides of the garment and the waistband (Figure 6). Match the waistband to the skirt (right sides to right sides) at these four points.
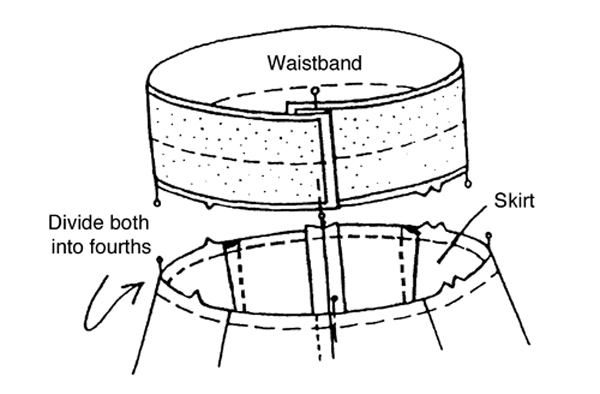
Figure 6. Dividing the skirt and waistband into fourths prior to attaching waistband to skirt.
2. Pin the waistband to the skirt between these points, making sure seams and darts are turned to the correct positions (Figure 7).
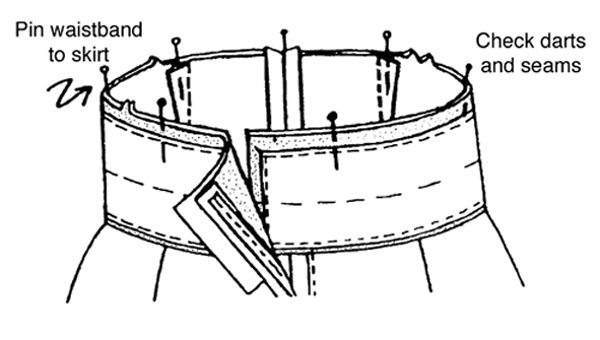
Figure 7. Pinning the waistband to the skirt at the four reference points.
3. Evenly distribute the ease or gathers. Be sure that the placket is the same length on both sides and that the waistband seam is right at the top of the zipper teeth.
4. Machine baste on the seamline. Try on the garment to check the fit (Figure 8). If it is too tight or too loose, make the necessary adjustments.
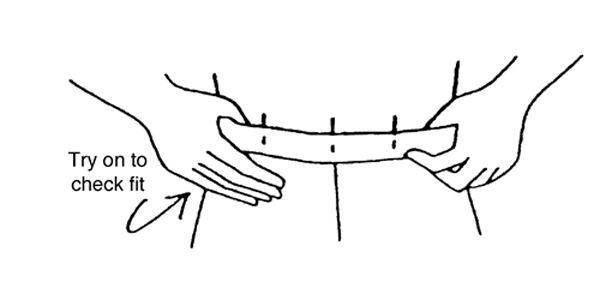
Figure 8. Trying on the garment to ensure correct waistband fit.
5. Permanently stitch the waistband to garment by stitching over the basting. If the fabric ravels easily, stitch again slightly inside the first row of stitching to finish the seam.
6. Grade seam to reduce bulk, with the longest graded seam to the outside of the garment.
7. Finish the ends of the waistband by folding them with right sides together (Figure 9). On the overlap, have the seam a continuation of the edge of the placket.
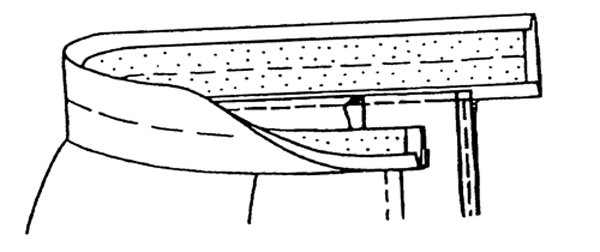
Figure 9. Folding the right sides of the waistband together to finish the ends.
8. Turn to the back of the garment. If you are finishing the edge by hand (Figure 10), pin the pressed edge to just cover the machine stitching. If you are finishing either by stitching-in-the-ditch (Figure 11) or topstitching (Figure 12), pin on the front in the waistband at the seamline.
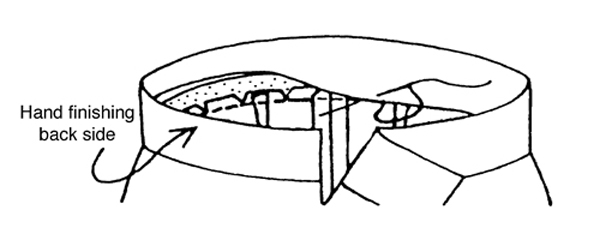
Figure 10. Finishing a waistband edge by hand.
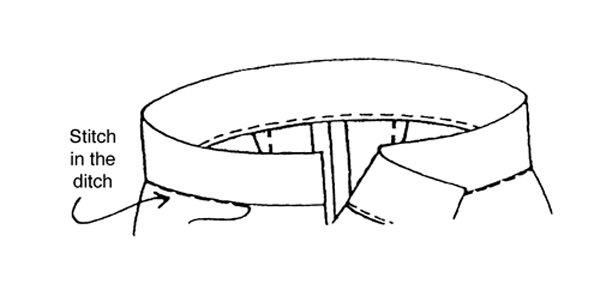
Figure 11. Finishing a waistband edge with a stitch-in-the-ditch.
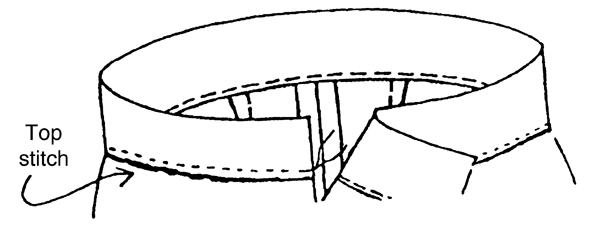
Figure 12. Finishing a waistband edge by topstitching.
Casing
Casing is commonly used in waistbands; however, casings can also be used in sleeves and the hems of pants. For waistbands that are finished with elastic or drawstrings, a casing is required. An elastic casing will be totally enclosed in the waistband. However, a drawstring will require an opening for the strings to come through the front or back side of the casing. The openings are usually made by stitching two buttonholes at the center front of the garment.
Elastic. When using elastic, you must take into consideration they type of elastic being using and the level of comfort desired. Here are some suggestions for making the perfect measurement:
- Take a waistline measurement. Snug the measuring tape to the waistline to get an accurate reading. Add a 1-inch overlap to the final measurement.
- Before cutting the elastic, feed it through the casing and adjust the fit of the garment. Once the correct fit is done, cut, overlap and stitch the elastic together.
All-in-One Casing. This type of casing is found to be a part of the pattern piece. It is twice the width of elastic called for in the pattern. When folded over, the all-in-one-casing will have some room for finishing and allow the elastic to move through the casing easily.
Separate (elastic). Generally, this casing is a separate pattern piece. The size is designed around the width of elastic called for in the pattern. It is important to follow the pattern guide instructions for adding this type of casing to the waist of the garment.
Decorative or Sport Elastic. Special or decorative elastic is the waistband of the garment. These types of elastic are at least 1-inch wide and come in a variety of colors. This type of elastic does not have the same elasticity as elastic that would be used in casings. To measure this type of elastic, you will need to decide on the length and comfort level. This can be done by fitting the elastic around the waist and adjusting the length until a comfortable fit is achieved. A seam allowance must be added to the measurement prior to cutting. Stitch a seam in the elastic to make a circle, then add to the waistband of the garment. Decorative elastic is generally added to the outside of the garment, whereas sport elastic is added to the inside of the garment.
The garment waistline edge must be finished prior to stitching the elastic in place to give the top edge a finished look. To begin attaching the elastic to the garment, divide the elastic into four equal sections, then pin to the center front, center back, and side seams. Do not add pins in between the sections. Begin stitching from the opposite side, stretching the elastic until it is even in length to the fabric. Stitch in place. To keep the elastic firmly in place, add one more line of stitching.
Drawstring
A drawstring is added to a waistline much in the same way an elastic casing is. However, there must be an opening for the strings to emerge from the casing. It is a good idea to add the opening for the drawstring prior to stitching the casing in place. The openings can be stitched on the outside or inside of the garment, depending on what the pattern guide calls for. A drawstring can be made from several different types of products, such as cording, ribbon, or fabric. Just remember that the drawstring must be a material that will hold the garment in place and wear well.
Applying Belt Loops
Belt loops can be attached after completing the waistband (Figure 13). Cut a strip of fabric four times the desired width. Press the strip, folding it in half, then press it again, folding each raw edge to the crease line. Stitch close to the folded edge on each side.
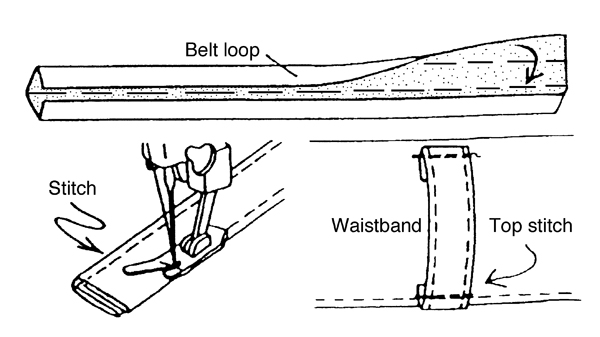
Figure 13. Making a belt loop and attaching it to the finished garment.
Topstitch the belt loops to the waistband. Be sure to use a larger machine needle for topstitching.
Additional Resources
M.M. Baker. 2006. Waistline treatments [CT-MMB.186]. Lexington: University of Kentucky Cooperative Extension Service.
Sewing and Craft Alliance. 2008. Easy Waistband Casings—Elastic and Drawstrings [12.150]. Monroe, PA: Author.
Original author: Susan Wright, Extension Clothing Specialist, from a publication by Nadine Hackler, Clothing Specialist, Florida Cooperative Extension Service.

Robin C. Mack-Haynes is the Extension home economist for Lea County. She received her Bachelor’s and Master’s degrees from NMSU’s College of Agricultural, Consumer and Environmental Sciences. Textiles have always been a passion of Robin’s, from working on sewing projects in 4-H to lovingly creating quilts for family and friends.
To find more resources for your business, home, or family, visit the College of Agricultural, Consumer and Environmental Sciences on the World Wide Web at pubs.nmsu.edu
Contents of publications may be freely reproduced for educational purposes. All other rights reserved. For permission to use publications for other purposes, contact pubs@nmsu.edu or the authors listed on the publication.
New Mexico State University is an equal opportunity/affirmative action employer and educator. NMSU and the U.S. Department of Agriculture cooperating.
Revised and electronically printed June 2011, Las Cruces, NM


