Guide C-221
Revised by Jennah McKinley
College of Agricultural, Consumer and Enviromental Sciences, New Mexico State University
Author: Extension Family and Consumer Sciences Agent, Eddy County Extension Office, New Mexico State University. (Print friendly PDF)
© Katyamaximenko | Dreamstime.com
Sewing in a zipper is not hard, but you do need to understand a few fundamentals. Sewing in a zipper may seem like a daunting task for someone just learning to sew. However, while it will take some patience and practice, learning how to do it is worth your time and effort. Being able to sew in a zipper is a very useful skill to have if you want to successfully make your own clothes or other sewing projects that include zippers.
Length of Zipper
Zippers come in a variety of standard lengths, from 7 to 22 inches. There are other lengths available for special projects, and zippers by the yard are available.
To select the correct zipper length, check the item you are making and consider individual body proportions. A long zipper opening will reduce strain placed on the garment as it is put on and taken off.
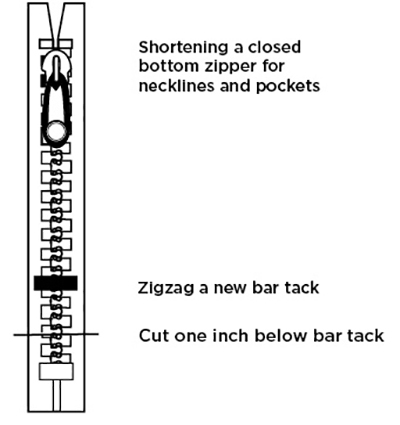
To shorten a zipper, sew a bar tack across the zipper at the desired length. Then sew another bar tack about 1/2 inch below the first. Cut the zipper off about 1/2 inch below the lower bar tack.
Type of Zipper
Zippers come in three basic types—skirt/neck/dress, separating, and trouser. Zippers designed for skirt and neckline applications are open at one end. To use the same zipper in a dress, a bar tack can be placed at the top of the zipper. A separating zipper has a special slide that allows it to separate completely for use in jackets, sweaters, blouses and special items. A trouser zipper is designed for use in trousers and is heavier than other zippers.
To select the correct type of zipper, consider the garment design, fabric weight, color, and type of wear the garment will receive.
Zippers are made from several materials. Metal zippers are most useful in heavy fabrics and in garments that get rugged use. Zippers of manufactured materials are softer and more pliable. They work best in lightweight fabrics.
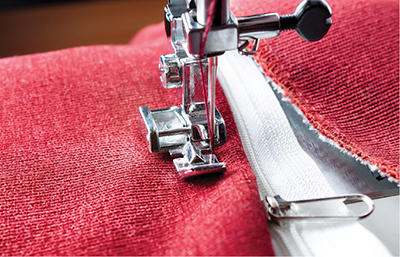
Conventional zippers require a placket of some type if they will be covered. In some cases, a decorative or exposed method is used to apply a conventional zipper. A hidden or invisible zipper gives the appearance of a regular seamline. For any zipper application, a special zipper foot should be used to achieve the most attractive and efficient application.
Whichever zipper or application method you choose, it should be strong, shrink-resistant, smooth, and attractive.
Determining the Length of a Conventional Zipper Opening
Step 1: Measure zipper from top of slide to bottom stop.
Step 2: Add 5/8 inch for seam allowance.
Step 3: Add 1/2 inch for hook and eye at neckline for neckline zippers.
Step 4: Measure along seam allowance and mark bottom of opening.
Example:
7-inch zipper + 5/8-inch seam allowance + 1/2-inch space for hook and eye = 8 1/8-inch zipper opening
Lapped Application
1. Preparing. Insert zipper either before or after the facings, but before a waistband. Seam below zipper has been stitched. Machine baste the zipper opening closed from bottom to top. Press seam open.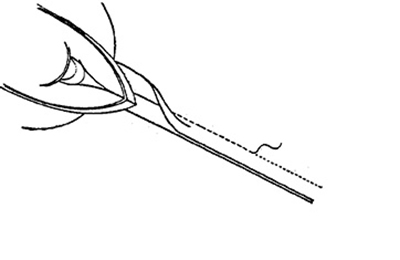
2. Basting. Put the zipper foot on the machine, adjusted with needle at the left. Place zipper face down on single seam allowance. Top stop is 5/8 inch below waist or 1 1/8 inches below neck seamline. Edge of zipper coil is along machine-basted seam. Machine baste from bottom to top.
3. Stitching first side. Turn zipper face up. Zipper extends to the right and all other layers are toward the left. Adjust foot with needle on the right. With regular stitch length, stitch close to edge of fold starting at the bottom.
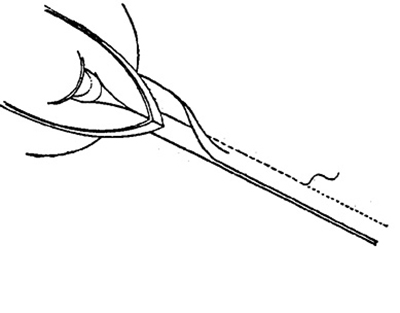
4a. Stitching second side. Place garment flat with zipper turned flat and face down over the seam allowance. A small pleat forms at the end of the zipper.
4b. Stitching second side. Adjust foot with needle at the left. From right side, stitch from seam at lower end across bottom of zipper. Pivot with needle in fabric and continue up the side of the zipper. Transparent tape can be placed along seamline as a stitching guide. (Stitching may be done from inside.)
5. Finishing. To finish, pull thread ends to inside and knot. Remove machine basting and press.
Centered Application
1. Preparing.
- Insert zipper either before or after a facing is attached, but before applying a waistband. Seam below zipper has been stitched.
- Machine baste the zipper opening closed along seamline.
- Press seam open.
2. Basting. Place open zipper face down on single seam allowance with top stop 1 1/8 inch below neck or 5/8 inch below waist seamline. Edge of coil is along machine-basted seam. Using regular zipper foot, machine baste from top to bottom.
3. Stitching. Close zipper and spread flat. Stitching is done from the right side, placing stitches 1/4 inch from seam. Start at the seam and stitch for 1/4 inch across bottom of zipper. Pivot with needle in fabric and continue up one side. Adjust foot and repeat for other side. (Stitching may be done from inside of garment.)
- Center bottom zipper stop over bottom of opening, placing right side of zipper to outside of fabric. Baste end of zipper in place.
Exposed Application
1. Marking and staystitching.
- Mark length of opening to equal the zipper length plus 1 inch. For example, for a 7-inch zipper, mark an 8-inch opening.
- Decide how much of the zipper tape you want exposed. Staystitch on outline for your zipper opening, making stitches smaller at lower corners for reinforcement. Slash open along and to corners.
2. Pressing.
- Press long edges to inside along staystitching.

3. Stitch lower end.
- Replace foot with zipper foot. From wrong side, stitch securely across triangle of fabric. Place stitches just inside staystitching.
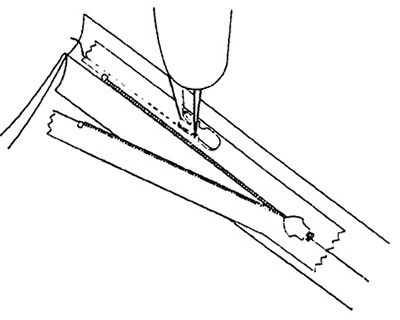
4. Topstitching.
- Bring top of zipper to garment edge. With zipper flat, pin folded edges to zipper. Hand baste in place.
- Using a zipper foot, topstitch close to folded edges in direction of arrows in figure below.
Decorative Application
A decorative zipper application will use a conventional zipper with ribbon, braid, or lace trim. The trim is sewn to the zipper tape in a variety of ways:
1. Trim close to zipper teeth.
2. Bottom of trim mitered to give a square finish.
3. Bottom of trim mitered to give a pointed finish.
4. Zipper tape exposed.
To Sew Trim to Zipper
- Step 1. Fold trim in half and place center at bottom of zipper near the stop.
- Step 2. Fold trim into appropriate shape for end of zipper—square or pointed bottom. Pin carefully.
- Step 3. Locate trim over zipper tape as close to zipper teeth as desired. Pin so that any design in tape creates an attractive appearance.
| Caution: When selecting trim, consider how it will be applied. Trim with a directional design can cause problems. If the trim has individual designs, they must be organized in an orderly way when trim is sewn to the zipper. |
Applying a Decorative Zipper
The following instructions are for applying a decorative zipper to a garment with a seam.
1. Sew closed up to bottom of placket. Slash seam allowance diagonally and in 1/4 inch beyond seamline. Press open below placket.
2. Turn garment to right side. Press back placket seam allowance and trim to 1/2 inch.
3. Machine stitch outer edge of decorative zipper to garment.
4. From inside of garment, center zipper (face down) under opening. Slipstitch edge to zipper tape.
If the garment has no seam, prepare a slashed opening as follows:
1. Determine the location of opening.
2. Staystitch a rectangle around opening.
3. Slash opening down center of rectangle to 1 inch from bottom. Cut diagonal slashes to corner of rectangle.
4. Press edges to right side along stitching and trim to 1/2 inch.
5. Follow steps 3 and 4 given for a garment with seam to complete application.
Fly Front Application
Here’s an easy way to sew a fly front zipper in pants. It is used in the center front seam and includes an extended facing that acts as a fly shield under the zipper. It works well in medium-to-heavyweight fabrics.
| Note: These instructions are for women’s pants. For men’s pants, reverse the right and left directions so that the fly front laps from left to right. |
Procedure
The facing should be at least 1 3/4 inches wide, measured from the fabric edge to the center front seam. Adjust the pattern, if necessary, before cutting out garment. Use a zipper foot where necessary.
1. On the right front, mark the curve for topstitching 1 1/4 inches from the center seam on the right side of the fabric.
2. Starting 1 1/2 inches up from the inseam, stitch the front crotch seam up to the zipper marking and backstitch. Machine baste the remainder of the center front seam closed. Clip basting every 2 inches. Press seam open.
3. With the bottom of the zipper opening away from you, extend the pants left facing. Place closed zipper face down on the facing with the edge of the tape along the seam and the bottom. Stop 1/4 inch above the marking for topstitching. Starting at the bottom of the zipper, machine baste zipper in place. Stitch about 1/8 inch from edge of the zipper tape.
4. Turn the zipper face up, folding along the basting stitches and pin in place. Starting at the bottom of the zipper, stitch along fold of zipper tape. Remove pins.
5. Extend the pants right facing. Place the zipper face down over the facing and pin the free zipper tape to the facing only. Pin the pants left facing back on itself so that it will not be caught in topstitching. Stitch the zipper to the pants right facing close to the zipper coil.
6. Spread garment flat. On outside, pin the right facing to the garment along the marking for topstitching. Starting at the bottom, topstitch along marking. Bring thread ends to inside and tie.
7. With zipper open, unpin left facing and press flat. Stitch across tape within the waistline seam allowance several times on each side of zipper. Cut off excess zipper. Sew a bar tack at the bottom of the zipper through all thicknesses.
8. Finish waist band of garment as required.
Further reading
C-227: Making Perfect Pants
https://pubs.nmsu.edu/_c/C227/
C-231: Machine Buttonholes Made Easy
https://pubs.nmsu.edu/_c/C231/
C-233: Facings Made Easy
https://pubs.nmsu.edu/_c/C233/
C-234: Waistbands Made Easy
https://pubs.nmsu.edu/_c/C234/
References
Baker, M.M. 2007. Zippers [FCS2-842]. Lexington: University of Kentucky Cooperative Extension Service.
Schaeffer, C.B. 1997. High-fashion sewing secrets from the world’s best designers. Emmaus, PA: Rodale Press.
Tondl, R.M. 1988. Sewing with denim [HEG88-240]. Lincoln: University of Nebraska Cooperative Extension.
| Original author: Susan Wright, Extension Clothing and Textiles Specialist. Subsequently revised by Constance Kratzer, Family Resource Management Specialist. |

Jennah McKinley is a Family and Consumer Sciences Agent and I-CAN Supervisor for NMSU’s Cooperative Extension Service Office in Eddy County. She earned her B.S. in family and consumer sciences education and her M.Ed. in online teaching and learning from NMSU. She specializes in community education and 4-H youth development. Her programs focus on parenting, childcare, nutrition, diabetes education, family resource management, and youth development.
To find more resources for your business, home, or family, visit the College of Agriculture and Home Economics on the World Wide Web at pubs.nmsu.edu
Contents of publications may be freely reproduced for educational purposes. All other rights reserved. For permission to use publications for other purposes, contact pubs@nmsu.edu or the authors listed on the publication.
New Mexico State University is an equal opportunity/affirmative action employer and educator. NMSU and the U.S. Department of Agriculture cooperating.
Revised January 2017