Guide C-218
Revised by Insook Ahn
College of Agricultural, Consumer and Environmental Sciences, New Mexico State University
Author: Assistant Professor, Department of Family and Consumer Sciences, New Mexico State University. (Print Friendly PDF)
An overlock sewing machine, or serger as it is commonly known, can trim, stitch, and overcast seams as they sew. They can also be used for applications such as inserting a zipper and creating beautiful decorations with certain stitches. They sew faster than conventional sewing machines at up to 1,700 stitches per minute. Because of these features, an overlock machine can save time and give a professional appearance to constructed items.
The overlock machine can be used to sew a wide variety of items—from placemats and napkins to sportswear and draperies. Sewing items like a T-shirt or jogging outfit can be done in minutes, and the seams of the finished products will look like those in store-bought clothing.
The overlock can also be used to finish the edges of seams. Decorative effects can be achieved by using special threads in the loopers. Threads, such as metallics, silks, and perle cotton, can be used to sew seams or to finish garment edges. For special effects, fine knitting yarn, buttonhole twist, crochet thread, and even narrow ribbon can be used.
Overlock sewing machines are specialized, but they do not replace the conventional sewing machine. Overlocks form interlocking stitches using one or two needles and one or two loopers. The overlock stitch is more like crochet or knitting than the stitch of a conventional machine. Loopers replace the traditional bobbin and interlock threads together.
Seam edges are trimmed by blades located just in front of the needle(s). In some models, the upper knife can be rotated up to disengage the cutting action. In other models, one blade must be removed when trimming is not desired.
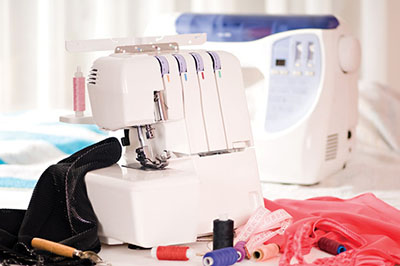
© Slon1971 | Dreamstime.com
Selecting an Overlock Machine
The type of overlock machine used will determine the kind of sewing techniques that can be done. The price of the machine depends on the number of threads and loopers, so users should consider the configuration that best fits their needs.
A two-thread model is best for finishing seam edges and decorative edgings, or finishing edges for light fabrics (Figure 1). It can also be used to stitch flatlock seams. A flatlock seam is usually sewn with the wrong sides of the fabric together. The seam is then pulled so the seam allowances slip and lie flat inside the stitching. This seam is useful when seaming sweatshirts, jogging suits, and other active wear made from sportswear fleece and velour. It can be used to stitch elastic and lace to lingerie. Hems can also be sewn using some two-thread overlock machines.

Figure 1. A two-thread overlock stitch.
A three-thread overlock trims, stitches, and overcasts seams in one operation (Figure 2). The three-thread overlock seam is most useful when sewing knits. It can be used to sew woven fabrics, but not in areas that will receive a lot of stress. The three-thread can also be used to sew pintucks, make narrow rolled hems, and to finish fabric edges. Decorative stitches are possible using a variety of threads or yarns, such as crochet yarn, perle cotton, buttonhole twist, lightweight knitting yarn, narrow ribbon, or metallic thread. Some three-thread models can be converted to do two-thread stitching.
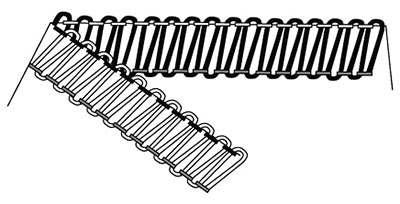
Figure 2. A three-thread overlock stitch.
The four-thread overlock will stitch a chain stitch or a safety stitch as it stitches and overcasts seams (Figure 3). The chain stitch model is most useful when seaming woven fabrics. The safety stitch model can be used to sew woven or knitted fabrics. It uses two loopers and two needles. Some four-thread overlock machines convert to do three-thread stitching.
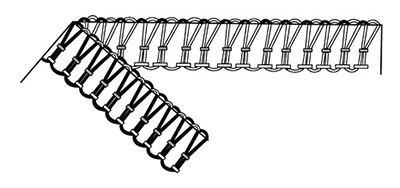
Figure 3. A four-thread overlock stitch with a safety stitch.
Where to Use Overlock Stitching
Two-thread Overlock Stitch
- Used for finishing seam edges and decorative edges.
- Used for finishing scarf edges
- Should be avoided in areas that will receive stress.
Three-thread Overlock Stitch
- Suitable for sewing woven and knitted fabrics, but should be avoided in areas that will receive stress.
- Can be used when sewing most shirts, blouses, skirts, dresses, lingerie, and swimwear.
- Areas of stress to avoid include crotch seam of pants and sleeve seams of shirts or blouses.
Four-thread Overlock with Safety Stitch
- Used for same projects as the three-thread overlock stitch, but can be used in areas that receive stress.
- Suitable for sewing blouses, shirts, skirts, dresses, pants, lingerie, action wear, swimwear, and sleepwear in knitted or woven fabrics.
Four-thread Overlock with Chain Stitch
- Suitable when sewing woven fabrics, even in areas of stress.
- Stitch does not stretch, so should not be used in knitted garment when stretch is required in seams.
- Used when sewing shirts, blouses, skirts, pants, sleepwear, and draperies.
- Use chain stitch when fitting garments since stitches are easily removed.
Basic Features of Overlock Machines
There are a number of features to consider carefully when selecting an overlock machine.
The major concern for prospective owners is the threading process. Check to be certain the machine has a coded threading—colors, symbols, or numbers may be used. The thread stand should have adaptors for the use of cones or spools of thread. Check the use and care manual for threading instructions.
The loopers are the most difficult parts to thread (Figure 4). A special threading tool and a pair of tweezers are usually provided. The lower looper is usually threaded before the upper looper.
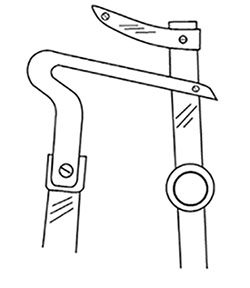
Figure 4. Upper and lower loopers.
The tension dials may be marked with numbers to indicate degree of tension, but some machines use + or − signs. The tension system differs from machine to machine. On some machines, tension dials are sensitive, requiring only a slight turn to adjust the flow of thread. On others, dials must be rotated several times before the thread tension is affected.
The presser foot of an overlock machine is much larger than that of a conventional machine. The pressure on most models can be adjusted to the weight of fabric being sewn. Because the foot is so long, there is seldom a problem of fabrics feeding unevenly as they are sewn. Check the position of the presser foot lifter on the machine. On some models, it is on the right side of the machine near the handwheel.
The throat plate or presser foot will have a special stitch former not found on a conventional machine (Figure 5). On some machines, this former can be adjusted to change the stitch width. On others, the throat plate or presser foot must be changed when a different stitch width is desired. Stitch widths range from less than 1 mm to greater than 5 mm.
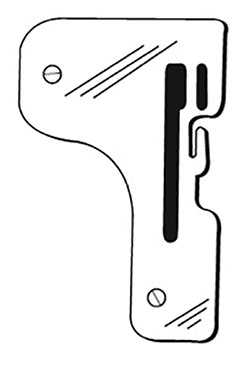
Figure 5. Example of a stitch former.
The stitch length adjustment procedure varies from machine to machine. Some offer a stitch adjustment dial on the front of the machine. Others require adjustments to be made inside the machine. Determine how easily this adjustment can be made for regular seams or rolled edges.
A power switch that turns the machine on and off should be present. This switch may or may not be connected to a light. A built-in light should be included, if possible.
Although the cutting knives are made to last for many hours of sewing, it is important to determine how easy they are to change (Figure 6). One blade will need to be replaced more often than the other; it is the least expensive of the two blades.
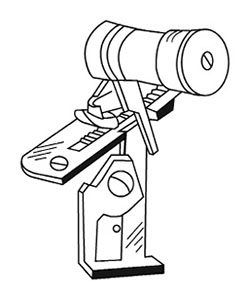
Figure 6. Upper and lower knife blades and housing.
On some machines, the knife position can be adjusted to vary the seam allowance width. Some knives can be disengaged so trimming does not occur.
Needles for overlock machines may be special or conventional in design. Determine what type is required and be certain they are readily available. Be sure to select the correct size for the fabric type being sewn, whether using a special or conventional needle.
A variety of threads can be used on the overlock machine. Standard threads can be used for sewing regular seams. There also are threads specially designed for these machines. The overlock uses much more thread than a conventional machine, so plan ahead. Cone thread—more than 1,000 yards per cone—is usually less expensive than regular sewing thread. A low-twist nylon thread that allows seams to stretch is also available.

@ Rodrigo Valla | Flikr
Special Features to Check
Some machines have a variety of presser feet to help the sewer with special needs. Feet are available for sewing a rolled hem and for applying elastic, cording, and stay tape to seams. Blind hemmer feet may be available. The rolled hem may also require a special throat plate. Take note of which come with the machine and which must be purchased as extras.
Other features to look for include an accessory or tool kit, a dust cover, a carrying handle, a built-in accessory storage compartment, and a scrap catcher. Some machines have a base that can be adjusted to create a free arm for sewing.
Trying Out an Overlock
As you investigate the machines, try several brands and models. Thread each several times. Use the tweezers and needle threader provided, if necessary. Change threads by tying an overhand knot to determine if tension dials must be adjusted to allow the knotted threads to flow through easily.
Notice how easy the machine is to start and stop stitching; some handwheels turn counterclockwise, others rotate clockwise. Is it easy to raise and lower the presser foot? Does the light illuminate the sewing area sufficiently? Is the instruction manual well-illustrated and easy to read?
Change the throat plate and needle(s) to determine how easily this can be done, and adjust the stitch length and width. Use a variety of thread types to determine how the tension is adjusted.
Sew at slow, medium and fast speeds to learn how easy the machine is to control and to determine if it walks. Some machines have suction cups on the bottom to hold them in place. Check to see how easy it is to sew without trimming the seam edge while the blades are in place. Then, disengage the blades to determine how it is done.
Use a variety of fabric weights and types when trying an overlock. Sew through single thicknesses and two or more layers of fabric. Adjust the presser foot pressure to make matching plaids or stripes a simple process. Check the amount of stretch in the seams you sew.
Finally, before you buy a machine, check the warranty and dealer services available. What does the warranty cover and for how long? Who makes good on the warranty, the manufacturer or the dealer? Does the dealer offer new owner lessons? Will special classes be available to you after you have learned to use it? Does the dealer have a complete and consistent supply of the parts and accessories you will need?
Consider the machine’s price in light of all the above factors. Take plenty of time to make a decision that will provide the best performance and true satisfaction. Sometimes it is smarter to pay a little more, especially when good service and peace of mind are involved.
Care of the Machine
After making your selection, you will want to keep the machine in good operating condition. Keep it free of lint and stray fabric scraps. Use the brush provided to brush away lint from the inside of the machine. Blow briskly on areas that tend to collect a lot of lint; canned air is available for this purpose, or use your vacuum or hair dryer.
Oil the areas recommended by the use and care manual. Use oil specially designed for machines. Avoid over oiling.
Change the machine needle if it appears to be dull or bent. Either factor can cause skipped stitches. Change the knife blade(s) as soon as the seam edges begin to look ragged.
For Further Reading
C-210: T is for T-shirts
https://pubs.nmsu.edu/_c/C210/
C-219: Sewing Techniques with an Overlock Machine
https://pubs.nmsu.edu/_c/C219/
C-227: Making Perfect Pants
https://pubs.nmsu.edu/_c/C227/
Original authors: Susan Wright, Extension Clothing Specialist. Subsequently revised by Constance Kratzer, Family Resource Management Specialist.

Insook Ahn is an Assistant Professor in the Department of Family and Consumer Sciences at NMSU. Her area of expertise is in creative fashion design, sustainable design, functional design, and CAD. She has taught for twenty years at three different universities, and has published research showcasing creative design works.
To find more resources for your business, home, or family, visit the College of Agricultural, Consumer and Environmental Sciences on the World Wide Web at pubs.nmsu.edu.
Contents of publications may be freely reproduced, with an appropriate citation, for educational purposes. All other rights reserved. For permission to use publications for other purposes, contact pubs@nmsu.edu or the authors listed on the publication.
New Mexico State University is an equal opportunity/affirmative action employer and educator. NMSU and the U.S. Department of Agriculture cooperating.
Revised September 2019 Las Cruces, NM