Guide H-262
Stephanie J. Walker, Lynda Garvin, Bradley W. Tonnessen, and Israel Joukhadar
College of Agricultural, Consumer and Environmental Sciences, New Mexico State University
Authors: Respectively, Extension Vegetable Specialist, Department of Extension Plant Sciences, New Mexico State University (NMSU); State Master Gardener Program Manager, Department of Plant and Environmental Sciences, NMSU; Research Scientist, Colorado State University; and Program Manager, Department of Extension Plant Sciences, NMSU. (Print Friendly PDF)
Introduction
Plant breeding has been called a combination of “art” and “science.” Before the advent of large commercial seed companies, farmers and home gardeners needed to save seed from year to year to ensure they had a crop to plant each season. While they may not have considered themselves to be plant breeders, by identifying and selecting plants with the most desirable traits season after season, they engaged in the “art” of plant breeding. By applying knowledge of a plant’s biological classification, flower biology, and pollination mechanism, seed savers can also incorporate the “science” of plant breeding in their seed-saving endeavors.
© Alsusg | Dreamstime.com
Why Save Seeds?
Humans have altered the genetics of plants since they first chose to save seed from the best wild ancestors. What made some plants the best? It could have been better taste, higher edible yield, or something else that appealed to the seed harvester. In modern times, we have many seed companies that sell seed for a wide range of plants. So why save our own seed? There are many benefits of seed saving:
- Reproducing varieties that do well in your growing area.
- Ensuring long-term survival and preservation of excellent or rare varieties.
- Adapting plants to your micro-environment.
- Saving money by avoiding yearly purchases of commercial seed.
However, it is important to remember that the purity of saved seed depends on knowledge of the variety and the care taken in producing and harvesting that seed—in short, “smart seed saving” techniques must be used.
What do we need to know before embarking on “smart seed saving”? Knowledge of the plant’s biology is critical to smart seed saving, and includes these basic concepts:
- What are the genus and species of this plant, and what other closely related varieties or weedy relatives will successfully cross-pollinate with this crop and produce viable seed?
- What is the flower biology and pollination mechanism for this plant?
- Is inbreeding depression a potential problem for this variety? If so, how many plants need to be maintained to ensure vigor in the seed?
- Is this plant an annual or a biennial?
- Is this a hybrid (F1) or open-pollinated plant? Hybrid plants are created through specific crossing of two different and distinct inbred lines of plants. Research has shown these crosses produce exceptional offspring in the first generation (F1) following the cross. However, seed saved from hybrid plants will not produce a uniform set of offspring plants; in fact, in the second generation (F2), plants will exhibit an assortment of traits, most far less desirable compared to the hybrid parent plant (Figure 1).
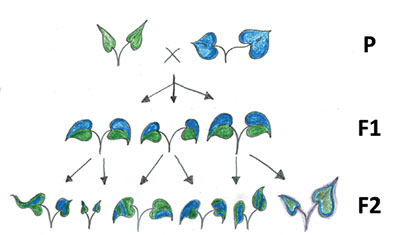
Figure 1. As hybrid (F1) plants reproduce, their offspring can exhibit a wide variety of visible traits (phenotypes), many of which are undesirable and not present in the parent (P) plant (illustration by B. Tonnessen).
Classification of Plants
The Linnaean system—named after Carl Linnaeus, the father of taxonomy—groups plants by how closely related they are to one another. Knowing the genus and species of a plant is critical to embarking on smart seed saving. Plants of the same genus are similar in their reproductive characteristics. When plants within the same species cross-pollinate, they can produce viable seed that will in turn produce plants with fertile seed. Plants of the same genus but different species will have difficulty or even a complete inability to cross-pollinate.
Biennials versus annuals
Under optimal conditions, a biennial crop takes two years to produce seed after planting. During the first year, these plants often produce a large structure that will store carbohydrates to produce seed in the second year. Biennial vegetable crops include onions, carrots, beets, cabbage, Swiss chard, and kale. When saving seed from a biennial crop, it is critical to avoid saving seed that sets (bolts) during the first season because the undesirable bolting trait will be quickly fixed in the variety.
An annual crop takes one season to produce seed. It can be desirable to collect seed from the earliest, healthy plants when early maturity is a desirable characteristic for a particular annual vegetable crop. Some annual crops, such as lettuce, lose their eating qualities when they begin to produce seed (bolt). Thus, it is advantageous to save seed from lettuces that bolt later in the season to encourage the late bolting trait (Figure 2).
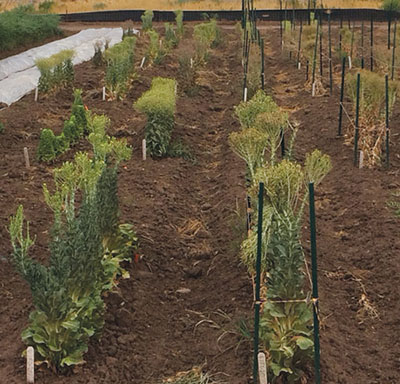
Figure 2. Bolting lettuce held up by trellises for seed saving (photo by B. Tonnessen).
Flower Structure and Pollination
Flowers are the center of pollination and seed production in most plants. Flowers may contain male parts (stamen: anthers borne on filaments), female parts (pistil: stigmas atop styles), or both. If a flower contains both male and female parts, it is a perfect flower (Figure 3). If a flower contains only male or only female parts, it’s referred to as an imperfect flower (Figure 4). Seed production begins when pollen from the anthers makes contact with the stigma of a receptive flower. This may be the same flower in the case of perfect flowers, a different female flower on the same plant if the flowers are imperfect, or a different flower of a completely different plant of the same species.
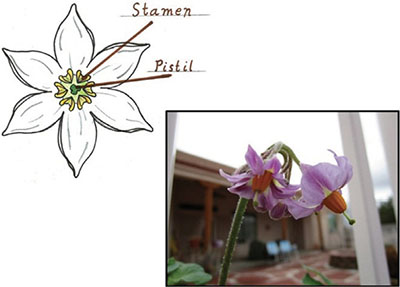
Figure 3. Example of a perfect flower. Male (stamen/anther) and female (pistil/stigma) parts develop on the same flower (photo by S. Walker, illustration by B. Tonnessen).
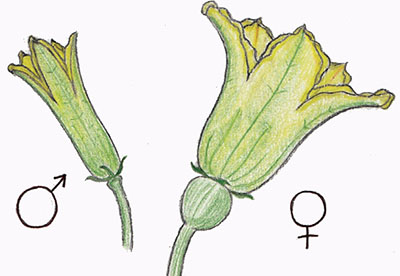
Figure 4. Imperfect male (left) and female (right) squash flowers. Each flower has only male or female parts (illustration by B. Tonnessen).
Self-pollination versus cross-pollination
Self-pollination occurs when a perfect flower pollinates itself, or when a male flower pollinates a female flower on the same plant. Cross-pollination occurs between flowers on two different, compatible plants.
Example: Chile peppers (Capsicum annuum) produce perfect flowers that contain male and female parts (Figure 3, illustration). They readily self-pollinate; however, bees and other pollinating insects in the area may transfer pollen from plant to plant, resulting in some cross-pollination. The relative amount of cross-pollination depends on the number of insect pollinators active in the area.
Example: Squash (Cucurbita pepo) typically produces imperfect flowers, i.e., separate male and female flowers on the same plant (Figure 4). For pollination to occur, pollen from the male flowers must be transferred to the female flowers. In squash, this is usually accomplished by bees or other insect pollinators. If the pollen came from a male flower on the same plant as the female flower, self-pollination occurs. If the pollen came from a different plant than that of the female flower, cross-pollination occurs. Keep in mind that individual pollen grains create individual seed, so a squash harvested for seed may contain both self- and cross-pollinated seed in the fruit.
Preserving Variety Integrity
The uniformity of plants grown from seed depends on precautions and steps taken during planting, management, and harvest. Pure seed will grow true to type and will produce plants with characteristics similar to those of the parent plant. There are many methods to ensure that pure seed is saved from cross-pollinated vegetables, mostly by separating different varieties of the same species through distance, time, or physical barriers.
Distance
Pure seed from cross-pollinated vegetables can be saved by isolating different varieties of the same species from one another. Separation distance between varieties, called the “isolation distance,” depends on the species and several environmental factors, such as number of plants in one garden, pollinator population, availability of other pollen for insects, and barriers. For example, wind-pollinated corn (Zea mays) varieties require a two-mile separation between varieties, while insect-pollinated zucchini (Cucurbita pepo) varieties of the same species must be separated by half a mile. In a backyard garden setting, if a ‘Black Beauty’ zucchini (Cucurbita pepo) is being grown in isolation with the intention of saving seed, and another garden a block away is growing yellow crookneck squash (Cucurbita pepo), bees will probably cross-pollinate the two different varieties. Achieving the large isolation distances necessary to produce pure seed may not be possible for home gardeners, so there are other methods to consider.
Time
Time isolation is a method of separating varieties of the same species by staggering the time when pollination occurs. Separating varieties by time works best with two varieties that have different maturity dates. Otherwise, different varieties can be planted at different times so that the variety planted earlier in the season will begin to produce seed before a variety planted later in the season. Some crops easily isolated by time are corn (Zea mays), sunflowers (Helianthus annuus), and lettuce (Lactuca sativa). For example, an early maturing corn variety planted early in the season and a later-maturing corn variety planted later in the season would produce pollen at different times, allowing a gardener to save seed from both varieties even if they were grown close together. Time isolation is more challenging for indeterminate crops that continue to set seed throughout the season, or if weather variability impacts crop maturity rate.
Physical barriers
If distance and time isolation are not possible, there is the option of bagging and caging. To obtain a small amount of seed from self-pollinating crops, individual flowers can be bagged with lightweight, breathable polyester cloth known as Reemay. The Reemay can be cut into small pieces, placed around the flower, and tied at the stem before the flower has opened or set fruit. Commercially produced “blossom bags” are also an option (Figure 5). Plastic bags or paper envelopes should not be used to bag flowers because they can cause the flower to bake in high temperatures.
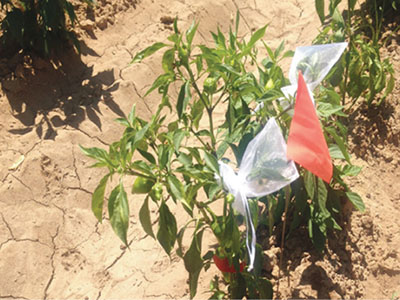
Figure 5. Blossom bags made of lightweight polyester are able to isolate open flowers from insect pollinators (photo by C. Havlik).
If you want to gather a larger quantity of seed, seed cages are another option to isolate rows of self-pollinating plants (Figure 6). Before putting up a seed cage, all flowers and fruit must be stripped from the plants early in the season so that adequate time remains for new fruit to set under the cage. Then a frame made of wood, wire, plastic, or metal tubing is built to hold lightweight polyester cloth or window screen over the row of plants. The polyester cloth or window screen must make contact with the ground on all sides of the row to ensure that no insects can enter. Keep in mind that cross-pollinated crops grown in cages will not produce seed unless there is a mechanism to transfer pollen from male flowers to female flowers. In such cases, bee hives may be placed inside the cage so that bees will cross-pollinate plants in isolation.
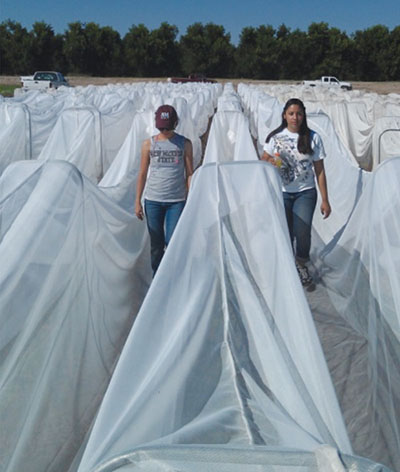
Figure 6. Large seed cages for increasing seed of chile pepper varieties at NMSU. Metal hoops driven into the soil support the cages (photo by S. Walker).
Population size
Preserving variety integrity by producing pure seed does not only depend on isolating different varieties of the same species from one another. It may also depend on the number of plants from a specific variety grown for seed production, avoiding inbreeding depression, and removing plants from a seed production area that do not have the desired characteristics (rogueing).
Many seed savers want to save the best and largest fruit from one plant, but this could decrease the amount of genetic diversity. Genetic diversity allows plants to adapt and grow under many different conditions. In order to maintain genetic diversity during seed production in a home garden setting, collect seed from as many plants of the specific variety as possible that have the desirable characteristics.
The number of plants in a population grown for seed production is important. If we select seed from small populations of plants, the result could cause inbreeding depression. This is when undesirable plant characteristics begin to emerge due to a concentration of negative traits in a plant’s genetics. For example, corn is very susceptible to inbreeding depression if it is cultivated for seed with a small population size. Corn naturally cross-pollinates, leading to healthy genetic diversity, but if the population size is too small, it will lead to less genetic diversity and more inbreeding depression. Self-pollinating crops need smaller population sizes due to their ability to maintain a healthy level of genetic diversity. Another reason why it is best to grow large populations of plants for seed—regardless of how they tend to pollinate—is so we can remove plants from the field that are not exhibiting the desired characteristics. For example, if we are growing chile (Capsicum annuum) for long fruit and we go into our seed production plots to find many plants with short fruit, we can remove those plants without worrying about causing inbreeding depression. This is because we planted more than enough seed to compensate for any plants lost during rogueing
Seed Cleaning
Seed cleaning can be split into two methods: wet processing and dry processing. Wet processing is used for seeds that are in the flesh of the fruit, like tomatoes, cucumbers, and melons. Dry processing is used for seeds harvested from pods or husks that have dried while still on the plant, like corn, okra, beans, and lettuce.
Wet processing
Wet processing has three steps: (1) removing the seeds from the fruit, (2) washing the seeds, and (3) drying the seeds. To remove the seeds, the fruit must be cut open or crushed, depending on the type of fruit. Some seeds, such as tomatoes, can be fermented. Fermenting seeds is a simple process of putting seeds and their pulp into a container with a loose-fitting or air-permeable covering, stirring the contents, and leaving it to sit for 2–3 days. Fermentation will occur naturally, and the pulp around the seed will be degraded (Figure 7). Fermentation also kills some microorganisms that may cause seed-borne diseases. After the fermentation process is complete, discard the fungal mat that forms on the surface of the liquid and wash the seeds to remove all pulp. It is important to note that viable seeds will be heavier and will settle on the bottom, making it easier to decant the pulp. Seeds are then dried by spreading them in a thin layer on a nonstick surface in a location with low humidity and where temperatures do not exceed 95°F. If temperatures go above 95°F, the seeds could be damaged or killed.
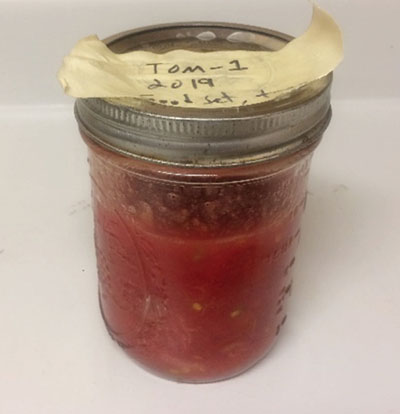
Figure 7. Tomato seed undergoing fermentation. The lid is kept loose to allow air to escape (photo by B. Tonnessen).
Dry processing
When using the dry processing method, pods and husks are dried on the plant in the garden. If the weather does not allow for drying husks and pods on the plant, then pull the entire plant and leave it in a dry area.
Threshing is a process that breaks the seeds from the pods or husks. Threshing can be done by rubbing or beating the seedheads or pods until the seeds come out. For example, some gardeners will put seedheads in a pillowcase and then flail it with a stick.
Winnowing is the process of separating the debris from the seeds after threshing. Wind can be used as a winnowing process to blow the debris away from the seed. For example, you can use a household fan to blow the debris off the seeds. Make sure to use the correct fan speed so seeds are not blown away. Another way to separate seeds from debris is to place seeds and debris on a screen with holes the size of the seeds. As the seeds fall through the screen, the debris will be left on top.
Seed Storage
The optimal storage conditions for seed are cool, dry, and dark, with temperatures below 50°F and humidity 50% or below. A refrigerator meets these conditions. Seeds must be sufficiently dry before storage so that moisture is not released from the seed, which can cause mold to form. Glass jars with tight-fitting lids are ideal for storing small amounts of seeds. This also allows you to check for insect damage or fungal growth. In our arid climate, paper envelops also work well as long as they are stored in a way that protects them from moisture, insects, and animals. Placing envelopes in a plastic bin with a tight-fitting lid usually provides enough protection from gnawing rodents. Plastic zip-top bags may be used if you store your seeds in a freezer. Plastic bags are permeable and will allow moisture to enter. When storing seeds in the refrigerator or freezer, allow the seeds to stand at room temperature for several hours to prevent condensation before opening containers. For large quantities of seed, plastic buckets or metal trash cans with tight-fitting lids are appropriate. Storing tip: Especially for beans and corn, if evidence of insects, holes, or “dust” appears, place the container in the freezer for several days to kill any insects. This can be repeated as needed.
Label your seed containers with the plant name and variety, harvest location, and harvest date. Other useful information to include is days to maturity; plant structure, fruit size, color, and taste; and productivity, disease resistance or susceptibility, water needs, and drought tolerance. Put a label inside the container; labels on the outside can become brittle, fall off, or smudge. Long-term viability varies depending on the type of seed; however, most high-quality, correctly stored seeds remain viable for at least 3–5 years.
Specific Crop Requirements
Plant characteristics, including whether a crop self-pollinates or cross-pollinates, pollinates by wind or insects, or exhibits an annual versus biennial life cycle, will determine how easy it is to save pure seed. Below is a sample of popular vegetable crops and tips on smart seed saving to ensure that the seed is pure.
Beans (Fabaceae or Leguminosae families)
Beans are annual crops that usually self-pollinate, making them an easy choice for beginning seed savers. Select healthy, vigorous plants with high yields. Allow the pods to turn brown and dry on the plant. If this is not possible due to weather conditions, remove entire plants from the garden and place them in a dry location such as a garage. Once pods have dried completely, select a threshing and winnowing method (see SEED CLEANING section) to break seeds from pods and separate them from the pod debris.
Tomatoes (Solanum lycopersicum)
Tomatoes are annual crops that usually self-pollinate. However, some varieties have exerted stigmas (Figure 8) that may allow some cross-pollination by insects to occur. Take a close look at the flowers on the plant. If the stigmas are visible outside the anther cone, using blossom bags to cover flower buds before they open is a good precaution against potential cross-pollination (Figure 5). Select healthy, vigorous plants that bear desirable fruit. Allow fruit to fully ripen on the plant. To remove seed, cut the tomato in half and squeeze out the pulp and seeds into a container with a loose-fitting or air-permeable covering. Add a small amount of water to the container and keep the container at room temperature for 2–3 days to allow the seeds and pulp to ferment. To help remove the pulp from the seeds, stir the mixture daily. After a few days, the mixture will look cloudy and may have a mold growing on it. Some seeds may have floated to the top; these seeds are not viable and should be discarded. The seeds on the bottom are viable and should be rinsed thoroughly to remove all remaining pulp from the seed. Once the seed is clean, it should be placed on a nonstick surface (coffee filters have been known to work well) and allowed to dry thoroughly.
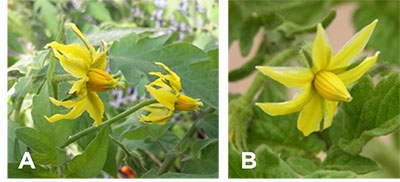
Figure 8. Tomato flowers with exerted stigmas (sticking out of anther cone) (A) are more likely to cross-pollinate than flowers with enclosed anther cones (B) (photo by S. Walker).
Chile peppers (Capsicum spp.)
The most commonly grown chile species in the U.S. is C. annuum; however, C. chinense, C. frutescens, and C. baccatum chile peppers are also produced. Chile peppers easily self-pollinate, but the open structure of the fertile flower also allows for easy cross-pollination by insects. Pollinating insects will readily cross-pollinate different chile varieties within the same species when grown within the insect’s foraging distance, so a jalapeño (C. annuum) will cross-pollinate with a bell pepper (C. annuum), but is highly unlikely to cross-pollinate with a habanero (C. chinense) because it is a different species.
For seed saving, select healthy plants with desirable fruit and plant characteristics. If isolation is difficult, either seed cages or blossom bags can be used to produce self-pollinated seed. Chile seed should be harvested when fruit are fully mature. If there is no freeze threat, allow the fruit to ripen on the plant. Most chile pepper fruit turn completely red when mature; however, depending on the variety, mature fruit color may also be yellow, green, orange, purple, or brown. If a freeze is expected, pull the entire plant and bring it to a protected location such as a garage or shed. Hang the plant and allow the pods to mature. When the fruits are a uniform mature color, remove them from the plant. The fleshier the fruit, the more susceptible the fruit is to mold, which may not be visible from the outside. Periodically check fruits by removing them, cutting the fruit, and checking for mold. If mold develops, remove the seeds and allow them to continue to mature in a cool, dark location at 65–75°F. If processing hot chiles, wear gloves to protect your hands from the capsaicin oils. When the fruits are fully mature, carefully cut open and scrape the seeds from the core. Mature seeds will be ivory in color or tinted yellow or orange, depending on the variety. Dark-colored seeds should be discarded. Once the seeds are removed, they can be dried on a cookie sheet or other hard surface without further processing. Mature seeds can also be removed from the core, then rinsed, decanted, and dried. To test seeds for dryness, bend the seed; if it snaps in half, it is ready for storing.
Squash (Cucurbitaceae family)
Within the closely related pumpkin, squash, and gourd genus, Cucurbita, there are four different species commonly grown in the U.S.: C. pepo, C. maxima, C. moschata, and C. argyrosperma. Since squash plants typically have imperfect flowers, pollen from male flowers must be spread to female flowers for pollination and fruit set to take place. The pollen transfer is typically accomplished by bees or other pollinating insects. Different varieties of squash, pumpkins, or gourds within the same species will easily cross-pollinate if grown within the foraging distance of the insect pollinators. A zucchini summer squash (C. pepo) will easily cross-pollinate with an acorn squash (C. pepo), but is unlikely to cross-pollinate with a butternut squash (C. moschata), which is a different species.
When harvested for consumption, the fruit of summer squash are immature and seed within the fruit are not yet viable. To harvest seed, allow the squash to mature on the vine for approximately 6 weeks after they would normally be harvested for eating. A hard rind on the fruit indicates that the seeds within are mature. To test for readiness, try to dent the rind with your thumbnail. If the rind remains intact, the seeds are mature. If the fruit is at risk of damage from a freeze before they’re mature, harvest the fruits and store them in a cool, dry place, ideally at 65–75°F, until the skin hardens and passes the dent test; this may take 3–4 weeks. When the seeds are ready for harvesting, cut open the fruit and scrape out the seeds and pulp, rinse in a colander with warm running water, and remove the pulp by gently rubbing the seeds against the colander. Remove the clean seeds and dry them on a nonstick surface, such as a wooden board or a cookie sheet lined with parchment paper. The seeds may stick to paper towels or newspaper. Another method is to remove the seeds and pulp and soak them in water for 8–12 hours. Rinse and decant the pulp from the seeds. Floating seeds are not viable and should be discarded. You may need to remove any remaining pulp by using the colander method above. Allow the seeds to dry thoroughly at room temperature. To test readiness for storage, bend the seed; it will snap in half when properly dry.
For winter squash and pumpkins (C. pepo), allow the squash to ripen on the vine until the first hard frost or until the fruit is at risk of damage or disease. After harvesting the fruit, allow it to cure in a cool, dark location at 50–55°F for another two months. The skin will be hard and will pass the dent test. Follow the instructions above for summer squash seed removal, cleaning, and drying. The seeds are ready for storage when they snap in half when bent.
Sweet corn (Zia mays)
While the large size of corn seed allows for easy mechanical removal, the crop characteristics of corn plants make saving pure seed somewhat challenging. Corn will suffer from inbreeding depression if seed is continually collected from too few plants. To prevent this decline in seed vigor, seed should be collected from at least 100 plants, and preferably 200 or more from the same variety of interest. In addition, corn is mostly cross-pollinated by windborne pollen. The pollen can be blown up to two miles, so corn can be cross-pollinated by different varieties that are being grown far away. Finally, most corn plants grown today are hybrid varieties. Seed saved from hybrid plants will not produce true-to-type plants. However, the predominance of hybrid corn varieties makes it even more important for small-scale farmers to save seed of long-standing, open-pollinated, non-hybrid varieties so that these varieties are not lost.
Sweet corn seed is immature and not viable when the crop is harvested for consumption. To save seed from such varieties, allow the cobs to dry on the plant until the husks are brown and papery. In the event of a hard freeze, remove the cobs from the plant, pull back the husks, and store the cobs in a cool, dry place until the kernels reach maturity. When seeds are dry, they will easily separate from the cob by holding one end and firmly twisting the kernels off with the other hand. Remove and discard any discolored or misshapen seeds.
Additional Resources
For additional information or details on other vegetables, refer to the following resources:
Ashworth, S. 2002. Seed to seed: Seed saving and growing techniques for vegetable gardeners. Decorah, IA: Seed Savers Exchange, Inc.
Gough, R., and C. Moore-Gough. 2011. The complete guide to saving seeds. North Adams, MA: Storey Publishing.
Navazio, J. 2012. The organic seed grower. White River Junction, VT: Chelsea Green Publishing.
Brand names appearing in publications are for product identification purposes only. No endorsement is intended, nor is criticism implied of similar products not mentioned. Persons using such products assume responsibility for their use in accordance with current label directions of the manufacturer.
For Further Reading
CR-457: Home Vegetable Gardening in New Mexico
https://pubs.nmsu.edu/_circulars/CR457/index.html
H-230: Growing Chiles in New Mexico
https://pubs.nmsu.edu/_h/H230/index.html
H-251: Row Cover Vegetable Production Techniques
https://pubs.nmsu.edu/_h/H251/index.html

Stephanie Walker is the NMSU Extension Vegetable Specialist, and has extensive experience in the food processing industry. Her primary research interests include genetics and breeding of chile peppers, vegetable mechanization, enhancing pigment content, post-harvest quality, and irrigation efficiency. She works to help commercial vegetable growers enhance the sustainability and profitability of their operations through collaboration, experimentation, and information sharing.
To find more resources for your business, home, or family, visit the College of Agricultural, Consumer and Environmental Sciences on the World Wide Web at pubs.nmsu.edu.
Contents of publications may be freely reproduced, with an appropriate citation, for educational purposes. All other rights reserved. For permission to use publications for other purposes, contact pubs@nmsu.edu or the authors listed on the publication.
New Mexico State University is an equal opportunity/affirmative action employer and educator. NMSU and the U.S. Department of Agriculture cooperating.
July 2022 Las Cruces, NM