Guide H-112
Esteban Herrera, Extension Horticulturist
College of Agricultural, Consumer and Environmental Sciences, New Mexico State University. (Print Friendly PDF)
Seed propagation is often used to produce large numbers of plants inexpensively. Generally, plants grown from seed take longer to reach maturity than those propagated vegetatively, but the low cost may compensate for the time lost.
The fact that plants sometimes do not come true from seed and that no two seedlings are exactly alike can add interest to this method of propagation. Variations among seedlings enable plant breeders to produce new varieties. Interesting as it is to look for new plant types, variability is undesirable if uniformity is needed in new plants.
Seed propagation is not difficult, but it involves careful management of germination conditions as well as knowledge of the seed requirements of the species.
Testing Seed
If the requirements for germination are not known, a germination test will be helpful in indicating the necessity for any pregermination treatment.
To test seed for viability and germination, select a small but representative sample from the lot under consideration. One testing method is to place a moist paper towel on a flat surface, then make a row of seeds so that they can be covered with an edge of the toweling. Then roll the towel and place more seeds and continue the process. Rolls should not be tight with about five layers. Larger seeds may be placed in germinating trays—sterile sand flats. Temperature for these tests should be about 65 to 75°F.
The results of these tests would give the germination at those temperatures and also indicate whether a pretreatment, such as scarification or cold, is necessary. Scarification involves scratching the seed on sandpaper or other abrasive. This allows water to enter the seed more readily.
Preparing the Germinating Mixture
Seeds may be sown in various materials. Popular germinating media are sand, sphagnum moss, peat moss, vermiculite, perlite and soil, or mixtures of these media. Any medium or mixture used should be well-drained and sterile. Vermiculite and perlite, as a result of their preparation, are sold sterile. Those media coming from nature should be sterilized before use. Sterilization kills weed seeds, insects and disease-causing organisms. To sterilize the media, it should be held at a temperature of 160°F for 45 minutes. An easy method is to place moist soil in a pan. Wrap a medium potato in aluminum foil and place on top of the mound of soil. Cover the pan with foil to avoid drying the soil. Bake the soil at 350°F in the oven until the potato is cooked —the soil is sterile. Or you can wait to sterilize the soil until it is in the container.
Fill the germinating container with soil mix to a 1/4-inch from the top. Moisten with water until the medium can be made into a ball, which crumbles easily but is not muddy from excess water. Once this is complete, sterilize both the medium and the container by placing in the oven for 30 minutes at 180°F.
After the soil mix has thoroughly cooled, level and tamp it gently to make a firm seedbed. Apply about 1/4-inch of sterile, seed-grade vermiculite to cover the seedbed. Moisten the soil again by setting the container in a shallow pan of water until the vermiculite on top is moist, then remove the container from the pan of water.
Sowing Seeds
Once the vermiculite layer is moist, the seeds can be sown. Scatter the seeds uniformly over the surface of the vermiculite. Do not sow the seeds too thickly, since crowded seedlings generally grow spindly or induce conditions favorable to rotting. Do not cover small seeds, such as those of African violet or begonia. They are dustlike in size and will not develop if covered even slightly. Cover the larger seeds with vermiculite until they are just hidden.
Place the container in a polyethylene bag and seal the end with a rubber band. Wire loops may be used to separate the plastic from the flat to allow for the seedlings’ height. Bags (fig. 1) used for freezing poultry and larger items are ideal, since polyethylene plastic keeps the moisture in but allows air exchange. Bags made from other plastics should not be used. No further watering is necessary until the bag is removed.
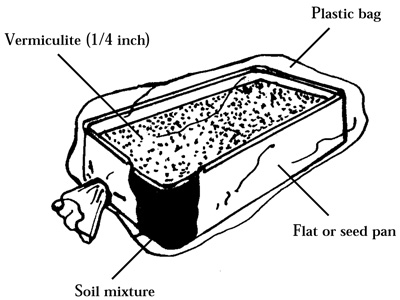
Figure 1. Seed germinator enclosed in plastic bag, which eliminates watering.
Care of the Seedlings
Place the container on a window sill just out of the sun’s rays where the temperature is 65 to 75°F. With most seeds, the bag is removed as soon as the cotyledons or seed leaves are well-developed. With tuberous-rooted begonia, do not remove the bag until the first true leaves form, which may take about three weeks.
For strong growth, the seedlings need proper light after they have germinated. Sun-loving plants, such as geranium and coleus, are given direct sun four to five days after the bag is removed. Others, such as African violet and begonia, prefer shade and should be kept in bright light but shielded from direct sunlight. Keep the soil moist by regularly watering from below. Fertilizer usually is not necessary at this stage of growth.
Once the true leaves have fully developed, the seedlings can be transplanted from the germinating container. The seedlings can be either spaced out in another flat or placed individually in 3-inch flower pots. Use the same soil mixture described earlier for seed germination. If the young plants become pale green and have good root systems, apply a complete soluble fertilizer. This may be purchased at your local seed store.
Other materials, such as compressed peat pellets, peat blocks, peat pots, etc., are available through catalogs or garden supply stores.
To find more resources for your business, home, or family, visit the College of Agricultural, Consumer and Environmental Sciences on the World Wide Web at pubs.nmsu.edu.
Contents of publications may be freely reproduced for educational purposes. All other rights reserved. For permission to use publications for other purposes, contact pubs@nmsu.edu or the authors listed on the publication.
New Mexico State University is an equal opportunity/affirmative action employer and educator. NMSU and the U.S. Department of Agriculture cooperating.
Revised and electronically distributed February 2004, Las Cruces, NM.