Guide G-412
Revised by Cydney Martin
College of Agricultural, Consumer and Environmental Sciences, New Mexico State University
Extension Family and Consumer Sciences Agent, Santa Fe County Extension Office, New Mexico State University. (Print Friendly PDF)
Where do I begin?

© Candybox Images | Dreamstime.com
When it comes to hobbies, the adage “A place for everything and everything in its place” is certainly true. Setting up and putting away every time you want to work on a hobby uses precious time that is better spent creating a treasure.
A well-designed, convenient sewing or hobby area—large or small—saves time and energy. It does not have to be a whole room (Figure 1); instead, it can be a seldom-used closet, an out-of-the-way corner, or a cabinet especially designed for your activities. Wherever you work, careful planning is important for the area to be functional. Whether it is a corner or an entire room, the basic requirements are the same. Some of the basic elements you want to consider when designing your space are:
- What will you be doing in this area? Will you be working on only one type of craft or several different crafts?
- Is it a convenient place to work when you have only a few minutes to work? Do you want an area you can close off when you are working on a project, or does the area need to stay open?
- What types of equipment will you need? Examples may include a computer with printer, cutting table, design wall, full-length mirror, storage, etc.
- When will your area be used? If you dovetail your craft or hobby along with other household chores, you may want the area to be within the same area of the home. For instance, if you dovetail sewing with meal preparation or supervising children at play, a hobby center near the kitchen may be desirable. A sewing center in the laundry lets you handle quick mending chores before clothes are laundered.
The type of area you design also depends on the amount of time you will be spending there. A person who only has short blocks of time needs a place where things can be left out until a project is completed. Someone who does small projects every once in a while needs a place where things can be stored and taken out easily.
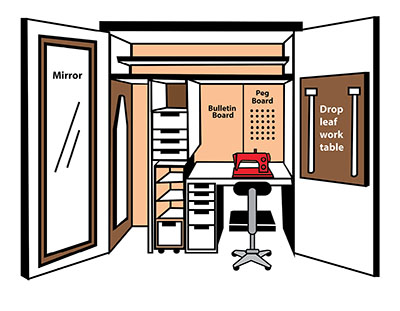
Figure 1. A large hobby workspace contained in a closet.
Designing Your Hobby Center
No matter the craft, there are generally two to three basic stations needed to work on your hobby. Begin setting these work areas in a U-shape or L-shape, along parallel walls, or on a single wall. Placement of these elements is key to a good workflow. The U-shape provides a convenient, ready-to-use arrangement. The L-shape, single wall, or parallel wall arrangement may require moving a table to make a “U” arrangement. The “U” requires at least 2 feet in front of the work area for the seating. A swivel chair in front of the work area puts each part of the process within easy reach.
When you don’t have a specific room that can be the hobby center, consider building or purchasing a cabinet with features designed to work from and organize your items. A closet can be functional if it is designed well. Bi-fold or double doors make it easy to hide clutter, if needed, during a project. Your closet could be an elaborate custom-made one, but with a small closet, a minimum amount of money, and a bit of ingenuity you can create a good center.
Here are some other items to consider:
- No matter the hobby, light is always important. Determining when you will be working in your center will give you a better idea of where you will need lamps and overhead lighting. If your space does not have a window, you can purchase an illuminating light that is very similar to natural light. Natural lighting and incandescent or fluorescent lighting may provide enough light for certain tasks, but extra lighting may be needed for working at night or for small work. Lighting experts recommend at least 150 watts incandescent or 40 watts florescent shaded lighting for most hobbies. Wall, ceiling, or table lamps can be used as long as they do not shine directly into your eyes, cast shadows over your work, or glare on your computer.
- Be sure electrical outlets are located so your sewing machine, lamps, and other equipment can be plugged in easily. Grounded outlets are recommended, as is a surge protector. A multiple outlet board with a surge protector can be used so all your equipment can be turned off with one switch. Avoid plugging the items in where cords must cross traffic paths.
- Light-colored walls and work surfaces reflect light and help make the work area brighter and more cheerful. Counters and tabletops should be durable, scratch-resistant, and easy to clean. Window treatments should allow as much natural light as possible without glare.
- Floor coverings should be given special consideration. A smooth surface is recommended because it’s easy to clean. If the floor is carpeted, consider buying a protective office mat like those used under an office desk. The hard surface will make cleanup easier.
- Consider gluing or nailing yardsticks and/or a T-square to the edge of your worktable for ease in working with measurements.
- Comfort is important. There is no need to strain your eyes or your back while you are working on something fun. Choose a chair that is comfortable—not too small or too large, and with good back support.
- Placement of the necessary elements in your room is key (Figure 2), but there are always additional elements that are necessary for any project. Take these elements into consideration and plan accordingly. For instance:
- A full-length mirror is needed in a sewing room. The mirror must be placed so that a person can stand 2 to 3 feet away from the mirror for a full effect.
- An ironing board can be hung over a door or on a wall as a space saver.
- Sewing machines for sewing and quilting need to be at the same level of the cabinet or table (28 inches from the floor) at which you will be sewing; machines that sit higher than this create too much drag and poor stitches on large projects.
- Some technology may be necessary. No matter the craft, many projects require the assistance of a computer and printer. Whether the computer is a necessary element or just something extra you may need some of the time, make space for this element.
- Although many of the projects we do are for entertainment, many individuals like to include a television or radio in their space. A TV and DVD player are ideal for learning new techniques from the experts on a particular hobby.
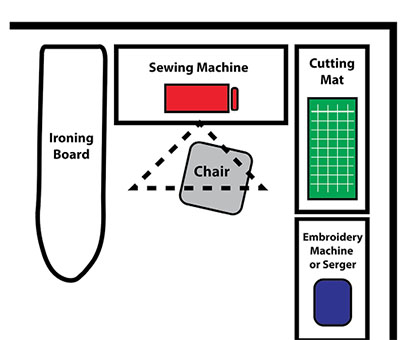
Figure 2. A well-designed sewing area.
Check the Height of Things
Design a center that fits you and your work habits. Have the major elements separate but close to one another in order to provide the most efficient work area. The height of the area should be given special consideration. An average-height person should have the working table 28 inches from the floor and the chair seat 16 inches from the floor. A swivel office chair on casters provides maximum mobility, and most of these chairs are adjustable.
The ideal cutting table is 36 to 40 inches high (or 3 inches below your belly button), 3 feet wide, and 6 feet long. Consider storage shelves or drawers underneath for storing ironing supplies or bolts of fabrics.
Storage Ideas
Storage of your projects, patterns, books, gadgets, notions, and other items should fit you and the space. If you are a “jack of all trades” type, develop a storage area that will keep you organized and work for a variety of crafts. Here are some functional and decorative storage ideas:
- If you are short on floor space for cabinets, try storing notions, small equipment, and thread on the wall. Using pegboard or wall hooks can be functional and decorative (Figure 3). Mount these items next to your sewing machine or cutting table, over a desk, etc. A mug rack or a magnetic knife rack can be mounted to the wall near the sewing machine to organize a variety of small items. Tie a loop of ribbon through scissors handles for easy hanging.
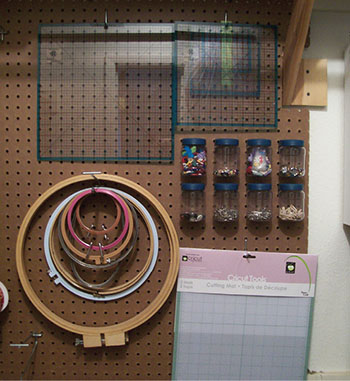
Figure 3. Using pegboard and hooks to store supplies.
- If you plan to mount your ironing board on the wall, consider a cabinet setup for storage. Today, many compact ironing boards can be found in a wall cabinet that attaches to the wall. When not in use, the ironing board, iron, and other necessary items fold up into the cabinet unit.
- A piece of cork on the wall is useful for pinning up instruction guides, notes about needed supplies, creative ideas, or fun quotes.
- Store items out in the open. Feel free to display your books, ribbon, thread, and other supplies or notions. Bookcases and shelving units give a hobby enthusiast unlimited possibilities.
- Closet storage units aren’t just for clothes. After taking measurements of the closet area, purchase shelving and compartment type units for holding such things as fabric, decorative paper, current projects, etc. Generally, the units can be changed around to accommodate your projects.
- Smaller storage problems can be solved using boxes, jars, cans, baskets, and other inexpensive items often found around the house or available at the local variety or grocery store (Figure 4). These items can add to the decorative look of your room while still being functional.
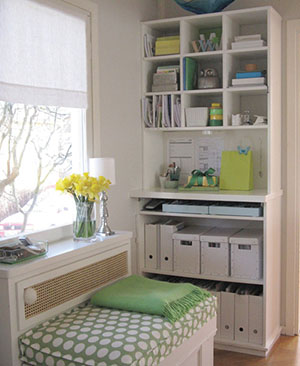
Figure 4. Using small storage containers to store supplies and other items. Photo courtesy of www.chezlarsson.com.
- Thread storage is often more than a small problem. A pegboard is an easy and visible solution. Special thread racks can be purchased to hang on the wall or set on storage shelves. A special thread tree that pivots will store cones of thread used for serger sewing. You can also use long, narrow boxes to arrange thread in rows by color for easy visibility and access.
- If you have more drawer space, create rows by gluing strips of wood or cardboard in a drawer or box to separate and organize thread, paints, brushes, inks, stamps, or other small items. The strips can be made wide or narrow to accommodate lots of supplies. You can also use baskets or other small containers (Figure 5).
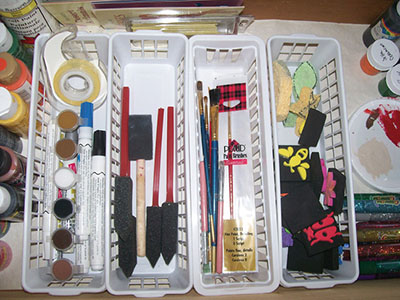
Figure 5. Using small containers to store supplies in a drawer.
- Buttons, snaps, and hooks and eyes can be stored in small jars that allow immediate visibility (Figure 6). Nail the jar lids to the bottom of a shelf so jars are securely suspended and out of the way. Or use compartmentalized stacking cabinets that usually come filled with screws, nuts, and bolts.
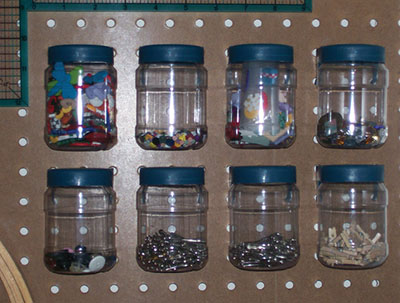
Figure 6. Clear jars allow for easy visibility of small supplies.
- Coffee cans make good storage for elastic. Cut a slot in the lid and pull elastic through as needed.
- Clear storage boxes, stacking baskets, or plastic crates are useful for storing fabric. Fold fabrics to fit and stack neatly so their edges can be seen easily. Interfacings and lining fabric can be stored in the same way. Label boxes clearly to identify all contents.
- Under-bed storage boxes or stacking file boxes make excellent containers for fabric and patterns. Sort patterns by size and type, and store in a metal file cabinet or in a bureau drawer. Pattern storage boxes are available, and shoeboxes are just the right size to stand patterns in for storage. If pattern envelopes are damaged, switch patterns to manila envelopes and glue picture and fabric requirements to the front for easy reference.
- Small equipment, such as hem gauges, marking pencils, chalk, and measuring tape, can be stored in a cutlery tray or in a desk divider tray. A kitchen or desk lazy Susan can be useful too. Use a large wastebasket to help keep your yardstick, large rulers, and tracing paper organized.
- If you have supplies and notions that come on a roll, such as tracing paper, stabilizer, or ribbon, create a hanging rod for these rolls (Figure 7). Some ideal places are on a curtain rod under a shelf, off some pegboard, or a paper towel rack. Each of these setups gives you a great way to roll the product off the roll without problems.
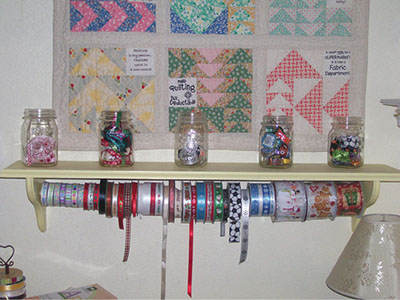
Figure 7. Storing rolled supplies on a dowel or other rod allows for easy dispensing of the supplies.
- Projects—current or old—need to be stored at one point. When choosing storage for your projects, make sure all the necessary items and supplies can fit into one storage box. There are many types of clear plastic boxes for various hobbies that you can purchase (Figure 8), but other ideas may include unused pizza boxes, shoe boxes, plastic zipper type bags, file boxes, or baskets. Each of these can keep all the supplies, notions, and instruction guides in one place for each project you are working on.
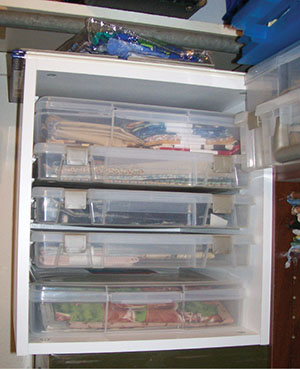
Figure 8. Using clear plastic boxes to organize and store supplies.
Sources
Kansas Cooperative Extension Service. n.d. A place to sew. Manhattan, KS: Author.
Louisiana Agricultural Extension Service. n.d. Plan a sewing center. Baton Rouge, LA: Author.
Simplicity sewing book. n.d. New York: Simplicity Patterns.
South Carolina Cooperative Extension Service. n.d. Planning for your sewing needs. Orangeburg, SC: Author.
Southern Cooperative Experiment Stations. 1958. Home sewing areas [Bulletin 58].
The Vogue sewing book. n.d. New York: Vogue Patterns.
Washington State University Cooperative Extension Service. 1961. Sewing centers. Pullman, WA: Author.
For Further Reading
C-102: Sewing Machine Maintenance
pubs.nmsu.edu/_c/C102/
C-205: Selecting a Pattern Size for Perfect Fit
pubs.nmsu.edu/_c/C205/
C-313: Rags to Riches: Recycling and Upcycling Old Clothes
pubs.nmsu.edu/_c/C313/

Cydney Martin is the Extension Family and Consumer Sciences Agent for Santa Fe County. She earned a B.S. from Lubbock Christian University, a B.S. from Eastern New Mexico University, and an M.A. from Eastern New Mexico University. She is an Allied American Society of Interior Design educator and an aging in place specialist. Her Extension and public outreach focuses on food preservation and aging in place.
To find more resources for your business, home, or family, visit the College of Agricultural, Consumer and Environmental Sciences on the World Wide Web at pubs.nmsu.edu
Contents of publications may be freely reproduced, with an appropriate citation, for educational purposes. All other rights reserved. For permission to use publications for other purposes, contact pubs@nmsu.edu or the authors listed on the publication.
New Mexico State University is an equal opportunity/affirmative action employer and educator. NMSU and the U.S. Department of Agriculture cooperating.
Revised November 2020 Las Cruces, NM