Circular 573
College of Agriculture, Consumer and Environmental Sciences New Mexico State University. (Print Friendly PDF)
Preface
This circular is intended to serve as a practical guide for managing drip irrigation systems. The information was compiled as proceedings for a short course on drip irrigating of row crops conducted on Nov. 9, 2000, in Las Cruces, New Mexico.
This one-day course offered crop producers the information necessary to consider adopting drip irrigation technology. Nationally recognized experts were invited as speakers. They stressed the importance of assessing water quality before embracing drip technology and, if necessary, developing an acidification procedure to prevent the system from clogging. The experts offered step-by-step instructions on how to inject chemicals and maintain the system. A panel of four innovative growers shared their experiences about how a drip injection system can be used to maximize profits. Manufacturers also demonstrated injection techniques and equipment.
The course was sponsored by New Mexico State University (NMSU) and the New Mexico Chile Pepper Task Force. The latter is a partnership between NMSU and the chile industry to improve chile yields and profitability. The task force identified adopting drip irrigation as a vital step toward strengthening the chile industry. At present, less then 1 percent of farms employ drip irrigation in New Mexico.
Biad Chili Inc.’s Rincon Farm leased by Marty Franzoy served as a case study or model for this short course. Franzoy, normally a furrow irrigator, and Biad Chili Inc. installed drip irrigation for the first time this year. They allowed this system to be developed as an example for
other farmers to follow. Information about the soil and water at Rincon Farm was provided, in advance, to each of the speakers. This enabled them to structure their presentations around the Rincon Farm example.
The keynote speaker was Howard Wuertz, who pioneered drip irrigation in the Southwest on his Sundance Farms in Arizona. He offered his vision of how drip systems and chemical injection can be used as tools for improving crop production. We are proud to recognize him for his pioneering efforts.
Robert F. Bevacqua, Extension Vegetable Specialist New Mexico State University
Richard Phillips, Project Manager, New Mexico Chile Pepper Task Force
Acknowledgements
Katrina Beverage earned our eternal gratitude for the professional manner in which she quickly compiled, edited, and distributed these proceedings for our short course on drip irrigation.
We would like to thank Rick Laemmle of Action Audio Visual for providing the audio and visual equipment for taping the short course.
The manuscript was reviewed by three faculty members at NMSU: Jim Libbin, Phil Hibner, and Jim Fowler. We gratefully acknowledge their support and guidance.
Table of Contents
Introduction
Rincon Farm as a Case Study
Subsurface Drip Irrigation: On-Farm Responses and Technical Advances
Economic Comparison of Drip and Furrow Irrigation Methods for Doña Ana and Sierra Counties, 2000
Assessing Water Quality Before Installing a Chemical Injection System
Managing Fertility in Drip-Irrigated Chile Production
Maintenance of Microirrigation Systems
Nitrate Testing in Chile Pepper
Pesticides and Drip
Fertigation and Injection Systems
Grower Panel Discussion and Questions
Summary
Appendix A: Soil NO3-N “Quick Test”
Appendix B: List of Acceptable Pesticides Available for Drip Systems
Introduction
Drip irrigation is the slow and frequent application of small amounts of water through emitters or tiny holes spaced along polyethylene tubing or tape. It also is called trickle, subsurface, or microirrigation. Growers of high-value crops, such as tomato, pepper, strawberry, and melons, were among the first to embrace this technology.
The important components of a drip irrigation system include a water source, pump, backflow preventer, injector, filter, pressure regulator, valves, and a distribution system of pipes (main and submain lines) and tubes (laterals). Solenoid valves and a controller can be used to automate a system.
The trend in drip irrigation is toward positioning the tubing at a depth of 8 to 10 inches beneath the crop row and maintaining the tubing for as many years as possible, usually 5 to 10. This approach was endorsed by most of the speakers at the short course, but it also is possible to position the tubing on the surface or at a shallow depth of 2 to 4 inches. The tubing’s life expectancy is much shorter in these latter instances.
A significant feature of drip irrigation is that the system can be used to deliver agricultural chemicals. Fertilizers and pesticides can be dissolved in water, injected into the irrigation system, and distributed directly to the plant’s root zone.
Drip irrigation, in general, and chemical injection, in particular, offer advantages and disadvantages to growers who are considering adopting the technology. The speakers and panelists at the short course generally agreed that drip irrigation offers increased yields, increased profits, reduced labor requirements, reduced fertilizer and pesticide requirements, opportunity for automation, and fewer tractor passes through the field.
On the other hand, drip irrigation costs more to install and requires higher-skilled labor and high installation costs, new implements for positioning the tubing, disposing of old crops, and preparing the bed for new crops. Also, the system must be designed carefully to ensure uniform delivery of water and chemicals to all corners of the field. Considerable effort in filtering, acidifying, chlorinating, flushing, and backwashing must be expended to avoid clogging in the drip tubes. Finally, few pesticides are available for injection, and injection mistakes are costly and can result in total crop loss.
Despite these disadvantages, a veteran grower who was among the first to adopt drip irrigation in southern New Mexico concluded his panel presentation by saying that drip irrigation had made farming more enjoyable for him and that he would rather retire than go back to the old days of furrow irrigating.
Rincon Farm as a Case Study
Robert F. Bevacqua, Extension Vegetable Specialist, New Mexico State University
In 2000, Biad Chili Inc.’s Rincon Farm, which is leased by Marty Franzoy and located seven miles south of Hatch, N.M., served as a case study or demonstration site for drip irrigation. The information gathered during the design, installation, and operation of the system is presented here to help other growers develop drip systems.
New Mexico State University and the New Mexico Chile Pepper Task Force sponsored the case study. Many experts contributed to the demonstration, especially during the design phase. Franzoy, normally a furrow irrigator, used drip irrigation for the first time. He allowed the system to be developed as a model that other farmers could adopt. On June 22, 2000, a field day was hosted at the Rincon Farm that attracted 45 people. Franzoy and the system designers and installer offered suggestions to growers who would like to install similar systems on their farms.
The following sections highlight some of the important features of the drip irrigation system at the Rincon Farm.
Water Source
The drip system’s water source is a 100-foot-deep well. The water is brought to the surface by an Amarillo pump with right angle drive, which required 70-horse power at 1,760 rpm. A General Motors engine fueled by natural gas powers the pump, which delivers 720 gpm.
Water Quality
The water quality is very poor with high levels of dissolved salts. Also, it is likely that precipitates will form that could clog the emitters. Growers should watch out for a pH of 7.5 and a high dissolved bicarbonate level of 5.6 meq/liter in their irrigation water analysis report. These red flags triggered the decision to acidify the water at an injection rate of 1.2 gallons of sulfuric acid per hour. The goal is to lower the pH to 6.5 to prevent the emitters from clogging with precipitates. A pH of 6.5 also is also favorable for to injecting agricultural chemicals into the system.
Soil Type
The soil texture is a clay loam with a pH of 8.3, percent organic matter of 0.5, and cation exchange capacity of 23. Low nitrogen and phosphorus levels are available for plant growth.
Field Area
The demonstration site is a 26-acre field that measures 700 ft by 1,600 ft. The field was laser-leveled and divided into two irrigation zones of 13 acres each.
Crops
The demonstration planting was ‘Sonora’ chile pepper. The drip tubing was permanently buried at a depth of 9 inches with the goal of maintaining the system for five years. The likely rotation of crops for those five years is chile, onion, corn, cotton, and alfalfa.
Nematode Assay
Soil samples submitted for nematode analysis revealed damaging levels of root knot nematode in portions of the chile planting. The field had an excellent stand in mid-April, but by mid-May was showing a decline due to nematode damage. In early June, 20% of the plants had died and 30% were stunted. At harvest, the nematode infestation was responsible for a 50% reduction in yield.
Filters
The irrigation water is filtered in twin, 48-inch, stainless steel filters filled with a sand media. The filters were equipped with a back flush device that is triggered by pressure differential in the system or a timer, with which back flushing occurs every 4 hours. The system has Waterman Aquatic Systems filters with Alex-Tronix backwash controls.
Pipes
Buried PVC pipes were used for the main lines (10-inch diameter), submains (4-inch diameter), and flush manifolds (3-inch diameter). The main lines were designed for future expansion to 200 acres.
Drip Tubes
The specifications for the Eurodrip tube, used in the demonstration planting are:
| Flow rate | .43 gpm/100 ft |
| Operating pressure | 10 psi |
| Inside diameter | .80 inches |
| Wall thickness | 10 mil |
| Emitter spacing | 12 inches |
| Emitter discharge rate | .25 gph |
| Lateral length | 700 ft |
| Lateral depth | 9 inches |
| Lateral spacing | 40 inches |
| Life expectancy | 5 years |
Backflow Preventer
If agricultural chemicals are injected into the drip irrigation system, it is important that the system include a device to prevent the injected materials from contaminating the water source. Backflow preventers are usually installed between the injection point and the water source.
Pressure Regulator
Drip irrigation systems can be damaged or disconnected by surges in water pressure. For this reason, a pressure regulator is an essential component.
Control System
The demonstration site includes an automatic control system. It can be powered by electricity from the utility company or batteries connected to a solar panel. The controller presently operates two irrigation zones but can be expanded easily to include more zones. The controller is a Rain Master RME Hawk model.
Valves
The system includes two valves for the two irrigation zones of 13 acres each. Each valve is operated by a solenoid that is connected to the controller by electrical wire.
Meter
The system includes a meter with a digital face that displays the total amount of water in gallons that enters the main line and the current water flow. The meter is a G.F. Signet Model No. PN: 4-3100.
Flushing Device
Instead of being tied off, the drip tubes’ distal ends are connected to a flush manifold of buried PVC pipe. The manifold, in turn, is connected to flush outs, which direct flush water into a drainage canal that parallels the field.
Soil Moisture Monitors
Tensiometers were located in four areas of the field. These Irrometer Company instruments were 18 inches long. They were positioned to measure soil moisture at a depth of 12 inches below the row surface. The following guidelines were used to interpret the tensiometer readings.
- Optimal soil moisture for the Rincon farm is 25 centibars (cbr). This is field capacity for a clay loam soil.
- Soil should not be allowed to get drier then 40 cbr.
- Soil should not be irrigated when soil moisture is below 10 cbr, because this is approaching saturation (0 cbr).
Monitoring Nitrogen Fertilizer
Nitrate-nitrogen concentration in the fresh sap of chile petioles (leaf stems) was measured at weekly intervals with a Cardy nitrate meter from Spectrum Technologies Inc. The following guidelines were used to interpret meter readings.
- For vegetative growth, the sufficient zone is 900 to 1,400 ppm nitrate-nitrogen.
- For early flowering, the sufficient zone is 800 to 1,200 ppm nitrate-nitrogen.
- For early, greenfruit development, the sufficient zone is 500 to 800 ppm nitrate-nitrogen.
Cost
The estimated cost for the design, materials, and installation of the drip irrigation system is $52,000. The relatively expensive materials were the drip tubes, PVC pipes, stainless steel filters, and the automated control system.
Summary
The demonstration site at Rincon Farm is a 26-acre planting of ‘Sonora’ chile pepper on a clay loam soil. The water source is a shallow well. The water quality is poor, and acidification is required before the water enters the irrigation system. The pump, powered by a natural gas engine, is set to deliver 720 gpm. The water is filtered in twin, stainless steel filters filled with a sand media. There is an injection system for metering fertilizers and other chemicals into the irrigation water. The main and submain lines are buried PVC pipe. Automatic valves divide the field into two irrigation zones of 13 acres each. Tensiometers were used to monitor soil moisture. The life expectancy of the drip tubes is five years. The cost is estimated to be $52,000.
Subsurface Drip Irrigation: On-Farm Responses and Technical Advances
Howard Wuertz, Owner/Operator, Sundance Farms, Ariz.
Sundance Farms has been involved in developing subsurface drip irrigation for vegetable and field crop production for more than two decades. Using microirrigation has radically changed our crop mixes and the way we culture them. Prior to our conversion to drip irrigation, we flood or furrow irrigated salt-tolerant field crops, such as wheat, barley, cotton and sugar beets. Because of declining water tables, our future seemed bleak at best. Declining prices for short staple cotton (our primary cash crop) and less than break-even revenues for rotation crops forced us to turn to the government and cultivate acreage reduction programs. Static cotton yields 1,350 lb of lint per acre. Rising energy costs further increased our dependence on the government dole.
In 1976, Sundance Farms started evaluating drip irrigation as an alternative to furrow, flood and sprinkler systems. A 5-acre, surface drip irrigation installation was planted to sugar beets. The system was patterned after technology developed in Israel. Drip lines consisted of 40 mil polyethylene hose with in-line turbulent flow emitters spaced 24 inches apart. The drip lines were placed between two rows of beets approximately 14 inches apart on 40-inch centers. The system had to be manually operated and moved by hand in and out of the field with each crop rotation. At Sundance Farms’ Coolidge division, with its porous sandy loam soil and salty water, stand establishment was greatly impaired. Because of the surface drip line, tractors and equipment had to stay out of fields after the crop was up, weeds were controlled by chemicals and, more often, the hoe. In spite of the start-up problems and high labor demand, a record crop of sugar beets was produced on less than half the water when compared to conventional furrow irrigation.
From these early experiments, we realized that drip irrigation had tremendous potential if the system could be automated and made more “farmable.” We needed a system that would allow us to till, plant, and cultivate with high-speed, tractor-mounted implements. Because we farmed 4,000 acres with 18 men, we needed crops that could be established with minimum hand labor and a system that could be easily maintained.
In 1980, to address these criteria, we started evaluating the feasibility of burying drip tubes underground. The initial experiment indicated that we could reduce water use by half and, more importantly, increase yields from the 1,350 lb lint/acre plateau for furrow irrigation to more than 1,800 lb lint/acre with drip (table 1). By burying the drip lines 8-10 inches under each row, we discovered that crops could be watered up with the system and still have adequate clearance to run tractor-drawn implements through the field. Our oldest installation was removed from the field after 11 years and 10 cotton crops, three small grain plantings, and a seedless watermelon crop. Key developments in drip system design and maintenance, plus intensive crop management, have enabled us to expand from a 1-acre test plot to a commercial operation of more than 2,500 acres.
Table 1. Average cotton yields and water application comparisons.
| Irrigation System |
Cotton Yields Lint (lb/acre) |
Water Applied (inches) |
Yield To Water Use Ratio (lb/inch) |
| Furrow | 1350 | 65 | 20.0 |
| Sprinkler | 1200 | 42 | 29.0 |
| Drip | 1890 | 32 | 59.0 |
Drip Systems Design and Maintenance
In order to make drip economical for vegetables as well as field crops, it is essential that equipment be maintained to stand the test of time.
Proper tube maintenance starts with irrigation system design. At Sundance Farms, we use Central Arizona Project Water and water from deep well turbines, which pump directly into the drip control stations. Inorganic sediment, such as rust, sand and silt, is initially settled out as it passes through 20,000-gallon surge tanks. Inorganic materials, such as clay colloids, and organic materials, such as moss, algae and slime, are further removed by banks of sand media filters.
The pressurized, filtered water is conveyed to the fields via buried PVC pipelines and electric control valves. Main lines, which range in size from 10 to 15 inches in diameter, are equipped with valves or removable end caps to facilitate flushing. Drip tubes receive water from submains consisting of 6-to 8-inch PVC pipe, which usually extends 1,280 feet. The end of the 6-inch pipe is reduced in size to accommodate 4-inch flush valves. The polyethylene drip tubes are buried 8 to 10 inches deep in every row and normally run 650 to 1,300 feet in length. Since there was no tape injector on the market that places the lines 8 to 14 inches below the top of the bed, Sundance Farms was forced to develop one. By using a heavy-duty parabolic ripper and incorporating a 1.5-inch properly bent and formed tube immediately behind the ripper, we were able to install the drip tape to an excess of 14 inches deep with no difficulty. We were still able to splice the tapes from one roll to the next above ground at the top of the injector tube.
The Sundance Tape Injector has since been patented and is sold with the Sundance Root Puller, Sundance Disk, and Sundance Tape Extractor. All of these tools collectively are referred to as the “Sundance System” and are carried by local implement dealers. To minimize hand labor, the ends of the drip tubes are manifolded into PVC flushing pipelines. Another advantage to manifolding ends is that water flow now occurs from both ends, resulting in reduced contamination when lines break. A third advantage of networking the lines is uniform pressure throughout the block.
Treating the water with chemicals is another aspect of system maintenance that must not be overlooked. U.S. Department of Agriculture researchers, such as Bucks and Nakayama, have studied drip tube plugging extensively and have outlined parameters for chemical treatment of various water sources. We adhere to their recommendations closely. Sulfuric acid is used to keep salts, such as calcium carbonate and bicarbonates, in solution. Acid also is used in conjunction with chlorine treatments and has been found to synergize the biocidal activity.
Chlorine must be administered frequently to subsurface tubes, regardless of the water quality. We have discovered that almost all of our plugging occurs from the outside and is the result of bacteria native to our soils. Upon shutting down the system, soilborne bacteria are drawn into the orifices and begin breaking down silicate particles. The bacteria excrete a slime, which bonds soil particles together to form an impervious block.
For preventive maintenance, Sundance Farms uses biweekly applications of 7 ppm chlorine at a pH of 6.5. Using liquid chlorine and sulfuric acid in bulk makes the treatment simple and inexpensive at about $5/acre per year.
Over the past three years, engineers at Netafim, T-Systems, Toro and Chapin Irrigation have developed “New Generation” drip lines that use turbulent flow emitters instead of the traditional laminar flow path. Large emission chambers associated with turbulent flow tubes distribute water uniformly and are far less likely to plug. The average life span for laminar flow drip lines is 2 to 3 years, whereas turbulent flow tubes should easily last 10 years or more.
In tests with prototype turbulent flow materials, we have seen less than 2% plugging after 13 years of operation. On the downside, some turbulent flow emitters have shown signs of root intrusion. To extricate roots from tubes, inject copper sulfate (15 ppm) and chlorine shock treatments (200 ppm) periodically (Snitzer). To prevent root intrusion, deficient irrigation and operating pressures below 8 psi should be avoided; 10-12 psi is much preferred.
Intensive Crop Management
We realized early that water savings and system longevity were very important. It is also important that the system be cost effective. The prevailing costs of installation are $700 to $1,200 per acre. Increasing yields was the primary objective of converting to drip. To accomplish this goal, it was necessary to address five critical areas: salts; crop rotations; minimum tillage; soilborne parasites and pathogens; and fertilizer and soil amendments.
Salt Management
Subsurface drip, if used properly, impacts salt management dramatically. In the short term, we have established excellent stands of grain and cotton on soils with initial electroconductivity (EC) levels that range from 12 to 75 mmhos/cm at the top 1-inch.
In addition, water delivered to the soil with subsurface drip irrigation is at 10 to 12 psi versus zero pressure under conventional flooding or furrow irrigation. Under this pressurized system, the water is delivered uniformly to the whole field, regardless of soil porosity differences. Thus, the salt flushing irrigation can be halted before any water is added to the subterranean return flow. Yet, the whole root zone is flushed, because drip irrigated crops have more shallow root systems. By placing tubes below every listed bed, salts have been pushed away from the root zone with the wetted front. Experience has shown that salty fields should be irrigated during rains to further protect plants after emergence.
Also, to establish stands in salty soil, we have noted substantial declines in salt levels from year to year (table 2). As noted earlier, since half of the water is applied with drip irrigation, half of the salts also are applied. Applying water every row at the root zone pushes salts away from the plant roots and into the furrows, just the opposite of conventional irrigation. Irrigation during rain continues to push salts out of the effective root zone. Based on initial research findings by Jack Strolien at the University of Arizona, we have found that adding a combination of sulfuric acid and gypsum to the water and soil expedites leaching of harmful salt buildups.
Table 2. Soil salt levels (EC mmhos/cm) in furrow irrigated fields followed by drip conversion.
| Irrigation Water Source ECW |
Average Salinity Furrow Fields prior to Drip |
Average Salinity Fields after Drip Conversion |
||
| 1982 | 1983 | 1984 | 1985 | |
| 1.25 – 6.25 | 8.05 | 2.20 | 1.94 | 1.62 |
| 0.7 | 2.50 | 1.40 | 2.00 | 1.75 |
In farm trials conducted in spring 1988, we found that small, seeded crops, such as lettuce and spinach, germinated better when sprinklers were used in combination with drip irrigation. Sprinklers help to break thermal-and salt-induced seed dormancy on salty soils. Using a dual system approach, we produced perfect lettuce stands and we produced water containing 300 ppm sodium and chlorides (SAR 30). Furthermore, by applying 1 to 2 tons per acre of gypsum to our lettuce fields prior to sprinkler irrigation, we reduced sodium levels in the soil and plant tissue several fold. Gypsum applications also have had a pronounced effect on lettuce quality and yield by increasing the uptake of calcium and other micronutrients (table 3).
Table 3. Soil and tissue analysis of lettuce drip irrigated with SAR 30 and SAR 2 water.
| Water Quality/ Treatment |
Soil/ppm | Tissue/ppm | ||||||||
| Ca | Na | Ratio-Ca:Na | Na | Ca | NO3 | PO4 | K | Zn | Mg | |
| SAR – 2.0 No Gypsum |
3400 | 240 | 11.1 | 0.1 | 1.8 | 4.3 | 0.44 | 7.1 | 28 | 0.3 |
| SAR-30 No Gypsum |
1200 VH |
480 VL |
2.5:1 L |
1.8 L |
0.8 L |
3.2 L |
0.28 | 3.2 | 22 | 0.2 |
| SAR – 30 Gypsum (2200 kg/ha) |
3100 | 210 | 14.7:1 | 0.09 | 2.1 | 4.8 | 0.40 | 5.1 | 26 | 0.3 |
| Nutrient levels for low SAR and gypsum treatment all adequate. Nutrient disorders in high SAR vs. gypsum treatment are as follows: VH = Very High; VL = Very Low; L = Low. |
||||||||||
Crop Rotation
Before switching to drip irrigation, we realized that our success as cotton farmers was closely tied to crop rotations. Most of our soils are classified as sandy loam with sand levels nearing 80% in some fields. Caliche (CaCO3) layers limit the effective root zone to 1 meter (3 feet) or less. It was not surprising to learn that a rotation with small grains was essential for high- yielding cotton on drip irrigation.
Because Arizona’s exceptionally long growing season (3,800 heat units) is conducive to pushing early maturing barley and cotton varieties, double cropping has become a profitable alternative. Proper variety selection coupled with intensive management resulted in production in excess of 7,500 lb/acre of grain and 3 bales/acre of cotton in double crop mode. Normally, one grain crop is rotated with three cotton crops.
Our ability to better manage salts has enabled us to diversify our crop mix. Salt sensitive vegetable crops, such as lettuce, sweet corn, mixed melons, spinach, broccoli, rapini, fava beans, chile peppers and watermelons, have been cultured successfully over the past several years.
Seedless watermelon has been the most lucrative specialty crop we grow. The precise control of water and plant nutrients delivered to melon roots via subsurface drip has resulted in production in excess of 30 to 45 tons/acre for fall and spring plantings, respectively. Subsurface water delivery also has afforded greater flexibility at harvest and enabled us to apply high-volume, ground applications of foliar feeds, fungicides, and insecticides at a moment’s notice. Enhanced pest control has been the key to producing quality melons for the lucrative fall market.
Minimum Tillage
Subsurface drip irrigation had a profound impact on the way we till our fields. As four-wheel drive tractors, plows, disks, and land planes became unusable or obsolete, we were forced to adopt the concept of minimum and controlled traffic tillage. The objective is to shred stalks and crop residues, kill their roots and incorporate the residue in the top 4-5 inches of soil just above the drip lines. Initially, commercially available minimum tillage rigs were evaluated. On paper, these rigs were designed to do all that was required in one pass over the field. In reality, the machines were complicated and slow. Most important they did not kill 100% of the roots, a requirement set and enforced by the Department of Agriculture in Arizona.
Over the past several years, through extensive testing and experimenting, Sundance Farms developed the root puller. The rig, which incorporates disks oriented at 90-degree angles to create a V-shaped pulling action, is capable of destroying all the roots (3-5 inches) below the soil surface.
A second machine developed by Sundance Farms is the Sundance disk. This machine consists of 3 sets of disks on separate tool bars in a single tool carrier with gauge wheels to control depth. The first bar contains opposing disks set at 30-degree angles to each for each row. These disks split the listed bed open, while the disks on the second bar, which are separated by about 16 inches, start the relisting process. This setup can do the same job as a tandem disk in a conventional field. The third bar, which contains a set of disks just like the front bar, is positioned to relist the field. Ripper shanks can be added between each row to deep till the furrows. When the Sundance Disk is used on nondrip fields, a chisel is added directly over the drill to further till and remove any plants in the center of the listed beds.
Together, the two machines kill all the plants in the drill by either cutting them completely off or by pulling them up out of the soil. The disk, which is pulled behind the same tractor as the root puller, incorporates the residue in the beds and rips the furrows, chisels the bed and relists the field for planting the next crop.
The following is a typical sequence of operations to till grain or cotton:
- Shred stalks with a flail-type shredder.
- Pull roots with Sundance Root Puller and disk with a Sundance Disk, as one operation. (Root puller on front of tractor and disk on rear.)
- Relist beds with a disk lister.
- Roll and shape beds.
- Peel off top of beds and incorporate herbicide with rotary mulcher.
- Plant.
With reduced tillage, there is less compaction, and tillage costs are cut by more than half, with no reduction in yield. In the falls of 1988, 1989, and 1990, the University of Arizona compared our equipment with conventional tillage systems. The results showed a 50% reduction in overall tillage costs (table 4).
Table 4. Cotton tillage comparisons.*
| System | Energy Use KW-H/ha |
Time/Hour 1000/acre Processed |
Cost Cotton to Cotton |
Lint Yield 1988-1990 lb/acre |
| Conventional | 131 | 2,265 | 72.0 | 678 |
| USM | 85 | 1,080 | 48.6 | 710 |
| Sundance | 60 | 1,085 | 33.8 | 764 |
| *Coates and Thacker 1990 | ||||
Nematode and Plant Pathogen
A review of existing literature reveals a reoccurring plant pathogen/nematode problem associated with both minimum tillage and intensive drip irrigated farming. At Sundance Farms, an increase in the incidence of root knot nematodes has been particularly evident. Since cotton fields are no longer summer fallowed, but doubled cropped with grain, the host-free period is insufficient to break the nematode cycle. The more consistent moisture regimes associated with drip irrigation also favor nematode survival. To cope with the problem, it has become necessary to use chemical control and tolerant cotton varieties, such as semicluster types.
Nematologists, such as Apt of Hawaii and Radewald of California, have tested a variety of nematicides through drip irrigation systems. Correspondence with these researchers has enabled us to fine tune rates and nematicide application timing. Controlling nematodes may require fumigation prior to planting. Additional control can be attained by injecting nematicides, such as Telone II, through the drip system. Using Telone II has reduced control costs considerably and aids in the production of nematode susceptible crops, such as cantaloupes and watermelons.
Fertilizers and Soil Amendments
Drip irrigation provides a perfect vehicle to deliver a variety of chemicals directly to the root system. In early experiments with drip, several fertilizers were used, such as UN32, Centrifuge Grade Phosphoric Acid, NPK mixtures, and micronutrients. The excellent results achieved with fertilizers prompted experiments with herbicides, insecticides, nematistats, and fumigants. While injecting herbicides and insecticides is still experimental, it is showing much promise.
Summary
Sundance Farms, with the aid of agricultural researchers from diverse disciplines, has developed a subsurface drip irrigation system, which can be used to economically grow cotton, small grains, and a variety of specialty crops. Managing and maintaining the system properly has enabled the drip tubing to be permanently buried (8-10 inches) below ground.
A permanently buried drip system must be reliable and sustainable; able to save water, increase yields, manage salts; provide for crop rotation; and allow for needed tillage operations.
It also must be a primary water delivery system that can take a crop from seed germination to harvest without the aid of another irrigation system, except in certain heat-and salt-sensitive crops where thermal dormancy occurs. The aid of a sprinkling system would ensure germination at high temperatures and in the presence of surface salt accumulation. Sprinklers are an effective tool for removing salts driven to the surface by subsurface drip, purging the beds of salts, and dropping the ambient temperature to allow for germination of crops like lettuce and broccoli. The subsurface drip irrigation system design also allows for a “T” connection, whereby the sprinkler booster pump can be temporarily attached to provide an efficient way to use a sprinkler system in conjunction with the drip. Experience has shown that an initial sprinkling will provide 1 1/2 inches of water. A secondary sprinkling of a 1/2 inch of water within 36 hours of the first sprinkling helps complete germination.
The actual operation of the subsurface drip system must provide for:
- Complete filtering of the water to remove all sediment and clay colloids.
- Acid treatment to prevent any hardness from precipitating out and clogging the emitters.
- Regular chlorinating to kill all organic contaminates, such as slime, algae, and fungus, to prevent clogging of the orifices.
- Proper pressures to ensure uniform water delivery throughout the block.
- Flushing on a timely basis.
In other words, if the subsurface drip system is designed as outlined above and operated as suggested, growers could expect to enjoy many years of trouble-free service. The yield history and cost analysis of our farm’s oldest drip field (table 5) lends credence to these statements.
Table 5. Production records on field C-12 with subsurface drip.
| Year | Yield lb/acre |
Price cents/lb |
Dollar value per acre |
Prod./Harv. costs/acre |
Net income per acre |
| 1981 | 2227 Carton | 0.70 | $1,559 | $750 | $809 |
| 1982 | 1781 Carton | 0.70 | $1,247 | $750 | $497 |
| 1983 | 6732 | 0.65 | $438 | $300 | $138 |
| Wheat | |||||
| 1983 | 2227 Carton | 0.65 | $1,448 | $550 | $898 |
| 1984 | 2227 Carton | 0.62 | $1,381 | $750 | $631 |
| 1985 | 4950 | 0.06 | $297 | $300 | <$3.00> |
| Barley | |||||
| 1985 | 1486 Carton | 0.60 | $891 | $550 | $341 |
| 1986 | 1757 Carton | 0.65 | $1,142 | $800 | $342 |
| 1987 | 1870 Carton | 0.67 | $1,253 | $800 | $453 |
| 1987 | 5148 | 0.55 | $283 | $300 | <$17> |
| Barley | |||||
| 1988 | 58816 | 0.18 | $10,586 | $4,650 | $5,936 |
| S/S Watermelons | |||||
| 1989 | 1105 | 1.15 | $1,271 | $850 | $421 |
| Pima | |||||
| 1990 | 2029 Carton | 0.65 | $1,319 | $800 | $519 |
| Total Net Income/Acre | $10,965 | ||||
| Drip System Cost | − $1,800 | ||||
| Maintenance/Repair Cost | − $200 | ||||
| $8,965 | |||||
| Property Taxes & Return on Investment |
− $3,000 | ||||
| $5,965 | |||||
| Per Year/Acre | $596.50 | ||||
References
Bucks, D.A. and F.S. Nakayama, 1985. Guidelines for Maintenance of a Trickle.
Irrigation System. Proc. Third International Drip/Trickle Irrigation Congress, Fresno, Calif., pp. 119–125
Snitzer, Stan, 1988. Ag Labs, Phoenix, Ariz. Personal communication.
Stroehlein, J.L. and A.D. Halderman, 1975. Sulfuric Acid for Soil and Water Treatment. Arizona Agri-File Q357, Tucson, Ariz.
Thaker, G. and W. Coates. 1988, 1989, and 1990. Equipment Test by University of Arizona. Tucson, Ariz.
Economic Comparison of Drip and Furrow Irrigation Methods for Doña Ana and Sierra Counties, 2000
Jerry Hawkes, Agricultural Economist, New Mexico State University
This study compared the economic viability of drip irrigation to that of furrow or flood irrigation. The economic estimates presented are conservative. The economic data was gathered through a process New Mexico State University has employed for nearly 20 years. The process begins with a producer panel meeting. Economic and production data are gathered from producers currently using drip irrigation as well as furrow-irrigated farms, Cooperative Extension agents, and individuals specializing in the major areas applicable to this evaluation. The crops evaluated were red and green chile, pima and upland cotton, wheat, grain sorghum, alfalfa hay, and three onion varieties. The results were compared to the established economic factors included in the flood-irrigated cost and return estimates. The flood-irrigated estimates were derived in the same manner as the drip estimates.
Fertilizer inputs, herbicide costs, insecticide costs, capital expenses, fixed costs, and seed costs were the primary economic areas considered. Yield increases for the drip-irrigated cost and return estimates also were considered. The comparison evaluated each of the economic indicators using the furrow-irrigated model as the base. For example, yield was estimated to be 25% greater when employing drip irrigation.
The results (table 1) indicated that even with increased fixed and capital expenditures, drip irrigation would produce a greater net operating profit (approximately 12%) than the furrow-irrigated model. Note that economics are not the only parameters considered when contemplating changing irrigation method.
Table 1. Economic comparison of drip and furrow irrigation methods.
| Economic Activity Evaluated for Each Scenario |
Drip Irrigated Percentage as Compared to the Same Furrow-Irrigated Farm Model, 2000 |
| Yield | +25% |
| Chemicals | −18% |
| Fertilizer | −26% |
| Capital | +47% |
| Fixed Costs | +19% |
| Seed Costs | −20% |
| Net Operating Profit | +12% |
Assessing Water Quality Before Installing a Chemical Injection System
Robert Flynn, Extension Agronomist, New Mexico State University
Low volume irrigation systems rely on small orifices that deliver 1/2 to 2 gallons of water per hour. Water, therefore, must be filtered so solid particles can’t plug the small emitters. Dissolved salts may crystallize within the emitter and cause flow reduction. Plugging is most commonly caused by precipitation of calcium carbonate. Other sources of plugging include microbial or chemical oxidation of iron or manganese, bacterial or algal growth, suspended solids, or a reaction of injected fertilizers with ions present in the water.
The plugging potential of water used for drip irrigation systems can be evaluated by testing for physical, chemical, and biological components. Table 1 summarizes what to test for and what values will cause problems.
Table 1. Plugging potential of irrigation water used for drip irrigation systems.
| Problem Parameter | None to Little | Potential Restrictions on Use Slight to Moderate |
Severe |
| Physical | |||
| Suspended solids (mg/L) | < 50 | 50–100 | > 100 |
| Chemical | |||
| pH | <7.0 | 7.0–8.0 | >8.0 |
| Dissolved solids (mg/L) | <500 | 500–2,000 | >2,000 |
| Manganese (mg/L) | <0.1 | 0.1–1.5 | >1.5 |
| Iron (mg/L) | <0.1 | 0.1–1.5 | >1.5 |
| Hydrogen sulfide (mg/L) | <0.5 | 0.5–2.0 | >2.0 |
| Biological | |||
| Bacterial populations (maximum number per mL) |
<10,000 | 10,000–50,000 | >50,000 |
Adapted from Water Analysis and Treatment Techniques to Control Emitter Plugging. F. S. Nakayama. From Proceedings of the Irrigation Association Conference, p. 21–24, Portland, Ore. Feb. 1982.
Most soil testing laboratories offer water quality analysis for the parameters listed above. Call a laboratory of your choice to obtain a description and price list for drip irrigation water analysis. Bacterial populations may need to be submitted to another laboratory, which will provide a sterile container and sample collection protocols. It is very easy to cause bias in results with sample contamination, no matter how careful the sample is collected.
Finally, before injecting any liquid other than water through the system, test for reactions by simply adding the liquid to the irrigation water. Immediate problems will develop quickly and avoid costly cleaning and downtime.
Managing Fertility in Drip-Irrigated Chile Production
Tim Hartz, Extension Vegetable Specialist, University of California-Davis
Converting to drip irrigation requires many production practice changes. Fertilizer management needs to be adjusted in both obvious and subtle ways. The following discussion covers the basics of managing nitrogen (N), phosphorus (P), and potassium (K) application for efficient chile production in New Mexico.
Phosphorus Management
Although drip irrigation offers the ability to apply P fertilizer throughout the growing season, this is generally not necessary. In most cases, all P requirements can be effectively met through a banded preplant application. The availability of P generally is most limiting in the early spring, when the soil temperature is cool and the plant root system small. The alkaline pH of most New Mexico soils also limits the solubility of phosphorus, keeping most P precipitated in chemical forms that are only available slowly. To maximize the availability of P in the early spring, banding fertilizer near the developing seedling is the best approach. The amount of P required will depend on the field’s soil test value.
The appropriate soil test procedure is the bicarbonate extraction, also called the Olsen test. If your commercial testing laboratory uses a different procedure, be sure it has local field trial data to calibrate the test. When using the bicarbonate test, I recommend banding 80–120 lb P2O5per acre if the soil is less than 10 ppm (parts per million) extractable P, and 50–80 lb P2O5if the soil is 10–20 ppm. Above 20 ppm, there may be no response to P fertilization. However, I advocate applying at least a small amount of P whenever planting in cool, alkaline soils. That small amount can be applied either as a preplant band, an at-planting “pop-up” fertilizer, or a drench applied with transplants.
P fertilizer can be applied through a drip system, but there are several potential problems and few benefits. If the drip line is buried 8–12 inches deep, the fertilizer may not be delivered as close as is ideal to the developing seedling. In alkaline soils, particularly those with any substantial clay content, drip-applied P does not move more than a few inches away from the drip line. Also, in alkaline irrigation water with high calcium content, P fertilizer may precipitate in the drip lines unless the water is acidified. This can be costly and a logistical hassle. Lastly, the most commonly fertigated form of P fertilizer, phosphoric acid, is considerably more expensive than the common, soil-applied, P fertilizers (10-34-0 or superphosphate, for example).
If done correctly, preplant or at-planting P fertilization by conventional means is as effective for the crop and at least as cost-effective as fertigation. During the season, plant tissue testing can document whether soil P availability is sufficient. If tissue P levels are low, a modest amount of P fertilizer can be applied through the drip, provided precautions are taken to prevent precipitation. In my experience, this is not common if preplant P application was appropriate, based on soil test results.
Potassium Management
Using drip irrigation actually may increase the need for K fertilization as compared with furrow-irrigated production. That’s because the root system tends to be concentrated in a smaller volume of soil. Also, when the drip system is buried, the top several inches of soil (which are the highest in K availability) remain too dry for active root growth. Lastly, the chile fruit contain large amounts of K, and if drip irrigation substantially increases fruit yield, plant K demand increases, too.
Again, fertilizer recommendations should be based on soil test results. The most appropriate test procedure is ammonium acetate extraction. Various laboratories have advocated other soil K tests, but nothing has proven to be as consistently successful in estimating K availability in the West’s mineral soils. Soils with more than 200 ppm of extractable K are unlikely to respond to K fertilization, regardless of irrigation technique. Many New Mexico soils will exceed this level and do not need K fertilization. Soils with less than 100 ppm should respond to K fertilization, particularly when drip irrigated. For soils below 100 ppm extractable K, applying 100–150 lb K2O per acre seasonally is appropriate, with drip-irrigated fields at the range’s top end. In drip-irrigated fields, I would apply a modest level of K (50–100 lb K2O per acre) for K levels between 100 and 150 ppm. In fields with extractable K between 150 and 200 ppm, there’s only a small chance that yield would respond to K fertilization.
If applying K is appropriate, it can be done preplant or by fertigation through the drip system. Because some soils tend to ‘fix’ applied K (make it unavailable for plant uptake), applying it in the irrigation water may be somewhat more effective. If you fertigate, apply most of the K when the plants are setting fruit, and the demand for K is highest. There are several soluble K fertilizers suitable to apply through drip, notably potassium chloride (KCl), potassium sulfate (K2SO4), and potassium thiosulfate (KTS). KCl is by far the cheapest. Some in the fertilizer industry contend that chloride can damage the crop, but at typical fertigation rates that should not be a significant problem.
Nitrogen Management
With N management, drip irrigation offers a clear benefit, allowing growers to apply N throughout the growing season and to respond to in-season soil or tissue analysis. In theory, because nitrogen leaching should be minimized with drip irrigation, less total N should be necessary. However, if water had been managed well with furrow irrigation, the N requirements should not change appreciably with the conversion to drip.
As a general rule, a seasonal total of 150–250 lb N per acre is required for chile production. Fields with heavier texture (which tend to have higher residual nitrate content in the spring and less leaching hazard) are at the lower end of the range. Lighter textured soils tend to require more N, since more leaching and less mineralization of organic N would be expected. If water is managed properly, a drip-irrigated field should rarely, if ever, require more than 250 lb N per acre.
A small amount of N should be applied preplant or at planting to ensure adequate N supply to young seedlings, but the majority of N should be fertigated incrementally over the season. Crop N uptake is slow until flowering and fruit set begin, so the amount of N required between germination (or transplanting) and the start of flowering is minimal. I recommend applying the bulk of the seasonal N during the 8–10 weeks following the appearance of the first flower buds. In most cases, weekly applications are as effective as more frequent fertigation, provided there’s proper water management. When drip irrigating a high fertility crop like chile, each inch of leaching during the season can remove as much as 25 lb of available N from the root zone. That appropriate irrigation scheduling is crucial to efficient N management.
In-Season Nutrient Monitoring
The preceding discussion outlines some general guidelines for macronutrient management with drip irrigation. To ensure that the practices employed are adequately supplying the crop, in-season nutrient monitoring may be necessary. This is particularly true for the first few years with drip. As time passes, your experience and confidence level with drip will grow.
Tissue analysis can be a valuable tool. Monitoring either whole leaf total N, P, and K, or petiole NO3-N, PO4-P, and K can give useful information. Total leaf nutrient content gives an overall indication of plant nutrient status, while petiole testing gives a more current estimate of recent crop nutrient uptake.
Table 1 gives some interpretive guidelines for tissue nutrient concentrations. These values have been compiled from a number of sources, although none from New Mexico. If your tissue values are substantially below the table values, there is cause for concern, and additional fertilizer is probably necessary. Values higher than the ranges given for P and K merely indicate that soil supply of those elements was particularly high, and there should be no detrimental consequences. But if petiole NO3-N or whole leaf % N far exceeds the range given, you might need to cut back on fertigation. Very high nitrogen availability can delay or reduce fruit set and make the plants so tall and vegetatively heavy that lodging can occur.
Table 1. Tissue nutrient sufficiency ranges for chile pepper.
| Growth stage |
Plant part sampled |
Nutrient form |
Sufficiency range in dry tissue |
Sufficiency range in petiole sap* |
| Vegetative growth |
Petiole of recently matured leaf Whole leaf |
NO3-N PO4-P K N P K |
7,000–12,000 ppm 2,500–4,000 ppm 5.5–7.0% 4.0–5.0 % 0.30–0.50 % 4.0–6.0 % |
900–1,400 ppm 3,000–4,000 ppm |
| Early flower | Petiole of recently matured leaf Whole leaf |
NO3-N PO4-P K N P K |
7,000v11,000 ppm 500–3,500 ppm 5.0–7.0 % 3.5–4.5 % 0.25–0.45% 3.5–6.0% |
800–1,200 ppm 3,000–4,000 ppm |
| Early green fruit | Petiole of recently matured leaf Whole leaf |
NO3-N PO4-P K N P K |
2,500–5,000 ppm 2,000–3,000 ppm 4.0–6.0% 2.5–4.0 % 0.20–0.40 % 2.5–4.5 % |
500–800 ppm 2,500–3,500 ppm |
| *The methods used to analyze petiole sap may be calibrated in ppm NO3 rather than NO3-N as usually reported by commercial labs analyzing dry samples. To convert sap NO3 to NO3-N, simply divide by 4.43 | ||||
Tissue analysis traditionally has been preferred by commercial testing laboratories on oven-dried samples. For petiole sampling, there are “quick test” methods by which a grower can estimate NO3-N, PO4-P, and K status without laboratory analysis. These methods are not as accurate as laboratory analysis, and the equipment is expensive. So, on-farm tissue analysis may not be a viable option for most growers. There are no accurate “quick test” methods to estimate whole leaf total N, P, or K levels.
In-season soil testing is useful only for available nitrogen. Available soil N will be primarily in the nitrate (NO3-N) form. A simple, soil ‘quick test’ procedure can be performed on-farm to evaluate the amount of NO3-N in the root zone (Appendix A). Using this test in conjunction with tissue testing will allow you to evaluate whether your N fertigation schedule is keeping pace with plant demand.
Maintenance of Microirrigation Systems
Larry Schwankl, Irrigation Specialist, University of California-Davis
Microirrigation systems are often automated and typically require less attention for irrigation purposes. Nonetheless, they may require a significant amount of maintenance to continue operating at maximum uniformity.
Routine maintenance can include checking for leaks, back washing filters, periodically flushing lines, chlorinating, and acidifying.
Cleaning Filters
Filters — whether screen or media — should be back washed periodically to clear any collected particulate or organic matter. Clogged filters can reduce pressure to the system, lowering the water application rate. Back washing can be done either manually or automatically. Depending on the design of the screen filter, manual back washing is accomplished either by physically removing and cleaning the screen or by opening a valve to allow water pressure to scrub the screen clean. Back washing the media filter manually requires initiating a backwash cycle in which water is circulated from bottom to top, causing the media to be suspended and agitated, which washes the particulate matter out of the filter media.
Automatic back washing of screen or media filters accomplishes the same task on an automatic, periodic basis. Most automatic backwash systems have an overriding pressure-sensing system that will initiate back washing, if a preset pressure differential across the filter is exceeded.
Flushing Lines
The main lines, submains, and particularly the lateral lines should be flushed periodically to clear away any accumulated particulates. Main lines and submains are flushed by opening the flush valve(s) built into the system for that purpose. When the system is designed, the flush valves should be made large enough to allow the water velocity to move particulates out.
Lateral lines are flushed by opening the lines and allowing them to clear. This is essential, since the filters trap only the large contaminants entering the system, causing lateral lines to collect material that may eventually clog the emitters. Flushing clears the system of many contaminants. Manifolding drip tape ends together allows them to be flushed in “blocks,” reducing the time and labor requirements for flushing.
How often the system should be flushed depends on the irrigation water quality and the degree of filtration. Generally, flushing should be performed biweekly, although less-frequent flushing may be adequate. The laterals also should be flushed following fertilizer or chemical injection and any periodic chlorine injection. Watch to see how much foreign material is removed during flushing. If very little foreign material is flushed out, especially from the lateral lines, flushing probably can take place less often. The reverse also holds true: If large amounts of material wash out during flushing, flush more often.
Chlorination
Water with a high organic load (algae, moss, bacterial slimes) should undergo chlorination with chlorine gas, sodium hypochlorite, or calcium hypochlorite. Whether chlorination should take place continually (1 to 2 ppm free chlorine at the lateral line end) or periodically (approximately 10 ppm free chlorine at lateral end) depends on the severity of the clogging. Continual chlorination usually is necessary when the clogging potential is severe. Surface water sources are more likely than groundwater sources to cause organic clogging. Well water pumped into and stored in a pond or reservoir should be considered a surface water source.
Acidification
Acidification may be required for irrigation water that tends to form chemical precipitates (lime or iron). Groundwater sources are most susceptible to chemical precipitation.
Acidification to lower the water’s pH to 7.0 or below usually will be sufficient to minimize chemical precipitate problems. Acids that can be added to the irrigation water include sulfuric, hydrochloric, or phosphoric acid. A nitrogen fertilizer/sulfuric acid mix is frequently used and is safer to handle. Acidification has the added benefit of increasing the efficacy of chlorine additions.
Less-Frequent Tasks
Other maintenance tasks to be carried out on a less-frequent basis include inspecting the filter media, inspecting the pressure-regulating valve, and replacing pressure gauges.
Filter media tend to cake together over time, and as a result, may fail to provide good filtration. Frequent back washing may be symptomatic of such a problem. Sand media should be replaced if this occurs. When the old media is removed, the underdrain system should be inspected. Even if the sand media appears to be in good condition, additional media may be added periodically, since some of the sand is invariably lost during the backwash cycle.
Adjustable pressure-regulating valves, set at installation, should be inspected and adjusted periodically to see that the correct operating pressure is maintained. Preset pressure-regulators should be inspected to ensure that they are operating properly. Foreign material in the line may jam the adjustment mechanism and inhibit operation.
Pressure gauges tend to wear out eventually and should be replaced if the accuracy is in question. Liquid-filled pressure gauges, which are slightly more expensive, may be a good replacement choice. Gauges must be scaled to operate in a pressure range appropriate to the system.
Assessing Water Quality
The irrigation water to be used in a drip system should be evaluated carefully to assess any potential clogging problems. Materials suspended in the water, such as sand, silt, and algae, can block emitter flow passages or settle out in the drip lines wherever water velocity is low. Constituents, such as calcium, bicarbonate, iron, manganese, and sulfide, also can precipitate to clog emitter flow passages. Where iron and manganese concentrations are high enough, iron slimes and bacteria can grow, clogging drip lines.
Criteria developed from numerous evaluations of the effect of water quality on emitter flow can be used to assess irrigation water for clogging potential (table 1).
Table 1. Relative clogging potential of irrigation water in microirrigation systems.
| Water characteristics | Minor | Moderate | Severe |
| Maximum suspended solids (ppm) | <50 | 50–100 | >100 |
| pH | <7.0 | 7.0–8.0 | >8.0 |
| Maximum total dissolved solids (ppm) | <500 | 500–2000 | >2000 |
| Maximum manganese concentration (ppm) | <0.1 | 0.1–1.5 | >1.5 |
| Maximum iron concentration (ppm) | <0.2 | 0.2–1.5 | >1.5 |
| Maximum hydrogen sulfide concentration (ppm) | <0.2 | 0.2–2.0 | >2.0 |
| Bacterial population (maximum number (per ml) | <10,000 | 10,000–50,000 | >50,000 |
| 1.Bicarbonate concentrations exceeding about 2 meq/liter and pH exceeding about 7.5 can cause calcium carbonate precipitation. 2.Calcium concentrations exceeding 2–3 meq/liter can cause precipitates to form during injection of some phosphate fertilizers. 3.High concentrations of sulfide ions can cause iron and manganese precipitation. Iron and manganese sulfides are very insoluble, even in acid solutions. |
|||
Chemical Constituents
Irrigation water should be analyzed for the following:
- electrical conductivity (EC)—a measure of the total dissolved salts (TDS). An approximate equation relating TDS to EC is: TDS (ppm) = 640 × EC (dS/m or mmhos/cm)
- pH
- calcium (Ca)
- magnesium (Mg)
- sodium (Na)
- chloride (Cl)
- sulfate (SO4)
- carbonate/bicarbonate (CO3 / HCO3)
- iron (Fe)
- manganese (Mn)
Units of Measurement
The most common measurement unit for reporting concentrations is parts per million (ppm). Concentrations also are reported as milligrams per liter (mg/l). For practical purposes, ppm equals mg/l for irrigation water.
Concentrations may be reported in kilograms per cubic meters (kg/m3), which is the SI unit. Kg/m3 is the same as mg/l.
Concentrations also may be reported in millie-quivalents per liter (meq/l). Conversion factors (table 2) are needed to convert from mg/l to meq/l and vice versa.
Grains per gallon may be used as a concentration unit. To convert grains per gallon to mg/l, multiply the grains per gallon by 17.12.
Table 2. Conversion factors: parts per million and milliequivalents per liter.
| Constituent | Convert ppm to meq/l | Convert meq/l to ppm |
| --------- multiply by --------- | ||
| Na (sodium) | 0.043 | 23 |
| Ca (calcium) | 0.050 | 20 |
| Mg (magnesium) | 0.083 | 12 |
| Cl (chloride) | 0.029 | 35 |
| SO4 (sulfate) | 0.021 | 48 |
| CO3 (carbonate) | 0.033 | 30 |
| HCO3 (bicarbonate) | 0.016 | 61 |
Examples:
- convert 415 ppm of Na to meq/l:
meq/l = 0.043 × 415 ppm = 17.8 - convert 10 meq/l of SO4 to ppm:
ppm = 48 × 10 meq/l = 480
The quality of the data should be evaluated using the following procedures:
- a. The sum of the cations (Ca, Mg, and Na), expressed in milliequivalents per liter (meg/l) should about equal the sum of the anions (Cl, CO3, HCO3, and SO4). If the sums are exactly equal, then one of the constituents was found by differences.
- b. The sum of the cations and the sum of the anions should each equal about 10 times the EC.
If these procedures reveal poor quality, the chemical analysis should be repeated.
Evaluating Water Quality
The following steps are guidelines for evaluating water quality. Refer to table 1 for assistance.
- What is the total dissolved solids concentration? If the electrical conductivity is given only, multiply this EC (mmhos/cm) by 640 to determine the total dissolved solids.
- What is the calcium concentration? If the calcium concentration exceeds 2-3 meq/l, read the section entitled “Chemical Precipitate Clogging.”
- What is the bicarbonate concentration? If the bicarbonate concentration exceeds about 2 meq/l, read the section entitled “Chemical Precipitate Clogging.”
- What is the iron and manganese concentrations? If either concentration exceeds about 0.2 ppm, read the section entitled “Chemical Precipitate Clogging.”
Water’s hardness and alkalinity may be reported in a water analysis, although these characteristics normally are not used for assessing potential clogging problems in drip irrigation.
Hardness and Alkalinity
Water’s hardness is due primarily to calcium and magnesium ions. Hard water tends to precipitate calcium carbonate. Thus, the higher the hardness, expressed in terms of calcium carbonate, the higher the potential for calcium carbonate precipitation in drip irrigation systems. Classifications of hardness are:
| 0-75 mg/l | soft |
| 75-150 mg/l | moderately hard |
| 150-300 mg/l | hard |
| more than 300 mg/l | very hard |
Water’s alkalinity is a measure of its ability to neutralize acids. Alkalinity is caused mostly by carbonate and bicarbonate ions. Decreasing the pH of water with a high alkalinity will require more acid than water with a lower alkalinity.
Table 3 gives water quality data from the analysis of two irrigation water samples. Examples 1 and 2 use the water quality data from table 2 to evaluate the clogging potential of these irrigation waters.
Table 3. Water quality analysis of two irrigation water samples.
| Water 1 | Water 2 |
| EC = 2.51 dS/m (1900 ppm)1 | EC = 0.87 dS/m (560 ppm)2 |
| pH = 7.4 | pH = 7.7 |
| Ca = 13.3 meq/l | Ca = 1.9 meq/l |
| Mg = 10.1 meq/l | Mg =1.3 meq/l |
| Na = 5.4 meq/l | Na = 5.5 meq/l |
| Cl = 4.5 meq/l | Cl = 2.0 meq/l |
| HCO3 = 5.2 meq/l | HCO3 = 2.0 meq/l |
| SO4 = 19 meq/l | SO4 = 4.7 meq/l |
| Mn = less than 0.1 ppm | Mn = 2.6 ppm |
| Fe = less than 0.1 ppm | Fe = 0.65 ppm |
| 1Total dissolved salts = 757 × EC 2Total dissolved salts = 644 × EC |
|
Examples:
- The relatively high total dissolved salts (TDS) (1,900 ppm) indicates that Water 1 has some clogging potential. This is verified by the relatively high bicarbonate concentration (5.2 meq/l) compared with the standard of 2.0 meq/l. The calcium concentration and the bicarbonate concentration together suggest that calcium carbonate could clog the emitters, particularly if the pH were to rise as a result of any chemical injection. The iron and manganese concentrations indicate little potential for clogging from precipitation of those elements.
- The analysis of Water 2 reveals little potential for clogging from total dissolved salts (560 ppm), but the pH and bicarbonate concentrations indicate that clogging might result from calcium carbonate precipitation. The manganese and iron levels indicate a severe potential for clogging from manganese oxide precipitation and iron oxide precipitation.
Chlorination
Chlorine often is added to irrigation water to oxidize and destroy biological microorganisms, such as algae and bacterial slimes. While these microorganisms may be present in water from any source, they are most likely to be present at high levels in surface water from rivers, canals, reservoirs, and ponds.
When water containing high levels of microorganisms is introduced into a microirrigation system, emitters can become clogged. Using good filters, such as media filters, and acidifying the water can cut down on organic clogging, but the best way to deal with the problem is to add a biocide, such as chlorine.
Dissolving chlorine in water produces hypochlorous acid, which becomes ionized, forming an equilibrium between the hypochlorous acid and hypochlorite. This is referred to collectively as the free available chlorine. Hypochlorous acid is a more powerful biocide than hypochlorite. Acidifying the water tends to favor the production of hypochlorous acid and, thus, makes the added chlorine more effective. It is important not to mix chlorine and acids together, since this causes toxic chlorine gas to form.
Sources of Chlorine
The most common chlorine sources are sodium hypochlorite (a liquid), calcium hypochlorite (powder or granules), and chlorine gas.
Sodium hypochlorite usually has up to 15% available chlorine. Household bleach is sodium hypochlorite with 5.25% active chlorine. To determine the chlorine injection rate when using sodium hypochlorite, use the following formula:
Chlorine injection rate (gal/hour) = System flow rate (gpm) × Desired chlorine concentration (ppm) × 0.006 ÷ Strength of chlorine solution (%)
Example: Determine the appropriate injection rate of household bleach (5.25% active chlorine) to obtain a 5 ppm chlorine level in the irrigation system water. The irrigation system flow rate is 100 gpm.
Chlorine injection = 100 gpm × 5 ppm × 0.006 ÷ 5.25% = 0.57 gal/hr
Calcium hypochlorite with 65-70% available chlorine usually can be obtained. In using the formula given above, note that 12.8 pounds of calcium hypochlorite added to 100 gallons of water will form a 1% chlorine solution. A 2% chlorine solution would, therefore, require adding 25.6 pounds of calcium hypochlorite to 100 gallons of water. Any chlorine stock solution can be mixed following the same pattern.
Chlorine gas contains 100% available chlorine. While using chlorine gas generally is considered the least expensive method of injecting chlorine, it also is the most hazardous and requires extensive safety precautions. The chlorine gas injection rate can be determined from the following formula:
Chlorine gas injection rate (lb/day) = System flow rate (gpm) × Desired chlorine concentration (ppm) × 0.012
If the irrigation water has high levels of algae and bacteria, continuous chlorination may be necessary. The recommended level of free available chlorine is 1 to 2 ppm measured at the end of the farthest lateral with a good quality pool/spa chlorine test kit.
Periodic injection (once every two to three weeks) at a higher chlorine rate (10-20 ppm) may be appropriate where algae and bacterial slimes are less problematic. How often chlorine should be injected depends on the extent of organic clogging.
Superchlorination—bringing chlorine concentrations to within 500 to 1,000 ppm—is recommended for reclaiming microirrigation systems clogged by algae and bacterial slimes. Superchlorination requires special care to avoid damage to plants and irrigation components.
Precautions
Follow these precautions when performing chlorination:
- Inject the chlorine upstream from the filter to help keep the filter clean and to allow the filter to remove any precipitates caused by the chlorine injection. Chlorine, an effective oxidizing agent, will cause any iron and manganese in the water to precipitate and clog the emitters.
- Store chlorine compounds separately in fiberglass or epoxy-coated plastic tanks. Acids and chlorine should never be stored together.
- Do not inject chlorine when fertilizers, herbicides, and insecticides are being injected, since the chlorine may destroy the effectiveness of these compounds.
- Always add the chlorine source (dry or liquid) to the water, not vice versa, when mixing stock chlorine solutions.
Chemical Precipitate Clogging
Precipitating chemicals and organic contaminants can clog microirrigation systems. When a microirrigation system using groundwater for irrigation becomes clogged, the cause usually is chemical precipitation from calcium carbonate (lime), iron, or manganese in the irrigation water.
Lime Precipitation
Calcium carbonate (lime) precipitation is the most common cause of chemical clogging in microirrigation. Water with a pH of 7.5 or above and bicarbonate levels of 2 meq/l (120 ppm) is susceptible to lime precipitation, if comparable calcium levels are present naturally in the system or if a compound containing calcium is injected into the system.
The usual treatment for lime precipitation is to acidify the water to lower the pH to 7.0 or below. Litmus paper, colormetric kits, or portable pH meters can be used to determine the water’s pH. Sulfuric acid usually is used to reduce pH, but phosphoric acid and hydrochloric acid also may be used. Since handling acids is hazardous, some water managers prefer to use one of the safer acid/fertilizer compounds now available. Researchers are evaluating other compounds—including a phosphonate material and several polymer materials—to determine their efficacy in preventing calcium carbonate precipitation.
Iron and Manganese
Iron and manganese precipitation can cause clogging even at low concentrations: iron at 0.3 ppm or greater, manganese at 0.15 ppm or greater. These compounds, which are most often present in groundwater, are in a soluble reduced state in the well. But they oxidize and precipitate as very small but solid particles when exposed to the atmosphere. Iron and manganese will precipitate across a wide range of pH levels. Iron, for example, will precipitate at pH 4.0-9.5 which includes the levels of almost all naturally occurring waters.
Iron precipitate is characterized by a reddish stain and rust particles in the water. Manganese precipitate has a similar appearance, but the stain is darker—nearly black in color.
Iron/manganese precipitation is further complicated by bacteria that use iron/manganese as energy sources. These bacteria form filamentous slimes that can clog filters and emitters and can also provide the matrix or glue that holds other contaminants in the system. Iron bacteria can be controlled by injecting chlorine continually at 1-2 ppm residual (at the end of the line) or intermittently at 10-20 ppm residual.
How to Mitigate Chemical Iron or Manganese Precipitation
The following measures can be taken to mitigate chemical iron or manganese precipitation:
Aeration and Settling. Water can be pumped into a pond or reservoir and allowed to aerate from contact with the atmosphere. The iron precipitate is then allowed to settle out. Additional aeration may be necessary to ensure that the iron is oxidized. After the iron settles, the water can be drawn off for use.
Chlorine Precipitation and Filtration. Injecting chlorine into the water will oxidize the dissolved (ferrous) iron, causing it to precipitate. The precipitated iron (ferric oxide) can then be filtered out, preferably with a sand media filter, which can be readily back washed.
pH Control. Where the potential for iron precipitation exists, lowering the pH in the system to less than 4.0 will keep the iron from precipitating. The cost of this practice may limit its use.
Chelation. In municipal water treatment, a polyphosphate, such as sodium hexametaphosphate, is added to the water before the iron is oxidized. This prevents agglomeration of the small individual particles. The recommended injection rate is 2 mg/l of sodium hexametaphosphate for each 1 mg/l of iron or manganese. Since this practice is expensive, it should only be used in agricultural systems after careful evaluation.
Miscellaneous Compounds
Other compounds that can cause clogging include magnesium carbonate, calcium sulfate, and zinc injected in sulfate form. Adding anhydrous or aqua ammonia to irrigation water will increase its pH, possibly facilitating the precipitation of calcium or magnesium compounds. Adding phosphate fertilizers also may cause the phosphate to react with calcium or magnesium, resulting in a precipitate. This can be prevented by adding acid to significantly lower the water’s pH.
Recommended treatments for various types of chemical and biological clogging are summarized (table 4).
Table 4. Water treatments to prevent clogging in microirrigation systems.
| Problem | Treatment Options |
| Carbonate precipitation (white precipitate) HCO3 greater than 2.0 meq/l pH greater than 7.5 |
|
| Iron precipitation (reddish precipitate) Iron concentrations greater than 0.1ppm |
|
| Manganese precipitation (black precipitate) Manganese concentrations greater than 0.1 ppm Iron bacteria (reddish slime) Iron concentrations greater than 0.1 ppm |
|
| Sulfur bacteria (white cottonlike slime) Sulfide concentrations greater than 0.1 ppm Algae, slime |
|
| Iron sulfide (black, sandlike material) Iron and sulfide concentrations |
|
Nitrate Testing in Chile Pepper
Tanya Cardenas, Agricultural Assistant, New Mexico State University
Nitrogen (N), the food most often applied to chile plants as a fertilizer, is responsible for green leafy growth. The amount and timing of N applications can be determined with a nitrate (NO3) meter. Nitrogen meters measure nitrate-nitrogen (NO3-N) in the sap of the petiole (leaf stem). They also are called ion meters, Cardy meters, or sap testers.
There are many economic advantages to using nitrate meters. For example, growers can use them to monitor N levels in the crop, helping to ensure a high yield.
Use the following procedure to test for N:
- Collect a representative sample of 24 leaves from the field in question. It is important that the petiole or stem be collected with the leaf.
- Select recently matured, disease-free leaves from high on the plant.
- Place the leaves in a paper or plastic bag labeled for identification purposes.
- Place the leaves in a cooler to protect them from heat.
- Take readings indoors or in a shaded location for best results.
- Using a sharp knife and cutting board, trim the leaf blade away.
- Retain the petiole (leaf stem) and the lower inch of the midrib.
- Chop or dice the petioles.
- Calibrate the meter using two standard solutions for nitrate-nitrogen.
- Put the chopped petioles in a garlic press and squeeze three drops of sap onto the meter’s sensor.
- . Allow the meter reading (ppm nitrate-nitrogen) to stabilize (approximately 30 seconds) and record the value.
- Rinse the sensor with distilled water after each use and blot dry.
- Repeat steps 4 and 5 a second and third time, if possible.
- Calculate a reading average.
- To interpret the reading, refer to table 1.
Table 1. Guidelines for interpreting nitrate testing results: sufficiency levels for NO3-N in chile pepper petiole sap.
| Growth Stage | Concentration (ppm) |
| Vegetative growth | 900 – 1400 |
| First open flowers | 800 – 1200 |
| Early fruiting | 500 – 800 |
Readings can be graphed to monitor nitrate levels throughout the growing season. Fig. 1 shows nitrate levels for chile at Rincon.

Fig. 1. Nitrate-nitrogen concentration in fresh sap of chile pepper ar Rincon Farm, 2000 (drip irrigated).
Nitrate meters enable growers to quickly measure N levels in crops. The results allow growers to apply the right amount of N fertilizer at the right time, thus helping ensure a high yield.
Nitrate meters also are portable, quick, and available for about $400. However, there are some disadvantages. Many leaves are needed, and the meters are sensitive to heat and light. Also, guidelines are only available for Florida and California.
References
Hartz, T.K., and G.J. Hochmuth. 1995. Fertility management of drip-irrigated vegetable. University of California-Davis Vegetable Research and Information Center.
Hochmuth, G.J. 1994. Plant petiole sap-testing for vegetable crops. University of Florida, Horticultural Sciences Department. Circular 1144.
Hochmuth, G.J. 1990. Pepper production guide for Florida: fertilization. University of Florida, Circular SP 215.
Spectrum Technologies, Inc 1997. Operation manual for Cardy Nitrate Meter, Plainfield, IL.
Pesticides and Drip
Brad Lewis, Entomology Specialist, New Mexico State University
General advantages of using drip irrigation include water conservation, increased yield potential, and reduced costs. Using drip as an alternative to applying pesticides currently is not one of the system’s primary benefits. For pesticides intended use through drip, benefits may include reductions in field traffic, pesticide rates, and employee pesticide exposure. Additionally, a properly conducted pesticide application through drip can reduce the pesticide’s impact on the environment and on beneficial organisms. The efficacy of certain pesticides also may be improved when the application is made through drip compared to a conventional application method. However, there are some disadvantages. Relatively few pesticides are intended for use with drip, time is required to monitor the system during an application, and it is difficult to determine where a pesticide is placed or where it moves in the soil profile.
In the wording of a pesticide label, chemigation is either not mentioned, is prohibited, or is allowed for specific uses. Those registrations that allow for its use define the safety equipment required, specific injection system, whether the intended use is with drip or overhead systems, rate of application, and the specific crop. There are more than 50 registrations that allow a pesticide to be used in an overhead system. These registrations include insecticides, herbicides, fungicides, and several products with some degree of nematicidal activity. There are eight pesticides registered for use with drip (Appendix B). Drip registrations include a limited number of crops that can be treated with Di-Syston 8, Dimethoate, Diazinon, Admire, Mocap, Vydate, Chloropicrin, and Telone II. Currently, pesticides intended for use through drip do not control the majority of stalk, fruit, and leaf feeding larvae, foliar pathogens, or weeds.
Pesticide application through drip works well with the use of Telone II and Chloropicrin to control nematodes and soil pathogens; Diazinon as a rescue treatment for root feeding and soil inhabiting arthropods; and Admire 2F and Di-Syston 8 to control aphids, whiteflies, and some thrip species. Using Admire 2F in drip systems has increased significantly over the past several years. Reasons include the relative immobility of the product in soils, excellent activity on aphids, long residual effects with a relatively small amount, and the positive environmental profile. Using Telone II to suppress some nematode species, primarily root knot, also has increased significantly. Applying Telone II through drip normally results in a more uniform application than with shanks.
Once injected into the drip system, pesticide movement from the tape is dependent on soil type, soil moisture, the pesticide’s physical properties, and the duration and timing of the injection. Injecting a pesticide in a sandy, wet soil early in the irrigation cycle contributes to leeching of both mobile and nonmobile pesticides. Injecting a pesticide late in the irrigation cycle and timed with the plant’s water needs minimizes pesticide movement. Pesticide movement in the soil can be down, up or lateral. Irrigations that result in “puddling” on the surface will more than likely result in pesticide movement to the surface when they are chemigated. Movement will either enhance or reduce pesticide performance and consistency.
Fertigation and Injection Systems
Larry Schwankl, Irrigation Specialist, University of California - Davis
Fertigation is the injection of fertilizers through the irrigation system. Microirrigation systems are well suited to fertigation because of their frequency of operation and because water application can be easily controlled by the manager. Applying fertilizers through a microirrigation system:
- Allows fertilizer distribution to be as uniform as the water application.
- Allows flexibility in timing fertilizer application.
- Reduces the labor required for applying fertilizer compared to other methods.
- Allows less fertilizer to be applied compared to other fertilization methods.
- Can lower costs.
In order to be injected, fertilizers must be soluble. Fertilizers delivered as a solution can be injected directly into the irrigation system, while those in a dry granular or crystalline form must be mixed with water to form a solution. Fertilizer materials differ widely in water solubility, with solubility depending on the physical properties of the fertilizer as well as on irrigation water temperature and pH. Dry fertilizers are mixed into a tank containing water until the granules or crystals are dissolved and the desired concentration is reached. The solution is then injected into the irrigation system. With use of solutionizer injection machines, the injected material may be in a slurry form, which goes into solution once it is mixed with the irrigation water.
Nitrogen Sources
The fertilizer most commonly injected is nitrogen, with many soluble nitrogen sources working well in fertigation. The following is a list of common nitrogen sources, with information on their use in fertigation:
Anhydrous Ammonia or Aqua Ammonia. These nitrogen sources cause an increase in water pH, which may result in a precipitate if calcium or magnesium is present in the irrigation water along with comparable levels of bicarbonate. Volatilization of nitrogen (loss to the atmosphere) also may occur when anhydrous or aqua ammonia is used.
Urea. Urea is relatively soluble in irrigation water and is not strongly held by soil particles, so it moves deeper into the soil than the ammonia products. Urea is transformed by hydrolysis into ammonium, which is then fixed to the soil particles.
Ammonium Sulfate. Ammonium sulfate, ammonium nitrate, and potassium nitrate are all relatively soluble in water and cause only a slight shift in the soil or water pH.
Calcium Nitrate. Calcium nitrate is relatively soluble in water and causes only a slight shift in the soil or water pH. If the water is high in bicarbonate, however, the calcium content may lead to precipitation of calcium carbonate (lime).
Ammonium Phosphate. Ammonium phosphate also can cause soil acidification. If calcium or magnesium levels are high enough in the irrigation water, precipitates also may form, which can clog the drip emitters. (See the discussion under phosphate sources below for precautions in using ammonium phosphate.)
Phosphate Sources
Using phosphate fertilizers may cause chemical or physical precipitate clogging. The calcium and magnesium content and the pH of the irrigation water should be considered, since calcium phosphate and magnesium phosphate precipitates may form when the water pH is higher than 7.5. Acidifying the water with sulfuric acid or using phosphoric acid keeps the irrigation water pH low and minimizes precipitation problems.
Phosphorous is quickly fixed to soil particles and does not move readily into the soil profile, but it has been found to move more easily under microirrigation than under conventional irrigation methods.
Potassium Sources
Injecting potassium fertilizers usually causes few problems, but caution should be observed if potassium fertilizers are mixed with other fertilizers. Potassium, like phosphorous, is fixed by soil particles and does not move readily through the soil profile.
Potassium usually is applied in the form of potassium chloride. But for crops sensitive to chloride, potassium sulfate or potassium nitrate may be more appropriate. Potassium sulfate is not very soluble and may not dissolve well in the irrigation water.
Injection Devices
Chemicals are often injected through irrigation systems, particularly microirrigation (drip and microsprinkler) systems. This process, known as chemigation, allows a manager to apply chemicals at any time without the need for equipment in the field. Chemigation both increases the efficiency of chemical application—resulting in decreased chemical use and cost—and reduces the hazard to those handling and applying the chemicals. It also is less potentially harmful to the environment, when compared with air applications, for instance, which may allow chemical wind drift. However, chemigation still can cause environmental damage, particularly when the chemicals injected move readily with the irrigation water. Too much irrigation, resulting in deep percolation, can contaminate groundwater when a mobile chemical is injected.
Many different substances can be injected through irrigation systems, including chlorine, acid, fertilizers, herbicides, micronutrients, nematicides, and fungicides. Of these, fertilizers are the substances most commonly injected. Chlorine or acid injection is used in microirrigation systems to prevent clogging caused by biological growths (algae and bacterial slimes) and chemical precipitation (particularly calcium carbonate).
There is a variety of chemical injection equipment from which to choose, including differential pressure tanks, venturi devices, positive displacement pumps, small centrifugal pumps, and solutionizer machines.
Differential Pressure Tanks
Differential pressure tanks, often referred to as “batch tanks,” are the simplest of the injection devices. The inlet of a batch tank is connected to the irrigation system at a point of pressure higher than that of the outlet connection. This pressure differential causes irrigation water to flow through the batch tank containing the chemical to be injected. As the irrigation water flows through the batch tank, some of the chemical goes into solution and passes out of the tank and into the downstream irrigation system. Because the batch tank is connected to the irrigation system, it must be able to withstand the operating pressure of the irrigation system.
While relatively inexpensive and simple to use, batch tanks do have a disadvantage. As irrigation continues, the chemical mixture in the tank becomes more and more dilute, decreasing the concentration in the irrigation water (fig. 1). If a set amount of a chemical, such as a fertilizer, is to be injected and concentration during the injection is not critical, use of batch tanks may be appropriate. If the chemical concentration must be kept relatively constant during injection, batch tanks are not appropriate.
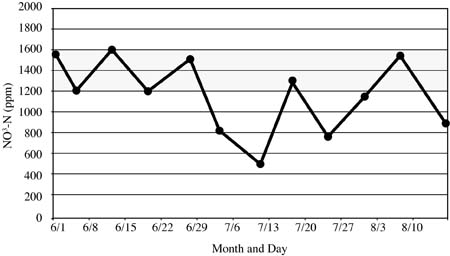
Fig. 1. Chemical concentration levels during injection using a batch tank, venturi injector and positive displacement pump.
Venturi Devices
Venturi devices (fig. 2)—often referred to as “mazzei injectors”—consist of a constriction in a pipe’s flow area, resulting in a negative pressure or suction at the throat of the constriction. Mazzei is a trade name for a particular brand of venturi injector. Venturi injectors also are available from other manufacturers.
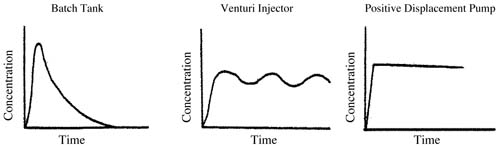
Fig. 2. Venturi device.
The venturi injector frequently is installed across a valve or other point where between 10 and 30 percent of the pressure is lost because of friction in the venturi. This means that the venturi injector’s inlet must be at a pressure 10 to 30 percent higher than the outlet port. Because of these significant pressure losses, the injector should be installed parallel to the pipeline so that flow through the injector can be turned off with a valve when injection is not occurring. The venturi device’s injection rate is determined by the venturi’s size and the pressure differential between inlet and outlet ports. Injection rates as high as 700 gallons per hour are possible with large venturi devices.
Venturi injectors also can be installed with a small centrifugal pump, which draws water from the irrigation system, increases its pressure while moving the water through the venturi, and then returns the water and chemical back into the irrigation system.
Venturi devices are inexpensive and relatively simple to operate, but they do not inject chemicals at as constant a rate as positive displacement pumps. However, injecting with venturi devices may be sufficiently accurate for some applications, such as a fertilizer injection.
Positive Displacement Pumps
Positive displacement pumps are piston or diaphragm pumps that inject at precise rates. The pumps are powered by electricity or gasoline or are driven by water. The water-driven pumps can be installed in locations that lack power. When a constant and precise injection concentration is needed, positive displacement pumps are preferable (fig. 1).
Positive displacement pumps are the most expensive of the injection devices, with costs for electric pumps running $750 or more.
Centrifugal Pumps
A centrifugal pump often is used for injecting fertilizers. These pumps have a greater flow rate than do the positive displacement pumps or most venturi injectors, making them appropriate for higher injection rate applications. The centrifugal pumps can be driven either by electricity or gas. Using the centrifugal pump in conjunction with a flow meter can be helpful in controlling the injection rate.
Solutionizer Machines
Solutionizer machines were developed to inject materials that are not readily soluble. Their most common use is for injecting finely ground gypsum through the irrigation system, but they also are used to inject fertilizer products, such as potassium sulfate.
The solutionizer machines inject a slurry of material into the irrigation line where it then mixes and goes into solution. In microirrigation systems, it is important that these materials be injected upstream of the system filters to ensure that insoluble materials are filtered out and do not clog the emitters. For example, gypsum materials, which are 95% pure, may still contain up to 5% insoluble materials. This would mean that for every 100 lb of gypsum material injected, 5 lb of insoluble material might be present. Dry fertilizer materials may also contain significant insoluble material.
Injection Point
The injection point should be located so that the injected fertilizer and the irrigation water can mix thoroughly, well upstream of any flow branching. Because of concerns about fertilizers being flushed out when the microirrigation system filters are back washed, the injection point should be downstream of the filters. To ensure that no contaminants are injected into the microirrigation system, a good quality screen or disk filter should be installed on the line between the chemical tank and the injector.
The system should be allowed to fill and come up to full pressure before injection begins. Following injection, the system should be operated to flush the fertilizer from the lines. Leaving residual fertilizer in the line may encourage clogging from chemical precipitates or organic sources, such as bacterial slimes.
Preventing Backflow
Contamination can occur if the irrigation water pumping plant shuts down while the injection equipment continues to operate, causing contamination of the water source or unnecessary amounts of fertilizer to be injected into the irrigation system; or the injection equipment stops while the irrigation system continues to operate, causing the irrigation water to flow into the chemical supply tank and overflow onto the ground.
Backflow prevention devices, including vacuum breakers (atmospheric and pressure types) and check valves (single and double) are available. Local regulations should be followed in selecting and using these devices.
If the injection pump is electrically driven, an interlock should be installed so that the injection pump will stop if the irrigation system pump shuts down. To keep water from flowing backward into the chemical tank, a check valve or solenoid valve, normally kept closed, can be installed in the injection line following the injector. If an electrical solenoid valve is used, it should be connected to the injector pump and interlocked with the irrigation pump.
Chemigating Uniformly
Once injection begins, the injected material does not immediately reach the emitters. There is a “travel time” for water and injected chemical to move through a microirrigation system. Measurements on commercial orchards indicate that this travel time may range from 30 minutes to well over an hour, depending on the microirrigation system design. To ensure that applying any injected material is as uniform as the water applications, the following steps should be taken:
Step 1. Determine the travel time of chemicals to the farthest point hydraulically in the microirrigation system. This is a one-time determination and can be done by injecting chlorine into the microirrigation system (a good maintenance procedure anyway) and tracing its movement through the system by testing the water for chlorine with a pool/spa test kit.
Step 2. The injection period should be at least as long as it takes the injected material to reach the end of the last lateral line (determined in Step 1). A longer injection period is even better.
Step 3. Once injection is stopped, the irrigation should continue for as long as it took the injected material to reach the end of the farthest lateral (determined in Step 1). A longer, post-injection irrigation period is even better.
Make sure, especially with injected materials that easily travel with the water (nitrate materials), that there is no overirrigation, which moves water (and injected material) through the root zone. Such overirrigation could waste the injected material and lead to groundwater contamination.
Grower Panel Discussion and Questions
Allen Akers, New Mexico Chile Inc., Columbus, N.M.
Dino Cervantes, Cervantes Enterprices, La Mesa, N.M.
Dirk Keeler, New Mexico Irrigation, Deming, N.M.
James Johnson, W.R. Johnson & Sons, Columbus, N.M.
Francis Schiflett, Uvas Valley Farms, Deming, N.M.
Larry Schwankl, Irrigation Specialist University of California-Davis
Howard Wuertz, Sundance Farms, Coolidge, Ariz.
The moderator for the panel discussion was Robert F. Bevaqua. He asked each panel member to answer the following questions:
- How may years have you been using drip irrigation?
- What crops do you use drip irrigation on?
- How has drip irrigation, and particularly the injection systems, enabled you to maximize profits and minimize costs?
Allen Akers
Crops grown under drip at our farm in Columbus, N.M., include wheat, milo, chile, onion, spinach, watermelons, artichokes, sweet corn, etc. Every crop we’ve put on it has responded very favorably. We’ve had the system six seasons. We were at Sundance Farms and met up with Howard Wvertz’ guys about six seasons ago and made the decision to try some drip irrigation. Ever since then, we’ve put in so much more every year. We’ve been extremely satisfied with the system. We’ve modified it some since then. We’ve gone to better filtration and better versions of tape.
The number one thing with the drip in our area (because we don’t have the luxury of pumping out of the canals like some of you do, we’re using underground water) is the saving in water. The pumping costs are extremely high, so the ability to save about 50% of our water allows us to double the acres, at least, with the same well. Labor costs are another thing. We used to have a lot of irrigators with trucks and siphon tubes. Drip does away with a lot of that. It doesn’t take long for a couple of guys to cost you a lot of money. The irrigator is handling one of your most valuable commodities on your farm–water. The success of your crop may be determined by how good an irrigator he is. But the drip has proven itself very quickly.
Road graders in our area are another thing. We used to use a road grader to cut a tail water ditch. With the drip, that was eliminated. All the road grader does now is grade weeds. There is less field maintenance when you use drip irrigation.
The response time using chemicals in the drip, even though there are only a few of them that you can use, is very quick. The response time to kill insects or the insect pressure, is very quick, because you have an excellent conveying system for chemicals, fertilizers, and pesticides. With the ease of injecting systems, there is no doubt that fertilizers are being put right at the root zone. We bury our tape 8 inches deep, and we have good uniformity. We have a good design. Dirk Keeler had been designing these systems for us for about 5 years. Uniformity is very important. A good design is of the utmost importance. Also, you can fine-tune a crop. You can push a crop with drip and with the help of a good agronomist. We can fine-tune a crop with fertilizers.
When you make a change with drip, you can quickly see your success with an insecticide, pesticide, or fertilizer. You do reduce the amount of fertilizer used. It is an extremely good tool. We try to put in so much every year, and we’re up to 1,200 acres at the moment. This all started out there at Sundance Farms, about 7 years ago when we saw what Howard Wuertz and the guys were doing out at Sundance. They do an excellent job.
Dino Cervantes
We were sold a system after seeing what Sundance Farms was doing in Arizona. After listening to Howard Wuertz talk for about half a day, we figured out quickly that this the way of the future for farming. The only way that we could remain competitive was to go to drip. We put in a system in 1992. We started out with 10 acres, and we increased that to 130-140 acres in 1993. When I put it in, the idea was that we were going to leave it in for 5 years without touching it, without making any larger investments, or cutting it back. I wanted to evaluate it on a 5-year period and rotate different crops in and out of it. Our normal rotation is typically 3 years in and out of peppers, which is our money crop. We wanted to look at a complete rotation twice before we committed to doing anything further.
The crops that were grown on it were chile, onions, corn for silage, which caused us some problems that I’ll get into later, melons, cotton and pumpkins. We’ve had great response and great yields in everything. I mentioned the silage corn, because really the only problem we’ve had is plugging because of equipment running over the drip lines when our soil moisture is at a higher level. We are going to have to pull out about 1/3 of our acreage this year and reinject the tape. The major reason is that the tape was plugged up by heavy equipment running over the lines during harvest. So it is something that you want to consider when you go through this. I know that a couple of years ago Howard, was trying to go to what he called permanent path systems. These are basically furrows, and you run your equipment along these furrows all the time and you don’t go on top of the bed. That’s one way to consider it. But whatever you do, some of the heavy equipment that you run through there requires that your soil be prepared correctly for harvest (as well as it does when you go through seeding).
As Allen (Akers) mentioned earlier, we have seen an enormous amount of labor savings. There is one thing I would disagree with Jerry (Hawkes) on. Jerry mentioned that your equipment costs are higher. One of the reasons that we went into drip irrigation was because our equipment costs were lower when we penciled it out. Typically, on our farm, we need about a 120-140 horsepower tractor for every 300 acres. So for 500 acres, we would’ve needed two tractors. With drip irrigation we can get by with one tractor, because we don’t make as many passes. Typically on a chile crop, we were running somewhere between 20 and 25 passes a year across it for spraying, cultivating, planting, etc. Now we are running in the neighborhood of 10, maybe 12, on a bad year. So we were able to cut our tractor passes. I traded off the cost of the tractor for my filtration unit. So really when it came down to it, the only real cost to us was the tape and header lines.
I think the other big mistake that we probably made or maybe it was just not understanding it… but we’ve got a nutsedge problem on a large part of our drip irrigation fields. Brad Lewis talked briefly about weed control. Weed control is a little bit of a problem, because you don’t typically have moisture in your soil, which activates a lot of herbicides. Your herbicide application is going to be a little bit different than it would be under normal, conventional farming. I think in the long run you’re money ahead easily with drip irrigation. We are going to continue installing it. The other thing I would say is that you have to give it a chance. Most of you have been farming conventionally for 20, 30, or 40 years. Give it a chance when you install it. Realize that it is going to take you 3-5 years to catch up. You are going to make mistakes in the beginning, and you’re going to do some things differently year in and year out. But, in the long run, if you give it a chance you are going to realize how much of a profit it can make for you.
James Johnson
I’ve had drip irrigation for 1 just year now. By waiting, we got 6 years of free experience. We got the change to learn from the mistakes that the early innovators like Francis Schiflett, Allen Akers, and Howard Wuertz made and shared with us.
My injection system has cut back on virtually everything. We make fewer tractor passes. For the chile crop, we fertilized all through the system. We never cultivated except for one time behind the thinning crew. There was no side-dressing and that alleviated three tractor trips. But, if you are going to put in a good injection system, you have to buy good fertilizer. If you buy cheap fertilizer you will plug up your system. You have just spent $1,200-$1,500/acre on a system. And if you save $10/ton on fertilizer and get bad fertilizer, you are going to be out a huge investment. Also, if you don’t change the oil in your car regularly, you don’t need a drip system.
Management is key. You don’t depend on your irrigator anymore. You are the person that’s in charge of that. Your computer is the tool that you use, but you also have to get out in the field, you have to flush your line, and you have to make sure that all the filters on your injection equipment are clean. Because if you are counting on your computer to do it all, it’s not going to happen.
One of the reasons that I was probably asked to be on this panel is I made one of the biggest mistakes in southern New Mexico this year. I killed 34 acres of chile. Luckily, I had picked it the first time. I was fumigating onion ground, and I counted on my system to do it. I fumigated it: I ran the system for 2 hours after the fumigant was out. It then switched over to my chile field and within 24 hours my chile was dead. A lot people saw it; a lot of people laughed at it. I got on the phone and I called a lot of my friends, who were doing the same thing. And Gary Schiflett thanks me, because he would have done the same thing if I hadn’t called him.
If you decide to put a system in, don’t go with the new guys. Go with someone who is established and knows what to do. Netafim has been big around here and have a good service team that can help you out. Talk to your neighbors. If you neighbors put in a system and it doesn’t work, ask them why it doesn’t work. If they’ve abandoned it, ask why.
Francis Schiflett
We put our first drip irrigation in about 6 years ago, after we went to Arizona and visited with Howard Wuertz and looked at some of his installation. I remember reading about what Howard was trying to do with drip back in the late 1980s. I told my sons that this guy is crazy. There’s no way to recover the cost involved. But here we are anyway. We went to him for advice and information, and we started installing drip. In our first year, we put in about 150 acres. And then we couldn’t wait to get more in.
The savings are a big item. One of our main things was our water supply. We were depleting our water, and we knew it, and it didn’t look good. We needed something to save water, and a drip system does it. It will save 50% of the water normally used in furrow irrigation. At the very least, you’ll save 35% of the water on a crop. That was very important to us.
First, I agree with the lighter horsepower tractors. We don’t have those big heavy tractors dusting across our fields all winter getting the land ready. We can use less horsepower, we can go out and do it fast, and the diesel fuel bill really went down. But so does the repair and maintenance on these heavier tractors, on the breaking plows, ripper, and the discs. We don’t use those any more and that makes a big difference. There’s less compaction, fewer trips over the field, less fuel, and less maintenance and repairs.
Also, there is less work for the aerial applicator at our farms. We can irrigate a chile crop or an onion crop and spray it with a ground rig at the same time. We used to have wet ends and wet fields that we couldn’t get in, and we had to call on an aerial applicator many times to come and do the job for us. But we’re doing that ourselves now with hi-cycles. We do a better job of application with less material, regardless of what material it might be. It puts the material where it’s needed. You’re not wasting it; it goes right to the plants.
Now Paul Downey showed you how you can do it really scientifically. But for an old man like me, all this technology is outrunning me. I can’t keep up. When we put some of our system in first, we though we were right on top of everything. It changes just like everything else. Even if you have to suck it out of a bucket with a verturi, it works. You don’t need to have all that complicated equipment. There are other ways to do it. But the way they design this stuff, it’s super great. It puts a desired amount of water where it’s needed.
When we were irrigating out of open ditches on windy days, it was a headache. The wind was blowing weeds into the ditches. The ditches were running over, and we had all sorts of other problems like that. Now the wind can be blowing 50 mph out there, and it doesn’t phase the drip system. There’s less wind erosion. We used to have a problem furrow irrigating. We’d furrow irrigate and before it dried enough to get on it to stir the soil, the wind would blow down those furrows and burn our crops. We don’t have that problem now. You can have problems with wind, but it is nothing compared to what it was before we went to drip.
There are many advantages to drip. And there’s also disadvantages. Nothing is going to replace checking that system personally every day, regardless of how automated you get. Anything mechanical is going to give you some problems at some. You may program a valve for 2 days of irrigation, only to find out it didn’t open when it was supposed to. Yet it shows that the volume of water went through. You’ll also have one that opens on its own occasionally.
There are two different ways of controlling these valves: by radio and by wire. We will not put in any more radio equipment. It will be wired. It doesn’t mess up like the radio. The radio seems like a constant problem. With the wire, it’s a rare problem. And when you do have a problem, it’s very easy to find and correct it.
You need to keep close track of maintenance and keep the system clean. I had a problem with verticillium wilt. I really thought that drip would help. It didn’t. It made it worse, I believe, and we haven’t found a cure. I’m hoping Howard Wuertz or somebody can tell me what to do. But we have tried everything that anyone has recommended for it, and it hasn’t corrected it. We are finding things that help and delay the effects of it. But we haven’t been able to stop it. The next thing is gophers. They can be a pain in the neck. Stand on a row is very important, too. People put that in and think they hit the same mark every year. You’d be surprised at how your equipment can get off an inch on one side this year and another inch next year. The next thing you know is you’re wetting up over on the side of the bed instead of down the middle of the row. This is something else I wish they’d work on: some way to mark that line with a wire or something and put a sensor on a tractor that would tell exactly where the tape is to keep you on line.
We have experienced the increase in yields; it has made farming really enjoyable. At my age, you think about quitting. And if I had to go back to furrow irrigation, I wouldn’t be farming this year or next year. The way it is, I kind of enjoy it, and it’s fun. These systems do work and have been very good to us.
Questions:
1. Would you comment on the Fertijet and the accuracy of the application of fertilizer and chemicals you put through it and the recording of it. Does it help any?
James Johnson: For the Fertijet, everything is done on the computer and is extremely accurate. With the old way—utilizing shanks in the ground—if the shanks plugged up, there were streaks in the field. With the drip, there is no streaking and, so far, no problem with the injection pump. It is a whole lot easier than depending on a guy to make sure the equipment is working.
2. Several of you discussed the dangers and problems of sulfuric acid. How does it compare with the Enfuric, and why do you not use the Enfuric?
Allen Akers: We use Western Blend’s 10-0-0-13, which is blended at their plant and which is much like Enfuric or very close. We started out years ago using straight sulfuric acid and realized we weren’t plumbed for it. And that straight sulfuric acid is like a bucket of rattlesnakes, you don’t know when you are going to get bit by it. That is why we go with Western Blend’s 10-0-0-13. They can mix up any combination that you desire. We went with it mainly for the safety factor. Sulfuric acid, over the years, will even corrode stainless steel.
Comment from James Johnson: A lot depends upon what you are growing. For example, if you are growing onion. you don’t want any N the last 30 days and the Enfuric always dribbles a little bit of N.
3. When you are installing the system, one of you mentioned using the stainless steel wire ties instead of the connectors. Which do you recommend?
Stainless steel wire ties were recommended unanimously by all speakers.
4. What kind of slopes can you install drip irrigation systems on and are you able to put them in production where you might not be able to with a side roll or furrow irrigation system?
Howard Wuertz: We like to install the drip irrigation system with the slope. I suppose you could have too much slope, in which case we’d recommend that you do it like a conservation system with berms, benches, etc., because elevation has a lot to do with the emissions system. Every time you drop 2.31 feet, you’ll increase the pressure by 1 psi. So if there is a very rapid drop, then the elevation changes will work against you. If you have reasonable slope, 1/10 or 3/10 slope, you’ll always install the drip downstream. And then it will work in your favor, because the farther down the drip line, the less pressure because you have too many emitters to feed. A differential in pressure will work in your favor and give a little more pressure at the other end. If you have too much slope, then you go across the slope like you would if you were putting in a contour, so that you would take part of the slope out of it. But you would put some fall in it to work in your favor. The last of five maintenance steps is flushing. To flush properly, you increase the pressure just a little bit to get scour velocity of the water in the drip line carry it to the other end. We can deal with reasonable slopes, but if they are too much, we would go on the contour to take it out and engineer design the system, so it would have the best of all worlds. This can be done with odd-shaped fields, crossways, lengthwise, but you will need a little bit of fall in the line.
Dirk Keeler: A system can be designed to irrigate almost any contour that you can stand to farm. Since the water is not running, rainwater would be the only erosion you would have. Depending on your soil type, that could be bad. But one advantage to drip is that you don’t have to get rid of all that trash. The trash staying on the surface helps your erosion problem even with rain.
5. It was mentioned that there is drip on 80-inch centers and 40-inch centers. Is there any experience in 60-inch beds and planting on 30-inch centers other than cotton, which Mr. Wuertz mentioned this morning?
Howard Wuertz: Arizona Drip Systems has installed a drip on 40-inch, 60-inch, 80-inch, and every kind you can think of. If we can find out what the grower’s crops are and what he intends to use the system for, we can make a recommendation. We have been able to put in a lot more drip with less expense by putting in 80-inch drip lines and learning how to grow cotton on either side of the row, grain over the whole bed, and melons, which were the primary reason for putting in the 80-inch system in the first place. But we can do 60-inch lines and put in cotton at 30-inch intervals. We can put in 72-inch lines, and plant the cotton on 36-inch beds. And we can plant cantaloupes on 72-inch centers right over the drip line.
We need to find out from the grower what he wants to grow and then devise a plan to help him. We need to know the soil types, because if you have medium soils with pretty good loam, they will have good capillarity and give us a nice big wetting pattern. Then we can determine what kinds of crops he can grow with a given installation. In other words, once you install it, and you have an average textured soil, you turn the system on, pack the soil sown and see what your wetting patterns are before you go any further. Don’t plant where it isn’t wet. At Arizona Drip, we have designed a bunch of machines that would remove the dry soil and the salty soil from the surface and plant down just a little bit. Even though we are not directly over the tube, we have extremely good success (peel off rigs). If you have equipment available, you can do almost anything.
Comment from Larry Schwankl: When we have a particular soil type and we expect the water to move laterally a certain distance, one way to check it is to put some tape in, run the system, and then essentially cut a back hoe pit across the face of the wetted area and see how the water has moved.
6. What is the effect of organic matter with a drip system versus conventional tillage, because with conventional tillage you keep it burned out? Do the organic matter levels go up in these soils?
Dino Cervantes: Organic matter goes up, not necessarily because of the drip, but rather because of the farming methods you’ve adopted. You have a lot less tillage, a lot less turning over of the ground, etc. And with most of the work that’s been done in that kind of situation, you see organic matter go up. That will probably be the case for most of you.
Obviously, because of the tillage and the way that you grow, you are going to see your organic matter go up. We saw ours go up almost 2%, which is huge for this valley. Mostly, it’s the tillage practices. Once we started seeing that, we actually adopted the tillage practices that we use on our drip irrigated fields on our flood irrigated fields. We currently use our Sundance equipment on about one-half of our conventionally irrigated ground as well as on our drip irrigated ground, just because we get the organic matter levels up. Since going to the minimum tillage methods that Sundance uses, we don’t apply any manure to our crops at all, and we still get the same type of organic matter by the end of the season.
7. How do you finance a drip system?
James Johnson: The system is definitely financed: Cost per acre expenditures are expensive. But you retrieve the savings once you get the system in. The sooner you get it in, the sooner you start reaping the savings.
Dino Cervantes: When we installed our system about 8 years ago, we went to four different banks in the area and all of them kind of laughed us out of the room and told us to look elsewhere because they really didn’t understand. We ended up with a bank in Arizona that helped us with the financing. Since that time, banks have become a lot more aware of what is going on here locally, and they’ve seen systems work. (Allen Akers, James Johnson, and Frances Schiflett, all agree that the banks are a lot more aware). If you are working in southern New Mexico, you will find someone to help you finance it. It is a big difference from 5 to10 years ago, and it shouldn’t be a big problem.
Comments from Howard Wuertz: PCA and some insurance companies might be willing to finance as Farm credit system is quite liberal in lending money to put in subsurface drip systems.
One trick that Sundance Farms suggests is that wherever the money comes from, get the system in and grow a crop that has a fairly high return, like watermelons. The return on the watermelons was double what the drip irrigation system cost. Only spmd what you plan to get back form your specialty crop so you get your money back. But be sure you have a market for the crop.
8. Since you guys have gone into drip and are not able to rip and plow, are you finding your ground getting softer, harder, mellower, and more cloddy? What are your soil conditions like today?
More mellow and softer compared to the way it used to be was the consensus of all speakers.
9. Several growers have drip irrigation systems, and putting out phosphates is a main concern. We heard about several different phosphates you can run through a drip system, and then we’ve heard that you need to top dress your phosphates. I’ve got growers that would like to put on an acid-based phosphate and get away from the sulfuric acid due to safety problems. What have they done in Arizona and what can you tell us?
Howard Wuertz: Several presenters talked about the inability to get phosphate fertilizers to do any good. Tim Hartz gave us the best reason why you don’t really benefit from running it through your drip system. It is the seedling (grain crop) that takes up the greater amount of phosphate, and if you don’t have it right in the root zone where you plant the seed, you are in deep trouble. If your drip tubes are 8, 9, or 10 inches below the ground and phosphate fixes itself within a couple of inches of the dripper line, then you can add all the phosphate you want to, but it never gets to the seedlings’ roots. For grain production Sundance Farms puts out a couple hundred pounds of 11-53-0 and then puts the seeds in a grain drill and seeds it, so that all the fertilizer is right there in the presence of the sprouting seed.
Summary
Robert F. Bevacqua, Extension Vegetable Specialist, New Mexico State University
Drip irrigation offers the advantages of improved yields, reduced water use, and the opportunity to distribute agricultural chemicals through the irrigation system.
Biad Chili Inc.’s Rincon Farm leased by Marty Franzoy served as a case study or model for adopting drip irrigation in southern New Mexico. The demonstration site was a 26-acre planting of ‘Sonora’ chile pepper on a clay loam soil. There is an injection system for metering fertilizers and other chemicals into the irrigation water. Automatic valves divide the field into two zones of 13 acres each. The cost of installing the entire system was $52,000. The expected life of the drip tubes is 5 years.
The conversion from furrow to drip irrigation, as in the example of Rincon Farm, requires many changes in production practices. Some of the critical changes are in management of soluble salts, crop rotations, minimum tillage, soilborne pathogens, and fertilizers and soil amendments.
The conversion also has important economic consequences. In 2000, an economic comparison of two counties in southern New Mexico revealed dramatic differences. Drip irrigated crop production has 25% higher yields, 18% lower chemical costs, 26% lower fertilizer costs, 47% higher capital costs, 19% higher fixed costs, and 20% lower seed costs. The study concluded that drip irrigation produced a 12% greater net operating profit than furrow irrigation.
A drawback to drip irrigation is that the emitters in the drip tubes can easily clog or plug. Clogging can be caused by particulate matter, such as sand or silt: biological organisms, such as bacteria; or the formation of chemical precipitates like calcium carbonate. Water quality should be assessed before installing a drip system so tools can be employed to minimize these threats. Filters screen out or separate particulate matter from the water. Chlorination controls biological hazards. Acidification prevents the formation of precipitates. Preventive maintenance (cleaning filters and flushing of lines regularly) is another tool to avoid clogging.
Fertilizers are the most common agricultural chemicals to be injected into drip irrigation systems. The procedure is known as fertigation. Nitrogen is the most common nutrient to be injected. Based on the Rincon Farm example, the following fertilizer recommendations are offered for chile produced with a drip irrigation system:
- Apply a preplant application of granular fertilizer containing 80 lb of phosphate per acre as twin bands at seeding.
- Include a small amount of nitrogen fertilizer, such as 10 lb nitrogen per acre, in the preplant application.
- Apply 160 lb nitrogen total per acre through the drip system in weekly increments. Beginning with the appearance of green flower buds, at about June 7, apply 20 lb nitrogen per acre per week for eight weeks.
- Do not apply potassium fertilizer, because the soil and water contain naturally high levels of this nutrient.
Nutrient monitoring, especially for nitrogen, is used to ensure that a fertilizer program is adequately supplying the crop with plant foods. This can be done by sending leaf or petiole samples to a commercial laboratory for analysis or by doing “quick tests” in the field for soil and leaf nitrate-nitrogen levels. The most popular quick test is the Cardy nitrate meter that enables growers to quickly measure nitrogen levels in the leaf petiole. The results help growers apply the right amount of fertilizer at the right time, helping ensure a high yield while avoiding excessive fertilizer applications.
Few pesticides are registered for use in drip irrigation systems in New Mexico. An important exception is the systemic insecticide called Admire or imidacloprid, which can be used to control certain insects that infest cotton, pecan, and vegetables. Admire can be applied to the drip system’s irrigation water to control whiteflies, thrips, flea beetles, and Colorado potato beetle on chile pepper.
In conclusion, many changes in production practices accompany converting from furrow to drip irrigation and adopting chemical injection techniques. Installing a new drip system is expensive, and operating it requires skillful management. The immediate benefits are higher yields, reduced water use, and opportunities for automation. Some drip systems are considered disposable and are kept in operation for only one year. Other systems, with proper design, preventive maintenance, and the attention to detail to prevent clogging, are considered semipermanent. Their life expectancy can be 5 to 10 years. These longer-lasting systems offer significant economic benefits, the most important of which are the opportunities to maximize production while minimizing costs. This trend toward extending the life of drip systems is the way of the future.
Appendix A: Soil NO3-N “Quick Test”
Procedure:
- Collect at least 12 soil cores representative of the area wetted by the drip tape.
- Fill a volumetrically marked tube or cylinder to the 30 mL level with .01 M calcium chloride. Any accurately marked tube or cylinder will work, but 50 mL plastic centrifuge tubes with screw caps are convenient and reusable.
- Add the field moist soil to the tube until the solution rises to 40 mL. Cap tightly and shake vigorously until all clods are thoroughly dispersed. It is critical that the soil tested is representative of the sample. For moist clay soils that are difficult to blend, pinch off several small pieces of each soil core. Testing duplicate samples will minimize variability.
- Let the sample sit until the soil particles settle out and a clear layer of solution forms at the top. This may take only a few minutes for sandy soils or an hour or more for clay soils.
- Dip a Merckquant nitrate test strip into the clear solution layer, shake off excess solution, and wait 60 seconds. Compare the color that has developed on the strip with the color chart provided.
Interpreting Results:
The nitrate test strips are calibrated in ppm NO3. Conversion to ppm NO3-N in dry soil requires dividing the strip reading by a correction factor based on soil texture and moisture:
strip reading ÷ correction factor = ppm NO3-N in dry soil
Table 1. The test strips yield a value expressed in ppm NO3. This can be converted to ppm NO3-N for dry soil by dividing the test strip value by a correction factor based on soil texture and moisture.
| Soil texture | ------ Correction factor ------ | |
| Moist soil | Dry soil | |
| Sand | 2.3 | 2.6 |
| Loam | 2.0 | 2.4 |
| Clay | 1.7 | 2.2 |
Soil with less than 10 ppm NO3-N has limited N supply and may respond to immediate fertilization.
Soils between 10 and 20 ppm NO3-N have enough N to meet short-term plant needs. Soil NO3-N greater than 20 ppm indicates that additional N application should be postponed, until retesting shows that residual soil NO3-N has declined.
Supply Vendors:
- centrifuge tubes and calcium
- chloride
Ask your local Cooperative Extension Service agent to help find these items
- Merckquant nitrate test strips (0-500 PPM nitrate test range
Appendix B: List of Acceptable Pesticides Available for Drip Systems
Brad Lewis, Entomologist Specialist, New Mexico State University
Ben Meadows Co.
3589 Broad Street
Atlanta, GA 30314
(800) 241-6401
The New Mexico Department of Agriculture’s (NMDA) policy on injecting pesticides into a drip irrigation system only allows the use of products labeled clearly to include application through a drip system. At present, there are eight pesticides registered for use in drip irrigation systems: Admire 2F, Chloropicrin, Diazinon, Dimethoate, Di-Syston, Mocap, Telone II, and Vydate.
Questions about what pesticides can be used with drip irrigation should be directed to Elizabeth Higgins, pesticide registration specialist, at NMDA. She can be reached at (505) 646-2133 or at lhiggins@nmda-bubba.nmsu.edu.
Disclaimer Statement:
The information herein is supplied with the understanding that no discrimination is intended and no endorsement by the New Mexico State University or the Cooperative Extension Service is implied.
To find more resources for your business, home, or family, visit the College of Agricultural, Consumer and Environmental Sciences on the World Wide Web at pubs.nmsu.edu.
Contents of publications may be freely reproduced for educational purposes. All other rights reserved. For permission to use publications for other purposes, contact pubs@nmsu.edu or the authors listed on the publication.
New Mexico State University is an equal opportunity/affirmative action employer and educator. NMSU and the U.S. Department of Agriculture cooperating.
Printed and electronically distributed August 2001, Las Cruces, NM.