Sewing Synthetic Suedes
Guide C-229
Revised by Wendy Hamilton
College of Agricultural, Consumer, and Environmental Sciences, New Mexico State University.
Author: Professor and CES Grants and Contracts Development Specialist, Department of Media Productions, New Mexico State University. (Print Friendly PDF)
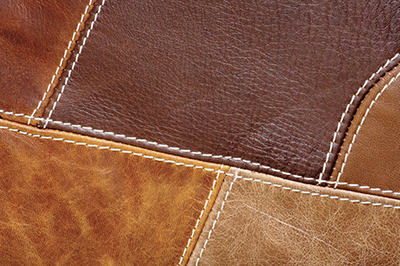
Synthetic suedes are fabrics that are brushed, sanded, or chemically treated to provide the look and feel of napped leather. They are easy to sew, care for, and wear because they have no obvious grain; do not shrink, crack, peel, pill, or stretch; and are resistant to stains, water, and wind. They are often preferred by consumers who do not want to wear real animal suede.
© Andy Platt | Dreamstime.com
Fabric Characteristics
Synthetic suedes are available in a wide variety of fashion colors. When selecting a color for your synthetic suede fashion, consider your complexion, hair color, and personal preferences. Select a color that will be a versatile addition to your wardrobe and is becoming on you.
These fabrics are available in a wide range of prices. Synthetic suedes vary in fiber content and structure, which affects their cost. Most are made with a microfiber polyester and a polyurethane binder. Some synthetic suedes are constructed as a nonwoven fabric with a suede-like nap on one or both sides. Some synthetic suedes have a woven or knitted cloth base with a napped surface on one or both sides. They are usually less expensive than non-woven suede fabrics.
Synthetic suedes are available in two weights. The medium-weight fabric has a crisp texture. Generally, this fabric does not ease well, so patterns with close-fitting curves, gathers, pleats, and intricate seaming should be avoided. Fashions with yokes, patch pockets, pocket flaps, and topstitching such as coats, blazers, and other tailored styles are good choices for these fabrics.
A lightweight, drapable suede offers a softer, more feminine fashion. Because of its light weight, it gathers, pleats, and tucks well. Blouses and dresses are good choices for lightweight suede.
Trial Garment
If you have not used the pattern before, make a trial garment using denim, corduroy, or a heavy muslin. The ease and drape of these fabrics are similar to that of medium-weight suedes. If you choose to use a lightweight suede, select a fabric with similar drape for your test garment.
After sewing your trial garment, check the fit carefully. Make any necessary alterations in length; location of design details such as buttons, buttonholes, and pockets; and ease. Transfer any alterations to your pattern pieces accurately.
Trial Pattern Layout
To determine the exact amount of fabric to purchase, do a trial pattern layout. Because most synthetic suedes don’t ravel, some seam and hem allowances may be eliminated to reduce the amount of fabric required—you may save as much as 0.5–1 yard (50–100 cm) of fabric.
Before doing a trial layout, determine the sewing method you will use—flat or conventional. The flat method of construction (usually recommended for nonwoven suedes) does not require standard seam or hem allowances. If your pattern uses conventional seams and hems, it may be adapted for the flat method. (See Lapped Seams section below for flat method construction techniques.) However, if you are using woven or fabric-based synthetic suedes, which ravel, use the conventional method.
After your pattern has been altered to fit and adjusted for the sewing method, you can either use the “with nap” layout on the pattern guide sheet to do the trial layout or you can save fabric by placing the grainline arrows as much as 30–45° off the fabric’s actual grainline (Figure 1).

Figure 1. Pattern may be placed slightly off-grain to save fabric.
Selecting Linings and Interfacing
Synthetic suede fabrics often have nap on both sides, which makes putting on suede coats, jackets, or vests difficult. A lining will make these garments easier and more comfortable to put on, and will also cover construction details such as darts and welt pockets.
Lightweight woven polyester and rayon fabrics are suitable for lining suede garments; choose a silky smooth fabric that will allow garments to slip on easily over other clothing. Make sure the fabric is washable and dry cleanable. Choosing a solid color or color-coordinated print for the lining adds an interesting fashion detail to your garment.
Use fusible interfacing of either woven or nonwoven fabric. Be sure to select interfacing with a weight compatible with your fashion fabric. Fuse a test piece of interfacing to your fabric to determine the amount of steam and pressure required to achieve a good fuse.
Notions and Equipment
These items will be necessary for sewing synthetic suede fabric:
|
Shears—very sharp |
Machine needles #9 or #11 (60–70) |
Press cloth (smooth) |
|
Pins—fine, long, sharp |
Fine hand-sewing needles |
Seam roll |
|
Invisible (frosted) tape |
Tape measure |
Pressing ham |
|
Marking pencils (water-soluble) |
Glue stick |
Hem gauge |
|
Tissue paper (for alterations) |
Basting tape |
Yardstick |
|
Tailor’s chalk (or sliver of bar soap) |
Steam iron |
Thimble |
A regular thread of spun polyester or cotton-wrapped polyester is your best choice for sewing synthetic suedes. If your garment requires topstitching thread, be sure to test it on your machine. Topstitching thread requires a larger needle than regular thread; try a size #14 (90), #16 (100), or #18 (110).
Preparing the Fabric
Synthetic suede fabric does not really need to be pre-shrunk because it normally shrinks very little or not at all. However, washing it before cutting out your pattern will make the fabric easier to handle. When machine drying your synthetic suede, don’t use a dryer fabric softener sheet—many synthetic suedes get oily spots from these fabric softeners. Instead, use a liquid softener added to the washer’s rinse cycle.
You will need to preshrink any lining, non-fusible interfacing, zippers, and other fabric notions before cutting and assembling. After your fabrics have been preshrunk, press to remove wrinkles. Check the grainline of the lining. If the fabric is off the grain, pull on the bias until the grainline is straight.
To preshrink the fusible interfacing, soak it in a basin of hot water for about 20 minutes. To dry, blot excess water from the interfacing and put aside to dry. Do not machine dry fusible interfacings.
Cutting the Fabric
As you prepare to cut your fabric, decide whether you want the nap to go up or down. If the nap goes up, the fabric will have a dark, rich color; if the nap goes down, it will have a frosted color. Check the fabric to determine which effect is best for your fashion and fabric.
Fold the fabric with the right sides out. Place pattern pieces on the fabric as required for the “with nap” pattern layout. Pin through the pattern and the top layer of fabric only. Place pins in the seam allowance if possible, but do not worry about pin marks—they will close up by themselves when steam pressed. If you do not want to put pins into the fabric, use pattern weights to hold pattern pieces in place.
With sharp shears, cut the fabric along the cutting lines of the pattern pieces. Cut as accurately as possible in order to eliminate the need for trimming seams after they are sewn. This is especially important on facings, hems, and collar edges.
Cut the interfacing and lining fabrics as recommended in your pattern guide.
Marking Fabric
Instead of cutting notches and darts, mark them with a marking pencil, tailor’s chalk, or a sliver of bar soap. To increase sewing accuracy, mark stitching lines of darts between dots using a ruler. Be sure to indicate pocket locations, the center front, and matching dots.
Construction Cues
Fabric-backed suedes are only sewn using conventional techniques used to sew other napped fabrics such as corduroy, velveteen, or velvet. Nonwoven synthetic suedes may be sewn using either conventional methods or special techniques, including the use of fusibles, glue, unfinished edges, flat hems, and lapped seams. Study the following information carefully before beginning your garment.
Machine Adjustments
Use a new, sharp sewing machine needle size #9–11 (60–70). Set the stitch length for 10–12 stitches per inch or longer because short stitches tend to weaken the fabric. Sew a test seam using two or more layers of suede. It may be necessary to: 1) decrease the presser foot pressure to allow for even feeding, 2) use an even feed or roller presser foot to help prevent “creeping” or underlayer shifting), or 3) loosen the upper thread tension for a balanced stitch.
Synthetic suede tends to grab the needle as it goes through the fabric, causing skipped stitches or looping underneath. If the machine is skipping stitches, try an all-purpose ballpoint or leather wedgepoint machine needle. Use a throat plate with a small hole to keep the fabric from being pushed through the hole. On a throat plate for zigzag stitching, use tape to partially cover the hole. Moving the needle to the left or right position on a zigzag machine might also help. When topstitching with a heavier thread, use a larger needle.
Construction Techniques
To prevent puckering, sew with the fabric under tension. Hold the fabric taut in front of and behind the presser foot, letting the fabric feed evenly. Do not stretch the fabric.
Because suede fabric tends to “creep,” baste all seams together before machine stitching. Use hand basting, fusible web, invisible tape, or basting tape to hold fabric pieces together. When using basting tape, do not stitch through it—the stitches may skip. Tie thread ends instead of backstitching to prevent enlarging the stitching holes or cutting the edge of the fabric with the needle.
Conventional Seams
Because of their stiffness and bulk, conventional seams and edges must be held flat. They may be flattened by topstitching through the garment and the seam allowances (Figures 2 and 3), or by placing fusible web close to the stitching between the seam allowance and garment (Figure 4).

Figure 2. Topstitch seam allowances open.

Figure 3. Topstitch seam allowances to one side.

Figure 4. Fuse seam allowances open.
Some seams, such as the following, are easier to sew and more comfortable to wear if sewn using conventional plain seam construction:
- Set-in-sleeve armhole seam
- Sleeve—underarm seam
- Pants inseam
- Pants—crotch seam
Lapped Seams
The flat or lapped method of construction gives a smooth, sporty appearance to the garment. Leather is often sewn this way. Use these guides to determine which sections to overlap:
- Front edges overlap back edges on regular shoulder and side seams (unless the garment has darts; then the flat section overlaps the dart section to cover dart ends).
- Front band overlaps garment front.
- Yoke overlaps front and back of garment.
- Sleeve band or cuff overlaps sleeve.
- Dropped shoulder overlaps sleeve.
- Neckband overlaps garment neckline and collar.
- Collar overlaps neckline if a neckband is not used.
To make lapped seams, trim away the seam allowance on the overlap section. Lap the edge of the overlap to the seamline of the underlap. To hold the seam in place and to help prevent creeping, fuse or baste along the seamline using a 1/4-inch-wide (6 mm) strip of fusible web between the layers, or glue the layers together (Figure 5).

Figure 5. Use fusible web to hold lapped seams in place to prevent creeping when sewing.
Topstitch along the edge and again 1/4–3/8 inch (6 mm–1 cm) from the first row of stitching. Trim the inside seam allowance close to the stitching if desired (Figure 6). Decorative hand or machine stitches may be used on overlap seams.

Figure 6. After sewing the lapped seam, trim the inside seam allowance close to the stitching, if desired.
Darts
Taper darts gradually to a point. Dimples or puckers at the dart point can be prevented by fusing a 1-inch (2.5 cm) circle of interfacing over the point before stitching. Make the last three or four stitches on the edge of the interfacing. Darts will be less bulky if you slash, trim, and fuse them flat to the garment.
Collars, Lapels, Cuffs, and Pockets
Flat construction eliminates bulk and provides a neatly tailored finish (Figure 7). Trim interfacing to the stitching line and fuse. Place suede layers wrong sides together. Stitch through all layers 5/8 inch (1.5 cm) from the cut edge. Stitch again 1/4–3/8 inch (6 mm–1 cm) from the edge. Trim close to the outer machine topstitching.

Figure 7
Topstitched Cut Outer Edges
These edges are difficult to topstitch right on the edge, so cut pieces with a 1/4-inch (6 mm) seam allowance and trim after topstitching. This technique works for:
- Collars
- Collarless necklines
- Sleeveless armholes
- Garment front edges that button
- Sleeve bands or cuff ends
- Belts, sashes, and ties
- Pocket flaps or welts
Buttonholes
Simple machine-stitched buttonholes work well with nonwoven suede. Machine stitch a rectangle 1/8–1/4 inch (3–6 mm) wide around the length of the finished buttonhole (Figure 8). Tie thread ends. Slash open between the stitches, being careful not to cut through the stitching.

Figure 8. Machine stitch a rectangle 1/8–1/4 inch wide around the length of the finished buttonhole.
Buttonholes may also be machine made or bound. Make a sample on leftover suede to determine which type to use.
Buttons
Sew buttons in place using a small backing button to prevent stress at the point of stitching.
Zippers
In plain seams, use conventional construction techniques to insert a zipper.
To insert a zipper in a lapped seam, trim the overlap seam allowance below the zipper (Figure 9a). Trim 1/2 inch (1.3 cm) from the underlap seam allowance in the zipper area (Figure 9b).
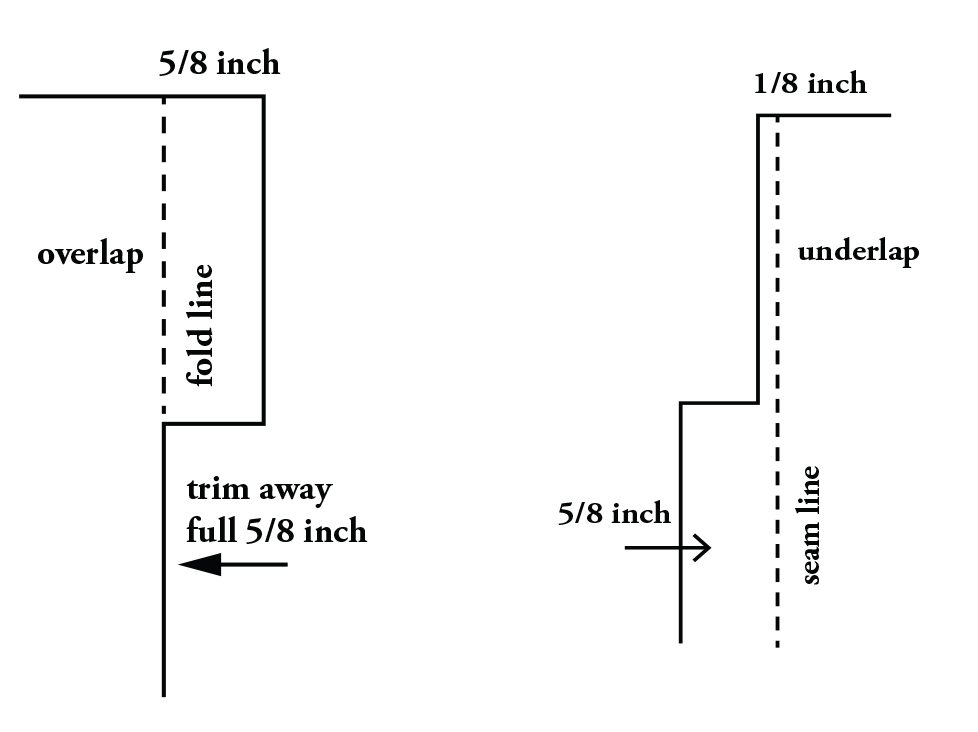
Figure 9a (left) and 9b (right). Trim seam allowances.
Place the underlap over the zipper tape close to the coil. Topstitch next to the zipper coil (Figures 10a and 10b). Fold under the 5/8-inch (1.5 cm) extension on the overlap. Fuse in place and edge-
stitch the length of the zipper opening.
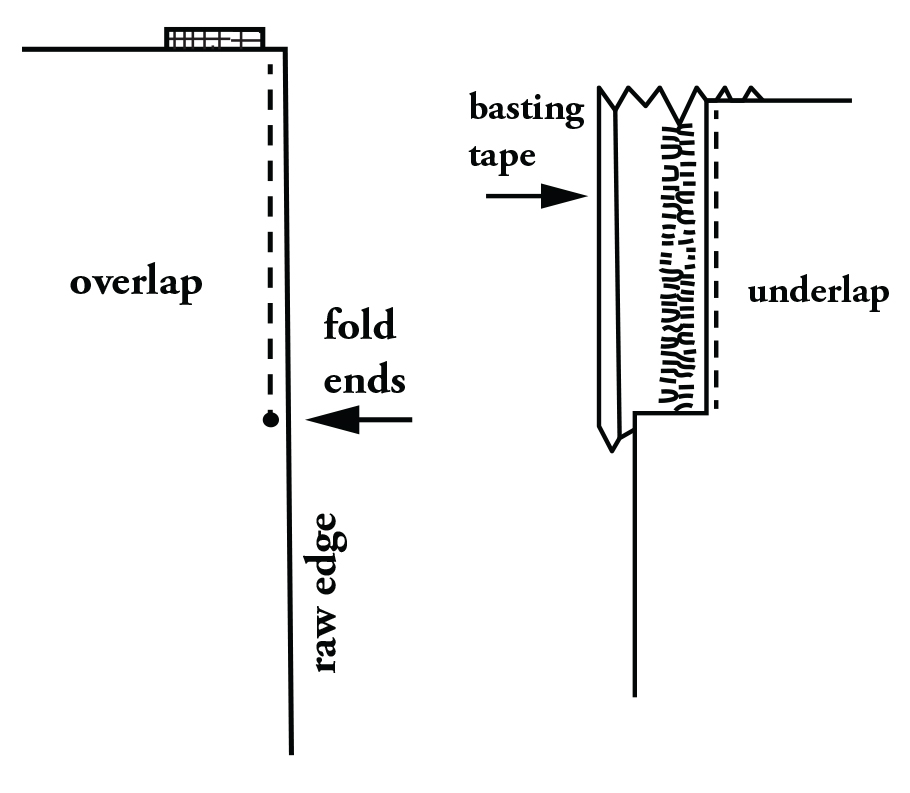
Figure 10a (left) and 10b (right). Sew zipper to underlap.
Place the overlap over the zipper along the underlap seamline. Topstitch the zipper in place; continue topstitching below the zipper opening down the rest of the seam (Figure 11).
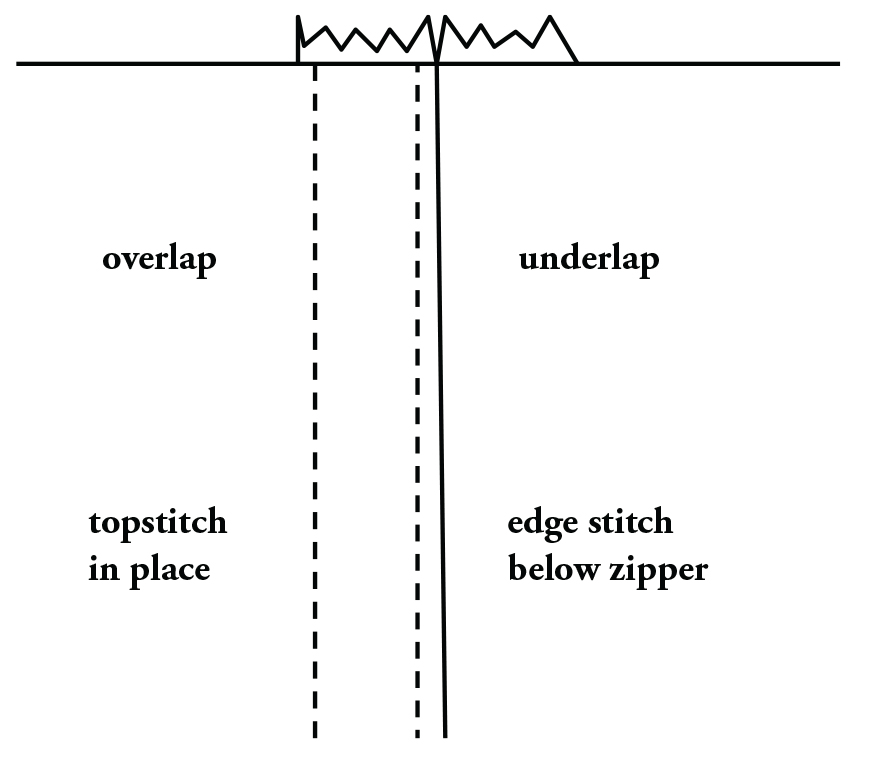
Figure 11. Topstitch overlap in place.
Hems
Make hems in synthetic suedes 2 inches or less in width to avoid a heavy, bulky look. One popular hem, a fused hem, is made by fusing the entire hem allowance. A turned hem is another easy hem (Figure 12). Turn up the hem allowance and topstitch twice around the bottom, matching the topstitching on lapped seams. On fabric-based suedes, zigzag or overcast the raw edge to prevent fraying. Turned hems may be used on sleeve edges, at tops of pockets, and for cuffs or bands for the waist and sleeves.
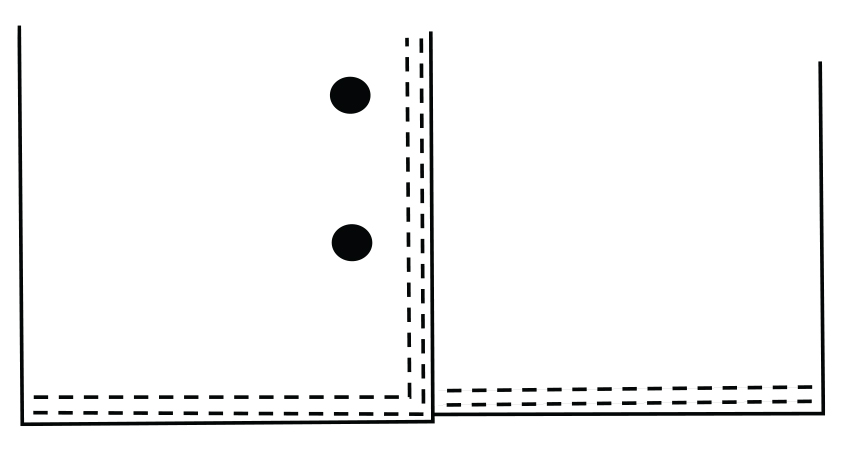
Figure 12. Turned and topstitched hem.
If the hem is curved, obtain a nice finish by facing nonwoven suedes (Figure 13). Trim the hem to the desired length. Cut a facing to match the lower edge, about 3/4 inch (1.8 cm) wide for jackets and sleeves and 1 1/2 inches (3.8 cm) wide for skirts and coats. Place the facing under the hem, wrong sides together, and topstitch twice. The stitching holds the facing securely; the facing will not fall down because it is the same shape as the garment.
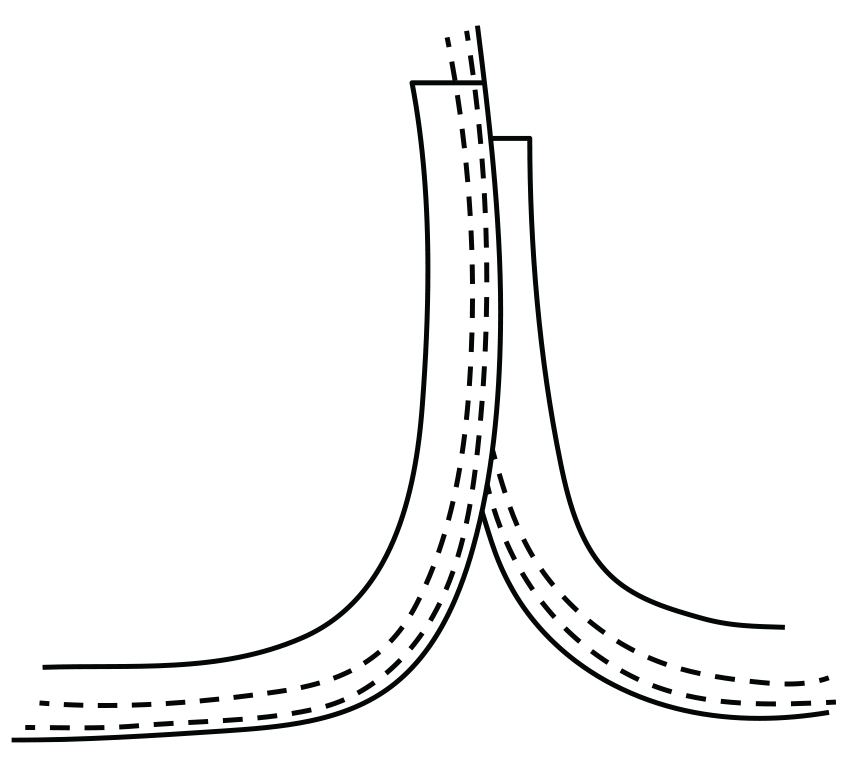
Figure 13. Faced hem (wrong side).
Pressing
Pressing is an important part of sewing synthetic suede successfully. Pressing requires a lot of steam and a press cloth. Whenever possible, press on the wrong side of the fabric. Use a seam roll and pressing ham to help shape the garment as you sew. Fusible web will help keep seams flat. If necessary, use a pounding block to flatten seams.
Caring for Synthetic Suede
Easy care is an important advantage of most synthetic suede fabrics. They don’t stretch, ravel, or wrinkle. Synthetic suedes don’t shrink or water spot, and the colors are fast with regular laundering procedures.
When caring for your synthetic suede fashion, follow the manufacturer’s care instructions carefully. In general, synthetic suede garments may be machine washed and dried. However, don’t use dryer fabric softener sheets when machine drying synthetic suede garments; instead, use liquid softener in the washer rinse cycle. Be sure to remove the garment from the dryer promptly to prevent unnecessary creases. If you prefer, synthetic suede garments may be dry cleaned.
To care for garments between wearings, brush lightly to refresh the nap of the fabric. A light steam pressing with a damp presscloth will remove any wrinkles.
Caution: Synthetic suedes burn easily. When wearing your garment, avoid people who smoke—a light touch or stray ashes can burn your garment. If such an accident occurs, some marks may be removed by rubbing the spot with dry white cleansing powder.
For further reading
C-208: Selecting Interfacing, Underlinings, and Linings
https://pubs.nmsu.edu/_c/C208/
C-220: Check Your Pattern for Proper Fit
https://pubs.nmsu.edu/_c/C220/
C-228: Pattern Alteration
https://pubs.nmsu.edu/_c/C228/
All Clothing Publications Listing
https://pubs.nmsu.edu/_c/
| Original author: Susan Wright, Extension Clothing and Textiles Specialist. |

Wendy Hamilton is an Extension Evaluation and Accountability Specialist at New Mexico State University who provides expertise for program development and evaluation. She has worked at four land-grant universities, and has a diverse background in textiles and clothing, adult education, 4-H youth-at-risk, horticulture, evaluation, and grant writing.
To find more resources for your business, home, or family, visit the College of Agriculture and Home Economics on the World Wide Web at pubs.nmsu.edu
Contents of publications may be freely reproduced for educational purposes. All other rights reserved. For permission to use publications for other purposes, contact pubs@nmsu.edu or the authors listed on the publication.
New Mexico State University is an equal opportunity/affirmative action employer and educator. NMSU and the U.S. Department of Agriculture cooperating.
Revised December 2016 Las Cruces, NM


