Guide C-222
Wendy Hamilton
College of Agricultural, Consumer and Environmental Sciences, New Mexico State University
Author: Professor and CES Grants and Contracts Development Specialist, Media Productions Department, New Mexico State University. (Print friendly PDF)
If a garment has sleeves with cuffs, it will require plackets unless the cuffs are made of a stretch knit fabric or are “pull-on” cuffs. The following plackets are simple and quick.
Making a Placket
Faced Placket
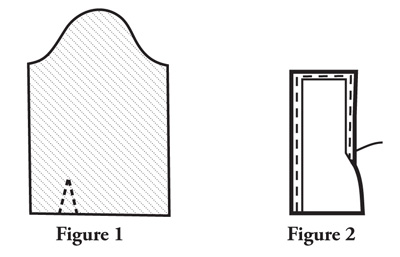
1. Cut out sleeve and facing pieces and mark the location of the placket (Figure 1).
2. If a facing pattern piece is not provided, cut two 3 x 4-in. rectangles of matching fabric.
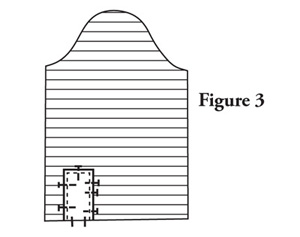
3. Finish the side and the top edges of the facing by turning edges under 1/4 in. and machine stitching turned edge (Figure 2).
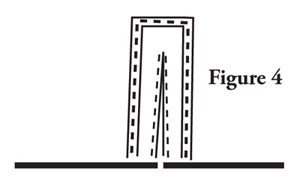
4. Pin the facing to the sleeve with right sides together, centered over the facing markings (Figure 3).
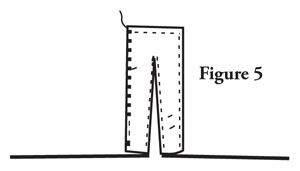
5. Stitch along markings using very small stitches near the point. For easier turning, stitch one small stitch across point (Figure 4).
6. Slash to the point of the “V,” turn the placket to the wrong side and press. Understitch seam to facing.
7. Cut two stripes of fusible web about 1/2-in. square.
8. Place the web between the facing and sleeve side at the top and fuse (Figure 5).
Note: Try this technique on a small swatch of fabric. If pressing mars the fabric, hand stitch top corners of patch to sleeve.
Mock Placket
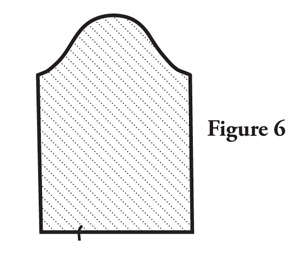
1. Cut out the sleeve and make a mark at the center of the placket (Figure 6).
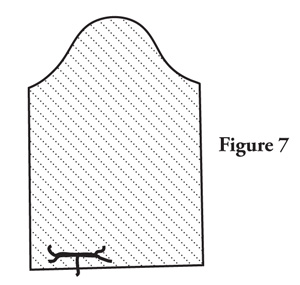
2. Reinforce the opening by stitching 1 in. on each side of the center along 5/8-in. seamline (Figure 7).
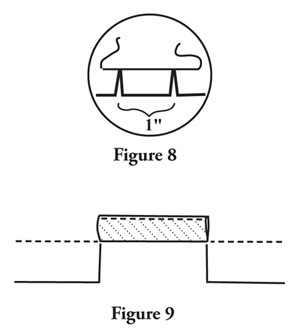
3. Clip to the reinforcement stitching 1/2 in. on either side of the center mark (Figure 8). Place a drop of seam sealant on edges of each snip. Let dry.
4. Fold the resulting “placket” section twice to the inside. Topstitch or slipstitch in place (Figure 9).
Continuous Lap Placket
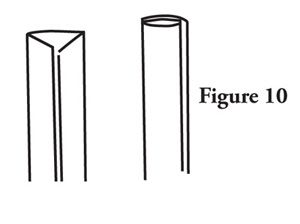
1. Cut two pieces of binding fabric 1 in. wide and twice the length of the placket. Cut this binding on lengthwise grain.
2. Fold binding in half lengthwise, then fold each half’s matching edge to the center fold (Figure 10).
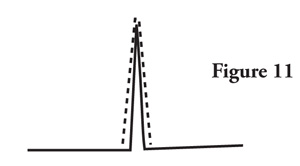
3. Reinforce the placket opening by sewing small stitches on the stitching line. Stitch one stitch across point of placket to make turning easier (Figure 11).
4. Slash placket through center of stitching to the point, but not through the point.
5. Pin the binding to the placket with right sides together. Match the first fold of the binding to the stitching line.
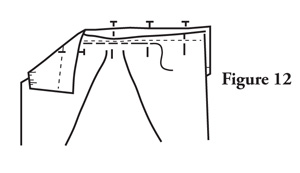
6. With sleeve on top, stitch the binding to placket, sewing just inside reinforcement stitching (Figure 12).
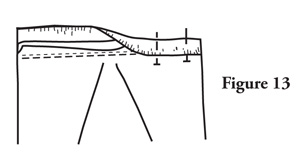
7. Fold binding over stitching, press, and pin carefully (Figure 13).
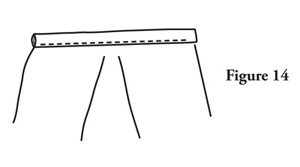
8. Stitch binding in place by topstitching or stitching-in-the-ditch (Figure 14).
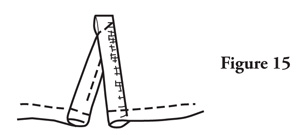
9. Fold placket into position, lapping binding evenly. Stitch a diagonal line across top of binding to make a small triangle (Figure 15).
10. Stitch binding in position at bottom of placket.
Finishing the Sleeves
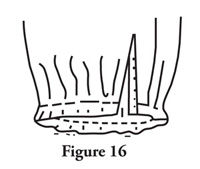
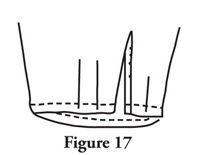
After you have completed the sleeve plackets, finish the bottom of the sleeves by gathering the fullness (Figure 16) or folding pleats (Figure 17) as the pattern requires.
Finishing the Bands
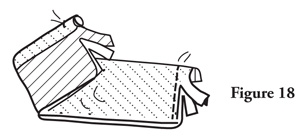
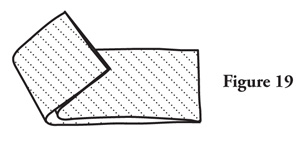
1. Interface the bands and fold in half lengthwise. Sew each end on 5/8-in. seamline from the fold to cut edges. Be sure to secure the stitches. Grade the seams to reduce bulk (Figure 18).
2. Turn bands right side out and press (Figure 19).
Attaching the Bands
Topstitched Band
1. Pin the band to the sleeve with right sides together. Make sure the interfaced side of the band is against the sleeve. Match the seam edges, notches, dots, and ends of band to ends of sleeve. Place pins on the sleeve side (Figure 20).
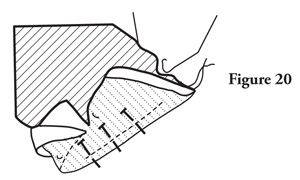
2. Sew on 5/8-in. seamline with sleeve side facing up (Figure 20).
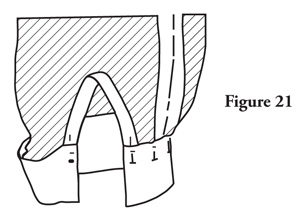
3. Turn sleeve seam into band. Fold the remaining edge of band section under on a 1/2-in. line and press. Pin folded edge to cover the stitching line (about 1/8 in. overlap) (Figure 21).
4. From right side of sleeve band, topstitch (Figure 22) or stitch-in-the-ditch (Figure 23) to finish the band.
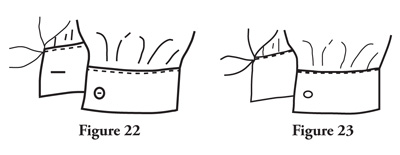
5. Sew buttonhole and button on band.
Quick Band
1. When finishing the lower edge of the sleeves, DO NOT sew the facing or binding in place—leave them loose.
2. Pin the band (both thicknesses) to the sleeve, matching the seam edges, notches, and dots. Match the ends of the band to the seams of the placket binding or facing. Place pins on the sleeve side.
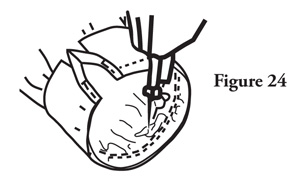
3. Fold the placket bindings or facing over the ends of the band and pin (Figure 24).
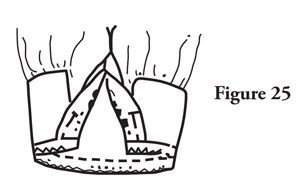
4. Sew the band to the sleeve on 5/8-in. seamline using one of the following methods:
a. Sew on 5/8 in. with straight stitch. Zigzag stitch the seam 1/4 in. from seamline and trim seam allowance close to stitching (Figure 25).
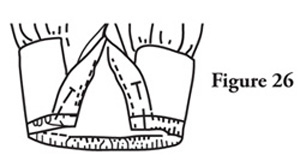
b. Serge the band to the sleeve. Secure the threads ends (Figure 26).
5. Turn the band into position and fold the binding or facing in place over the band.
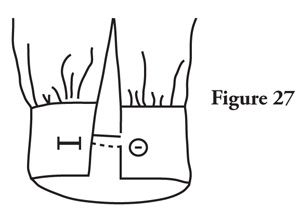
6. Sew buttonhole and button on band (Figure 27).
For more on this topic, see the following publications:
C-205: Selecting a Pattern Size for Perfect Fit
https://pubs.nmsu.edu/_c/C205/
C-214: Clothing Construction Standards
https://pubs.nmsu.edu/_c/C214/
C-312: Fashion Feasibility
https://pubs.nmsu.edu/_c/C312/
All Clothing Publications:
https://pubs.nmsu.edu/_c/
Original author: Susan Wright, Extension Clothing and Textiles Specialist.

Wendy Hamilton is an Extension Evaluation and Accountability Specialist at New Mexico State University who provides expertise for program development and evaluation. She has worked at four land-grant universities, and has a diverse background in textiles and clothing, adult education, 4-H youth-at-risk, horticulture, evaluation, and grant writing.
To find more resources for your business, home, or family, visit the College of Agricultural, Consumer and Environmental Sciences on the World Wide Web at pubs.nmsu.edu
Contents of publications may be freely reproduced for educational purposes. All other rights reserved. For permission to use publications for other purposes, contact pubs@nmsu.edu or the authors listed on the publication.
New Mexico State University is an equal opportunity/affirmative action employer and educator. NMSU and the U.S. Department of Agriculture cooperating.
Revised April 2015 Las Cruces, NM