Free-Motion Machine Embroidery
Guide C-213
Revised by Wendy Hamilton
College of Agricultural, Consumer and Environmental Sciences, New Mexico State University
Author: Professor and CES Grants and Contracts Development Specialist, Media Productions Department, New Mexico State University. (Print friendly PDF)
Sewing machine embroidery can put your unique mark of creativity on almost anything you make—clothing, table linens, towels, hats, totes, and many other items. It is fun, creative, and easy to do. It is also a lot faster than hand embroidery.
With practice and a well-tuned sewing machine, you will be free to create a wide variety of decorative effects through the use of color, texture, and shape.
(© Zheng Bin | Dreamstime.com)
Selection of Materials
Careful selection of materials to be used in machine embroidery is essential.
THREAD: There are a variety of threads designed especially for machine embroidery work. Some people recommend cotton thread only; some recommend number 50 machine embroidery thread. Almost any thread will work if your sewing machine is properly adjusted. You may want to try a variety of threads to find the one that works best with your machine. Special effects of texture and design can be created with different types of thread.
In general, the thread should fill in the design smoothly and create a silky gloss. It should not break easily as you work.
FABRIC: A firm, closely woven fabric will give the best results with machine embroidery. Other fabrics may be used if backed with another fabric or heavy paper. Permanent press fabric tends to pucker if stitches are not adjusted correctly. Knits may not be the most practical fabrics to use, but the result can be pleasing if a firm fabric or paper is used as a backing. Lightweight knits can be embroidered more successfully than heavy weights.
SCISSORS: A sharp pair of embroidery scissors is essential. Avoid using large shears or scissors that require cutting down on the blade—you may cut more than you intend to cut.
NEEDLES: A fairly fine needle is usually required for machine embroidery. Consider the size of thread when choosing the needle size. The thread should slip through the eye easily to avoid fraying. A size 75/11 needle is usually the best to use. The needle must be very sharp (new). If you plan to machine embroider on knit, be sure to use a “ballpoint” needle. It has a rounded tip that pushes knit fabric threads aside and doesn’t cut the fabric threads.
HOOPS: An embroidery hoop with an adjustable screw is needed. A hoop designed especially for machine embroidery has an extension on one piece to protect the machine from scratches. A regular hand-embroidering hoop can also be used. Hoops may be wood, metal, or plastic. A 6-inch (15-cm) or 8-inch (20-cm) hoop will be most useful.
BACKING PAPER: This paper should be “crisp” for best results. Tablet paper, newsprint, or typing paper are good choices.
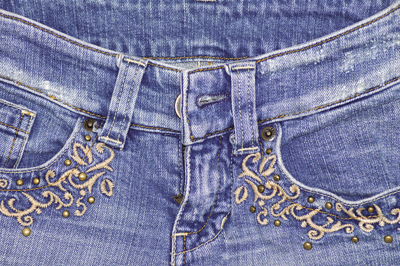
DESIGN: The embroidery design can be anything you wish. The sewing machine can be as versatile as a paint brush, so designs may be floral, geometric, or scenic (Figure 1). Through color and texture, designs may acquire a very formal, sophisticated mood or a casual, fun-loving one.CR543_Susan
Select designs from ordinary embroidery transfers, coloring books, prints in fabric, pictures, or nature, or use free expression to create interesting shapes and forms.
After a design is selected, it must be transferred to the fabric. This can be done with iron-on transfers, a transfer pencil, dressmaking carbon, a water-solvent pen, or colored pencils. Felt-tip markers can also be used if the color will not run. Do not use a ballpoint pen or a lead pencil—lead may smear and ink may stain.

Figure 1. Embroidery designs can be as simple or complex as you desire—the possibilities are nearly endless.
Preparing the Machine
Before attempting to embroider with your machine, read the machine manual for specific adjustment instructions. Be sure you understand the various adjustments and settings that your machine requires for machine embroidery.
Your machine should be clean, well oiled, and in good running condition. Check carefully for excess oiliness that could stain your project. Wipe the needle, needle bar, throat plate, and the entire work surface of the machine carefully before you begin stitching.
Correct thread tension is very important for successful machine embroidery. The top tension usually needs to be looser than the bottom. Adjust the machine to allow the bottom tension to pull the top thread down so it is even with the under side of the material. It should not be loose enough to cause loops on the wrong side of your work.
After adjusting the thread tension, remove the presser foot and lower or cover the feed dog. (On some machines, a lever may raise the throat plate to keep the feed dog from interfering with stitching.) Then, set the machine stitch length and width controls on “O.” Always test the stitch tension and setting before beginning your project (Figure 2). Fabrics and threads vary and may require adjustments of the tension.
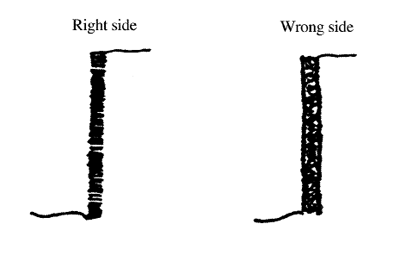
Figure 2. After adjusting thread tension, run a test stitch and check to make sure the wrong side is free of loops.
Putting Fabric in the Hoop
The fabric should be placed tightly in a 6- or 8-inch (15–20 cm) hoop that has an adjustment screw. Separate the hoop and loosen the adjustment screw slightly. Lay the larger ring on a flat surface and center the fabric on the hoop with the design side up. Slip the smaller ring into place, securing the fabric in the hoop. Tighten the adjustment screw while pulling the fabric around the edges until it sounds like a drum when tapped.
Preparing Fabric (Figure 3):
- Design side up
- Fabric tight
- Inside ring extended 1/8 inch (2 mm)
- Adjustment screw tight
After the fabric is tightly secured in the hoop, push the inside hoop until it extends about 1/8 inch (2 mm) lower than the outside ring. This will tighten the fabric even more and keep the outer ring from scratching or catching on the machine surface.
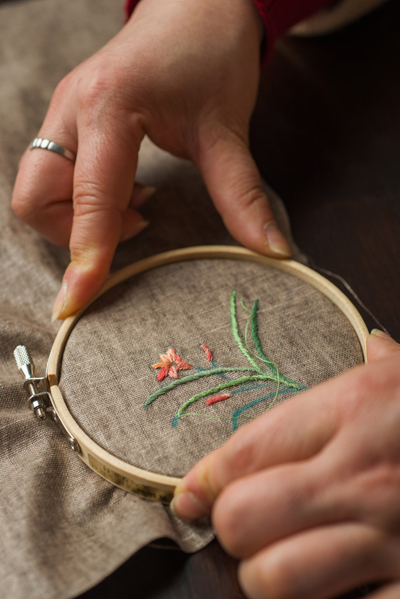
Figure 3. Fabric properly secured in the hoop, ready for stitching. (© Illustrart | Dreamstime.com)
Stitching
Thread the machine with the selected color of thread on the top and the same color or white in the bobbin. Place the fabric, in the hoop, under the needle and lower the presser-foot lever. (The lever must be lowered for thread tension to be effective.) Using the hand-wheel, insert the needle into the fabric and bring up the bobbin thread. Holding threads taut, take three or four small stitches to lock the threads in place (Figure 4). Clip off the loose thread ends.

Figure 4. With threads taut, make three or four small stitches to lock the threads in place.
To Begin:
- Presser bar down
- Bobbin thread up
- Stitch length “O”
- Feed dog down
- Stitch width set
Set the stitch width regulator for the desired width and begin stitching the design. As you work, move the hoop slowly and with an even speed or the thread may break. Remember, always move the hoop back and forth or from side to side, even when forming curves (Figure 5). Do not rotate the hoop; the thread may break and so may the needle!
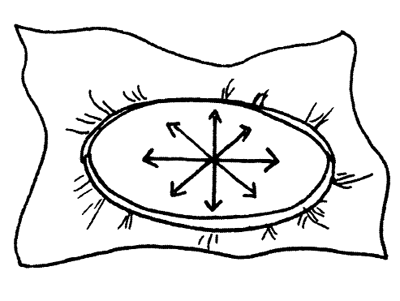
Figure 5. Move the hoop back and forth or side to side when stitching—never rotate the hoop.
As You Work:
- Move hoop back and forth
- Move hoop side to side
- Do not rotate hoop
Two basic stitch movements in successful machine embroidery are outline and fill-in. An outline movement is used to outline the design. It may be done with a zig-zag stitch in vertical, horizontal, or circular shapes (Figure 6). Outlining can also be accomplished with one or more rows of straight stitching.
Fill-in stitching is done using zig-zag or straight stitching (Figure 7). If vertical fill-in is used, the hoop is moved back and forward. For horizontal fill-in, move the hoop from side to side. These movements may form distinct rows of stitches, or the stitches may be blended by slightly overlapping them.
A special effect can be created by “feathering” the outline of a design (Figure 8). Feather stitching creates a jagged outline and is useful when a solidly filled-in design may not be desired.
While stitching, hold the fabric, in the hoop, tightly against the needle plate. If the fabric is not tight, it will pop up and down and stitches will not interlock correctly. To keep the fabric tight, place two or three fingers of both hands inside the hoop and press down near the area being stitched. Be sure to keep your fingers out of the stitching path!
Stitches should be close enough so the fabric does not show through, but not so close that an uneven build-up of stitches is created. As you work, check the thread tension frequently to be certain the top thread is not too loose (forming loops on wrong side) or too tight (bobbin thread showing on right side.) If stitches are not close enough, simply go back over the open spaces. If stitches tend to build up, move the hoop more rapidly as stitches are formed.
To end stitching, move the stitch width regulator to “O,” then stitch three or four stitches in the same place. Pull the threads to the wrong side and clip close to the fabric.
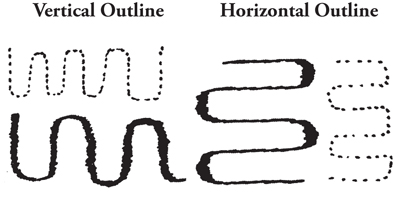
Figure 6. Outlining can be accomplished with straight stitching or zig-zag stitching.
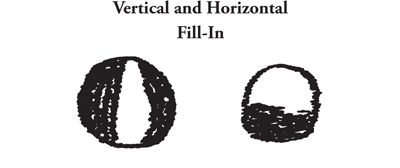
Figure 7. Examples of fill-in stitching.
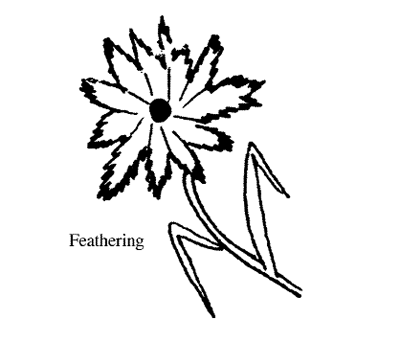
Figure 8. Feather stitching creates a distinct edge and can be used when a solid, filled-in design is not desired.
Special Techniques
If decorative stitches are programmed into your machine, they can be used for machine embroidery. Select those that will add to the character of free-motion embroidery. Use the patterns individually or in groups to create special effects.
Practice pattern stitching before applying it to a project. Check the thread tension and the stitch width and length regulators. Variations in patterns can be achieved by changing the stitch width and length, stitching over cord or ribbon, using a double needle, using variegated thread, or some other techniques. Check your machine manual for ideas.
For more on this topic, see the following publications:
C-102: Sewing Machine Maintenance
https://pubs.nmsu.edu/_c/C102/
C-202: Checklist of Common Machine Troubles
https://pubs.nmsu.edu/_c/c-202.html
C-217: Sewing Machine Appliqué
https://pubs.nmsu.edu/_c/C217/
All Clothing Publications:
https://pubs.nmsu.edu/_c/
Original author: Susan Wright, Extension Consumer Education and Health Specialist.

Wendy Hamilton is an Extension Evaluation and Accountability Specialist at New Mexico State University who provides expertise for program development and evaluation. She has worked at four land-grant universities, and has a diverse background in textiles and clothing, adult education, 4-H youth-at-risk, horticulture, evaluation, and grant writing.
To find more resources for your business, home, or family, visit the College of Agricultural, Consumer and Environmental Sciences on the World Wide Web at pubs.nmsu.edu
Contents of publications may be freely reproduced for educational purposes. All other rights reserved. For permission to use publications for other purposes, contact pubs@nmsu.edu or the authors listed on the publication.
New Mexico State University is an equal opportunity/affirmative action employer and educator. NMSU and the U.S. Department of Agriculture cooperating.
Revised February 2015