Guide B-814
Casey Spackman and Sara Fuentes-Soriano
College of Agricultural, Consumer, and Environmental Sciences
Authors: Respectively, Extension Range Management Specialist, Department of Extension Animal Sciences and Natural Resources; Associate Professor of Range Plants and Herbarium Director, Department of Animal & Range Sciences. (Print-friendly PDF)
INTRODUCTION
Range plants are one of the most important resources of New Mexico rangelands. They provide food for livestock, offer dietary necessities and cover for wildlife, produce timber, promote ecological function, and supply many other goods and services to humans. In contrast, some plants can be toxic, invasive, and/or disruptors of water conservation and soil quality. With over 3,000 range species, including 417 species of grasses in the state, proper identification becomes an important aspect of rangeland management. Pressing plants is one way to prepare a sample to aid appropriate identification. If a pressed specimen is complemented with collection information, it can also provide a long-term record of occurrence. This guide details collecting, preparing, labeling, and storing plants for personal or scientific purposes.
HOW TO MAKE A PLANT PRESS
When collecting plants, a plant press allows for the flattening, drying, and preserving specimens. There are several varieties and sizes of presses (Photo 1). A simple press may consist of heavy objects (e.g., books) with newspaper as the absorbent material. These presses are often limited to one-time needs or small quantities of plants. Another press is a Bag press, which is easily transported in the field, allowing for temporary storage of plants before being transferred into a more robust press.
Photo 1. Plant press types. Top: traditional press with primary components. Middle: torque wood press. Bottom: shoulder bag press.
A wood lattice press can also be taken into the field and will reduce specimen damage as it has hard sides and is lashed together. Finally, the torque press is, as the name implies, a press that is screwed together using torque bolts. These are difficult to transport and commonly used in herbaria, where specimens are brought to the press for long-term preservation. The primary components of any presses are (Photo 2):
- Two wood end-frames
- Cardboard ventilators
- Blotters (optional)
- Newspaper sheets
- Straps with cinch or cam fastener (or material that can be tied to hold the bundle)
The standard herbarium press size is 12 by 18 inches. Other sizes can be used depending on the project focus. If a solid wood frame is used, drilling multiple half-inch or greater holes throughout the wood will help with air movement. Commercial presses are made as a latticework of hardwood for this purpose. They are lighter and easier to transport. Nevertheless, lattice construction is difficult, time consuming, and, if purchased, costly.
The cardboard ventilators and blotters should be the same size as the frame (12 by 18 inches). Ventilators can be cut from corrugated cardboard or purchased. Cardboard corrugations should run the 12-inch length of the frame. Blotters are a highly absorbent paper and are optional in a press. However, the quicker a plant is dried, the more details are preserved. This does not occur with higher temperatures but rather with the speed at which water is removed. Thus, the combination of blotter and cardboard allows for airflow and rapid moisture removal.
Using old newspapers allows for enclosing each plant, avoiding mixing specimens. This prevents moisture and pigments from seeping onto blotters or cardboard, allowing reuse. Cut or tear single sheets about the same size as the press when folded in half. Secure the enclosed materials together into a neat bundle with two straps.
COLLECTING PLANTS
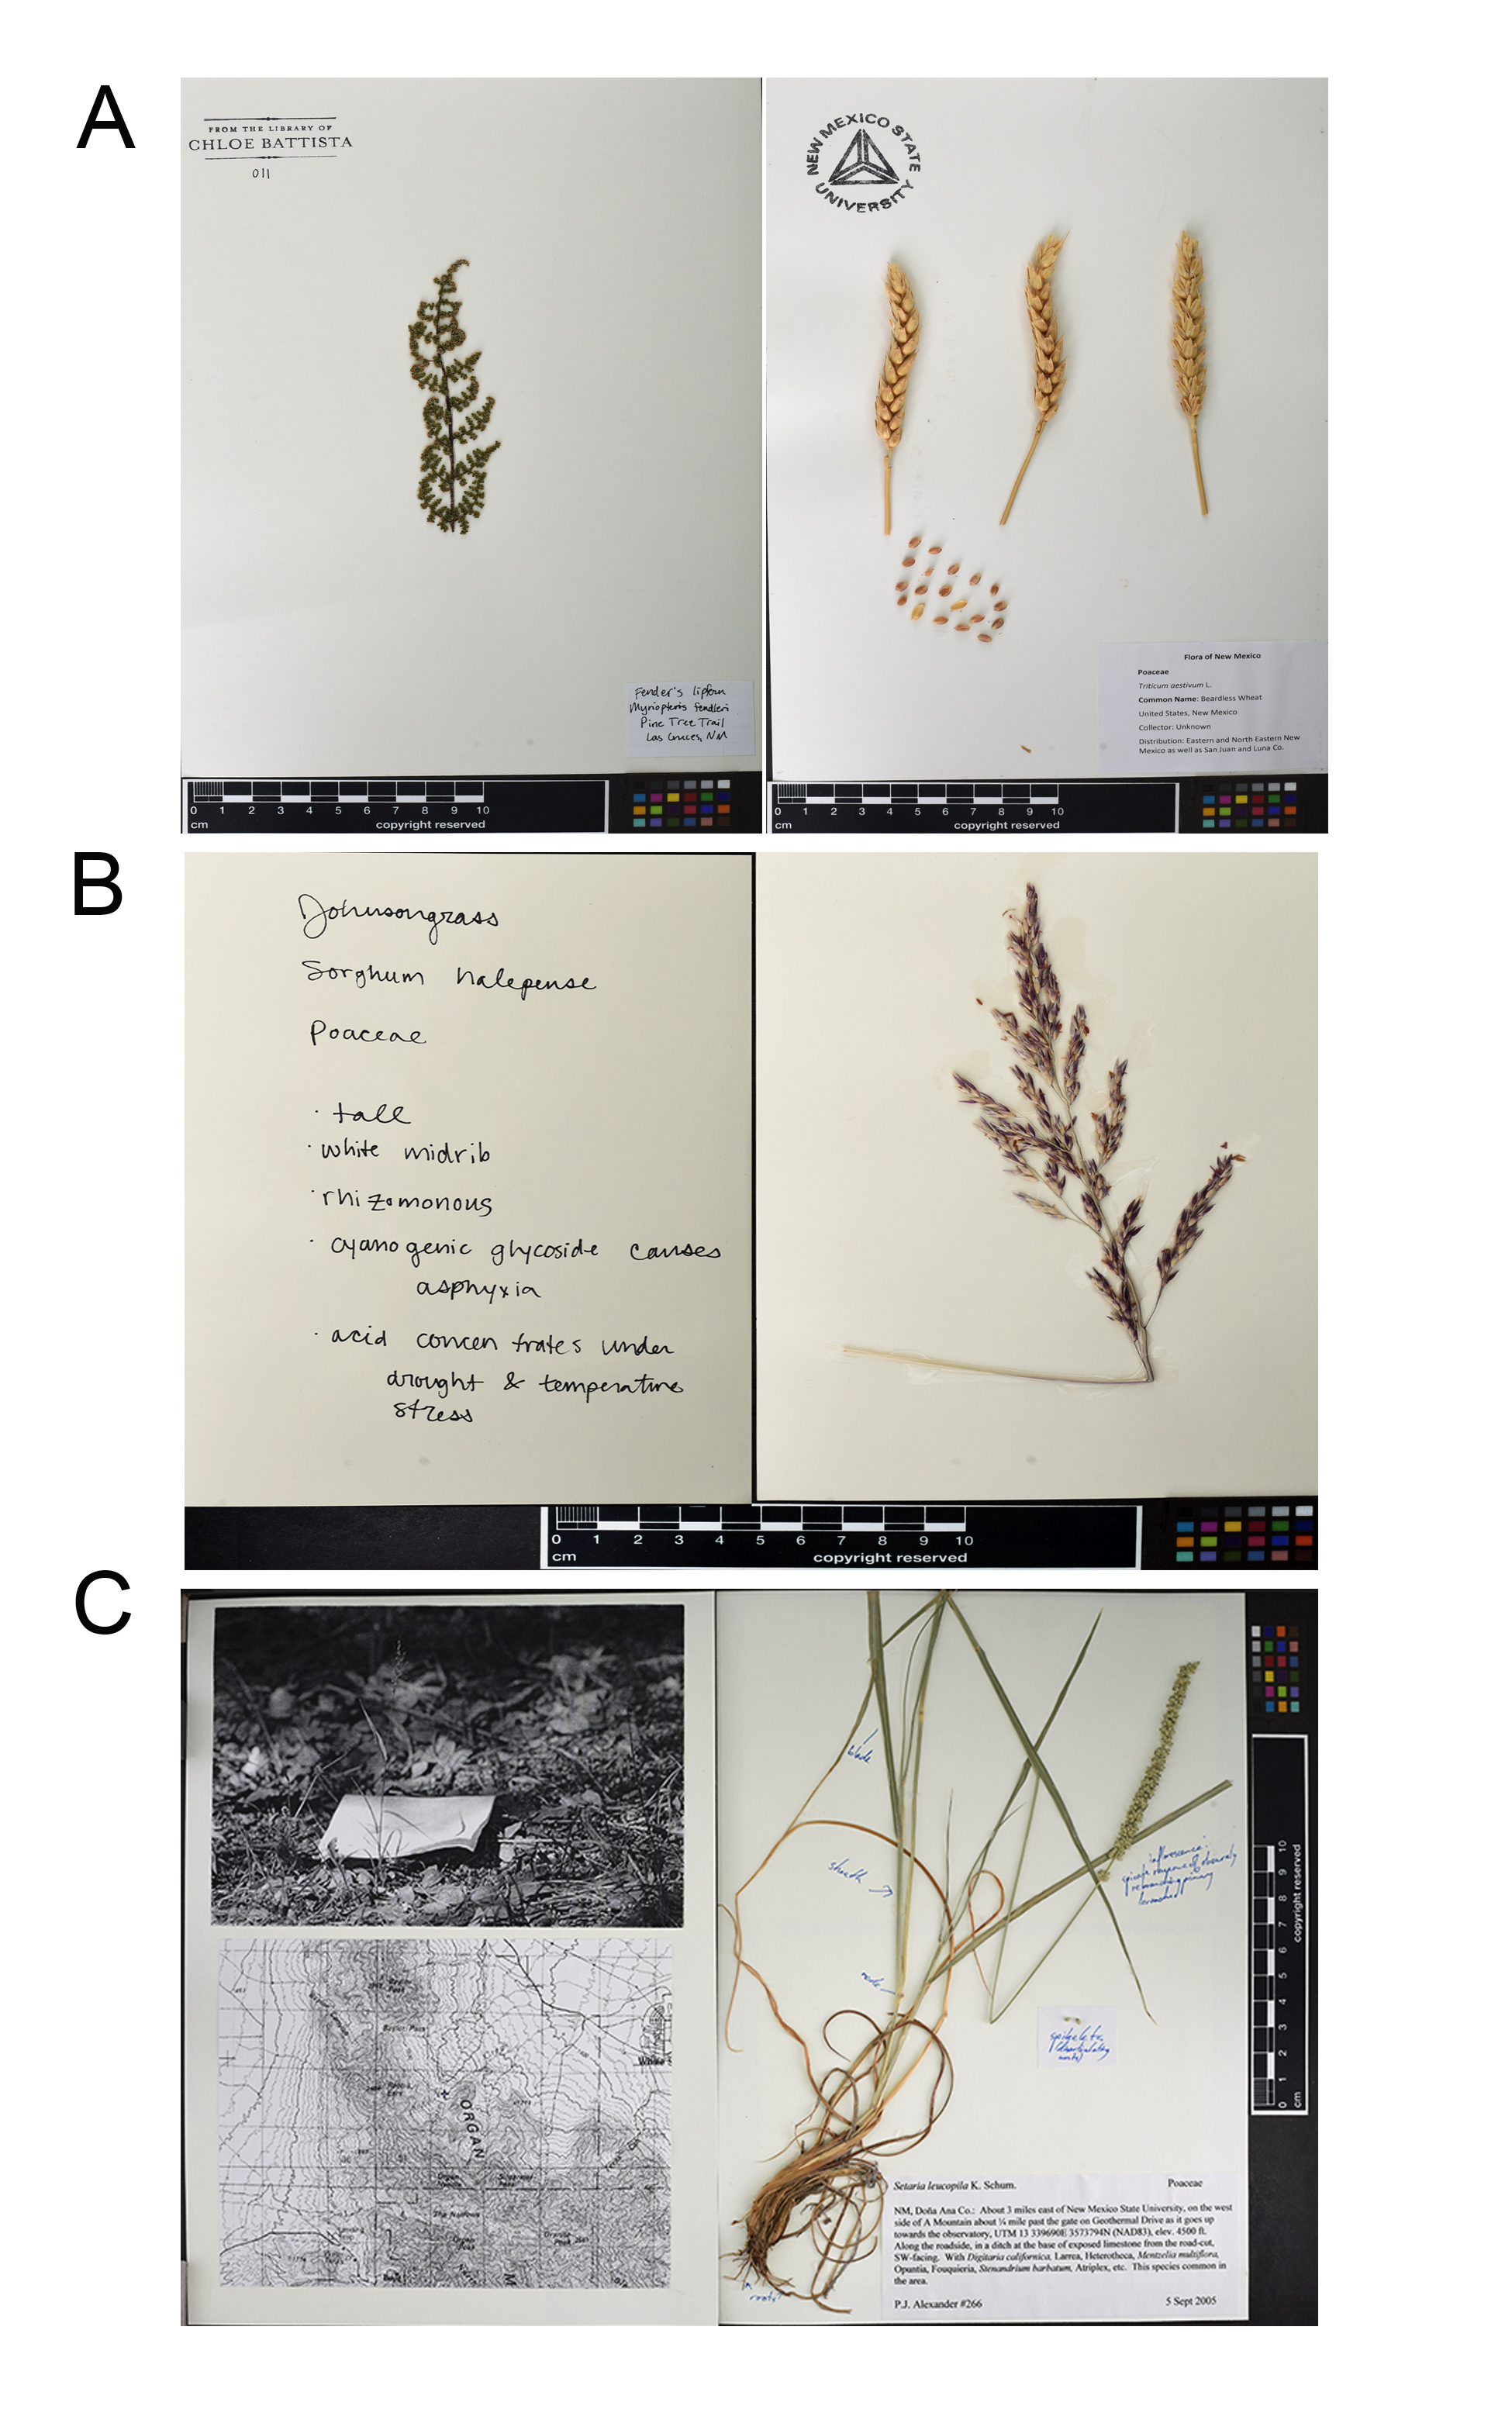
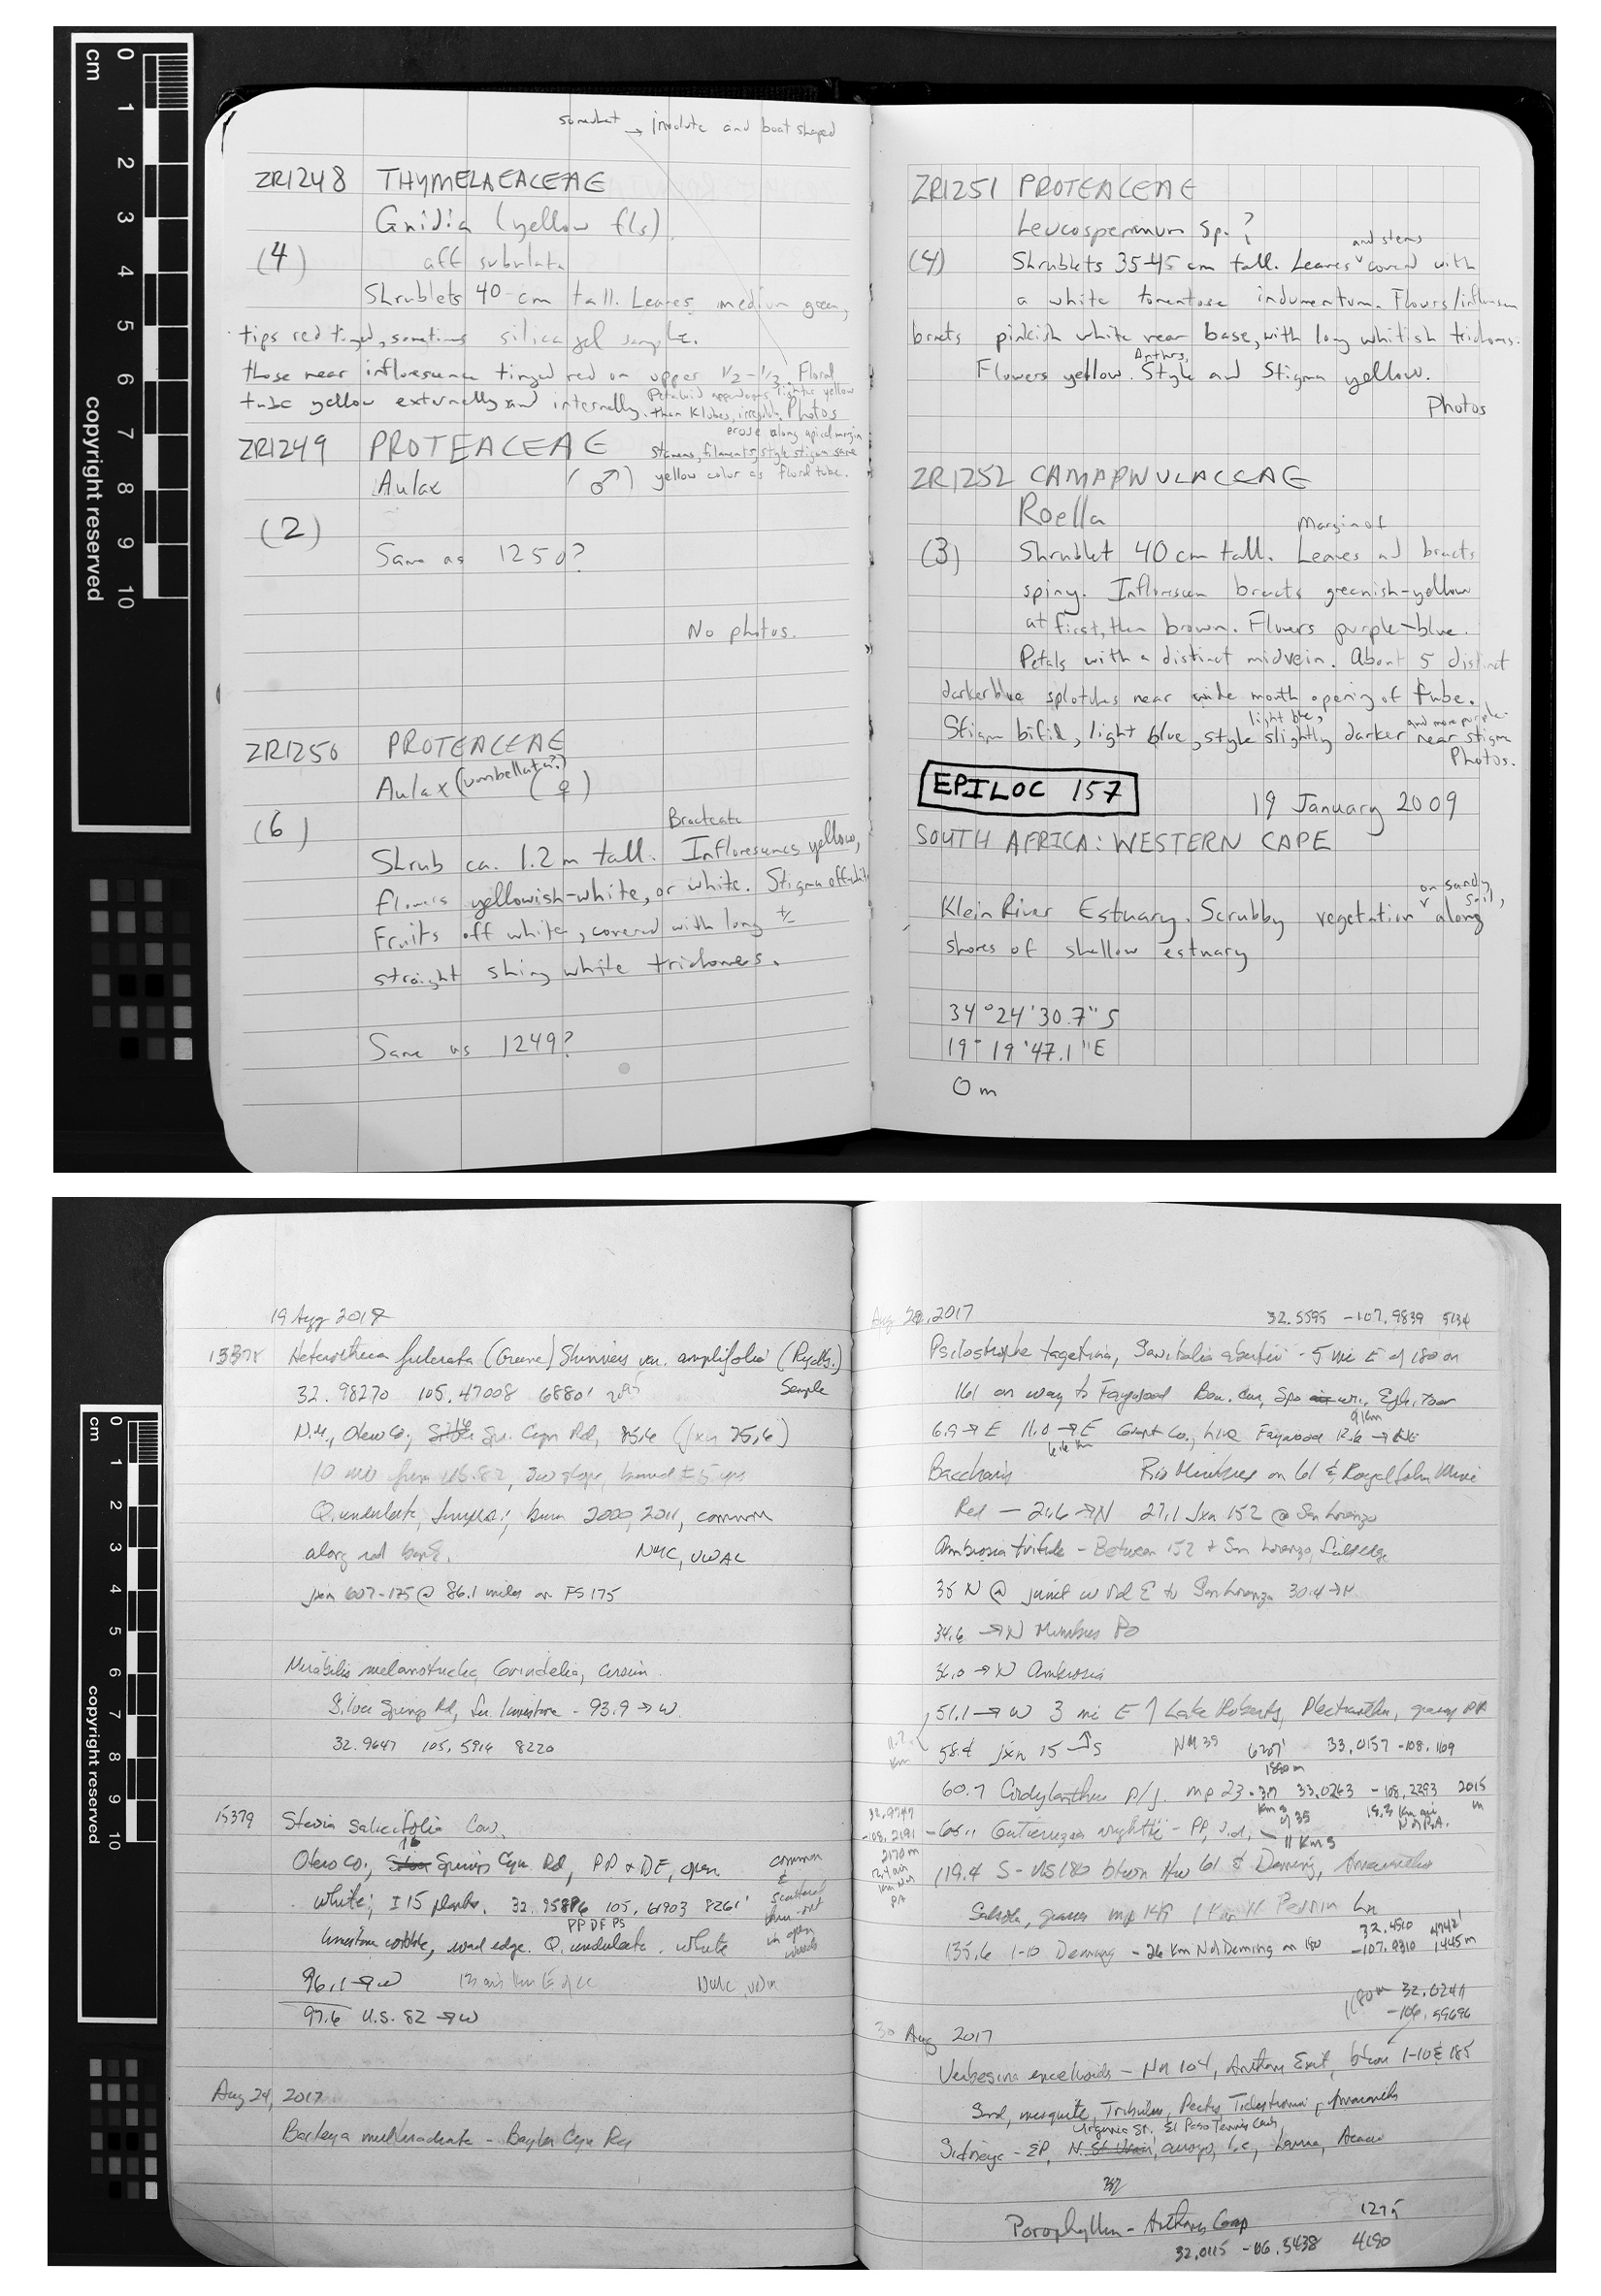
Select a plant that represents the species, lacks abnormalities or disease, and contains all relevant plant parts. Evaluating multiple plants of the same species within the surrounding community is the best reference for determining normality and representation. Whole roots, leaves, stems, flowers, and fruits are key plant parts needed for identification, except trees and shrubs, which exclude the root. If the whole plant is too large to fit in the press, bending in a “V” or “N” shape (e.g., tall grasses), making a lasso or rope for vines and lianas, or clipping individual identifying features (e.g., trees and shrubs) is sufficient (Photo 3). For bulky plants or plants containing high moisture levels (e.g., succulents), a cross-section, preserving one side, may be warranted to help with drying. Always collect multiple specimens to ensure if a collected sample does not appear or turn out as one likes, another will. Make sure to number and keep a log of all collected plants, including information on the plant specimen that may be lost during the drying process (e.g., color, senescence, presence of saps and other details, etc.), collection site (abundance of the plant on site, habitat status, etc.), and photographs (Photo 4). This will help the labeling, mounting, and identification process and prevent lost or mixed-up specimens.

Photo 3. Specific pressed plant parts with label or writing, and large plant in a bent arrangement with landscape photo and map. |

Photo 4. Plant collection log. |
HOW TO PRESS PLANTS
Press each specimen in the field or as soon as possible after collection. This helps to preserve color and minute details that may be lost due to withering. Remove soil, rocks, and other debris from the root system. Arrange the plant on half of a sheet of newspaper so identifying features are easily seen and not overlapping. Fold the other half of the newspaper over it. Once pressed and dried, the plan cannot be rearranged. Additional smaller plants or individual plant parts can be placed in the remaining open spaces of the newspaper. These are helpful for dissection and identification without manipulating the original specimen.
Newspaper with specimen is placed between two blotter sheets and two pieces of cardboard (Photo 1). If more space is needed, alternate additional newspaper specimens with blotter sheets before adding cardboard.
When finished collecting, add the two wood end frames and fasten the bundle tightly with ropes or straps (Photo 1). Retighten daily until the plants are completely dry. Normally, plants dry in two to three days with adequate heat and sunlight. Succulents, aquatics, or excessively wet plants require longer drying periods. For these species, blotter paper should be changed daily to prevent mildewing.
HOW TO MOUNT PLANTS
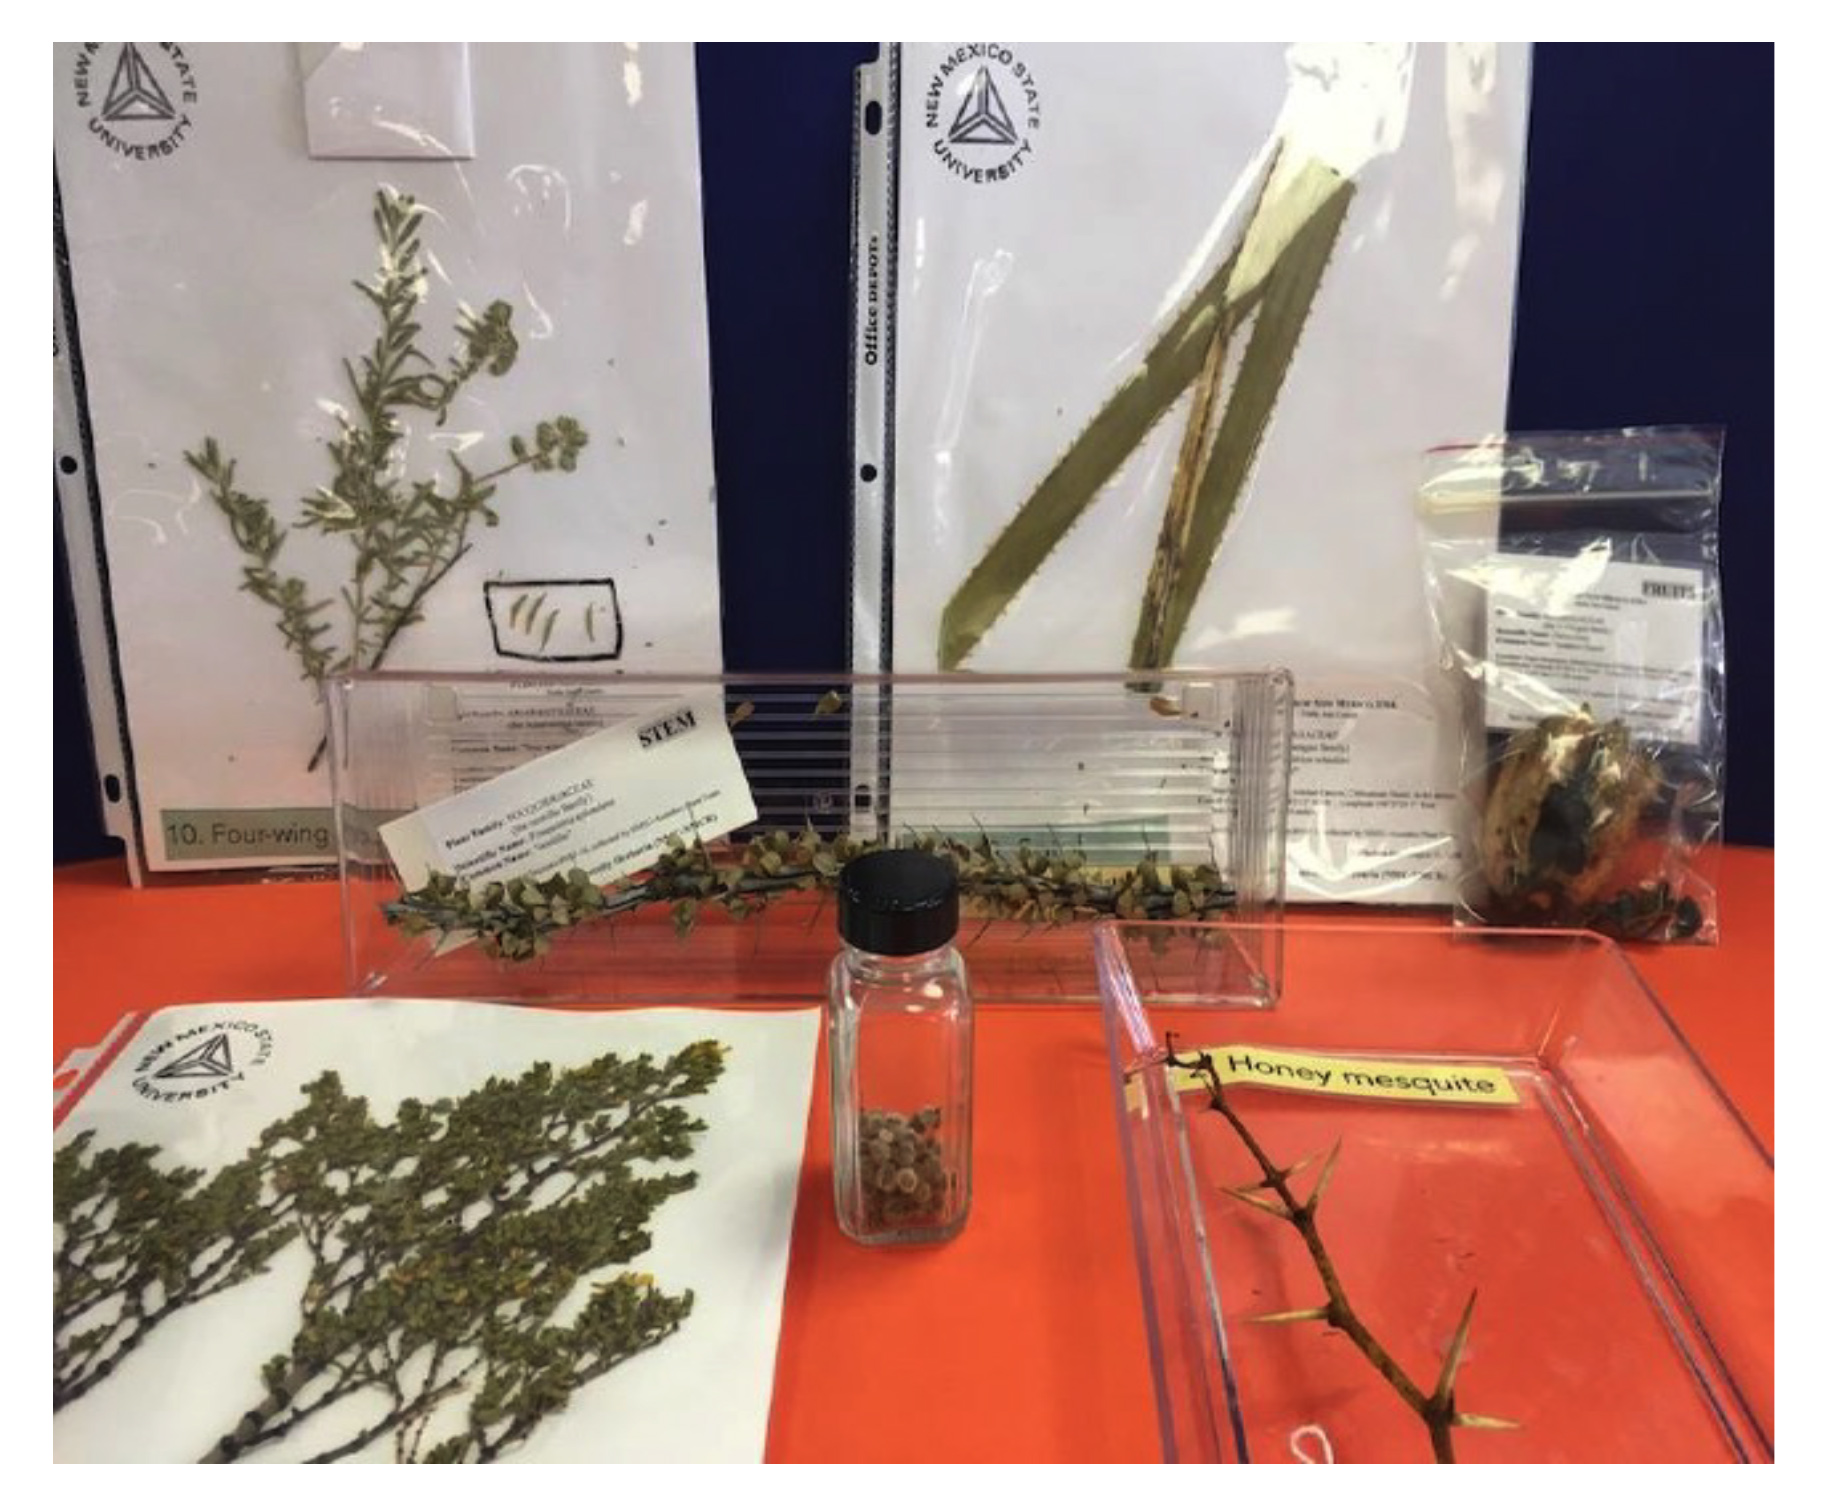
Mounted specimens provide an easy way to handle, display, and store preserved plants (Photo 5). A stiff white paper is needed to begin the mounting process. The standard herbarium mounting sheets are 11.5 by 16 inches. If submission to a herbarium is desired, submit without mounting and with collection information typed or handwritten. Smaller sheets can be used for personal collections.

Photo 5. Display of differently mounted plant specimens.
With mounting paper on a flat surface, glue the specimen label with appropriate information (Appendix A) in the lower right-hand corner of the sheet. If multiple plants are being mounted, ensure a proper label is used. Information can be written directly on the mounting paper for other desired uses (e.g., framed displays) (Photo 3).
Carefully transfer the dried plant from the newspaper. Arrange the specimen with flowers at the top of the page, avoiding overlap with the label. The preferred method of securing the plant is glue. Nevertheless, narrow linen or gummed cloth tape can be used. If glue is used, use a neutral pH polyvinyl acetate (PVA) glue to prevent long-term browning and specimen damage. Use glue sparingly with small dots strategically applied along the plant's backside. Apply extra glue or more frequent dots along the plant stem (Photo 6). Place wax paper on top of the glued specimen, return to press or place a heavy object on top. Wax paper will prevent excess glue from adhering to other papers, while weight keeps the specimen firmly in place. Allow glue to dry for at least 8 hours. If tape is used, place it across the large stems and branches to hold the plant firmly. Tape should not cover the flowers and other parts needed for positive identification.
Photo 6. Gluing and mounting plant specimens with labels.
HOW TO STORE PLANTS
After mounting, you can cover mounted specimens with a heavy transparent acetate material to protect them for personal display and handling (Photo 5). Make a 12- by 17-inch tri-fold plant genus folder. These are made of heavy-ply card material. One or more specimens of the same genus may be placed in a folder. Insects are a common threat to collections. A pesticide to prevent specimen damage should be carefully considered. Paradichlorobenzene crystals or naphthalene flakes (mothballs) are commonly used in herbariums and will usually kill or repel insects. A simple, effective treatment is to place the specimens in a freezer for two or more days prior to storage.
IDENTIFYING PLANT SPECIMENS
Many specialists are trained in plant identification and plant taxonomy. If you cannot obtain identification locally, call, email a high-resolution picture, or send plant specimens to:
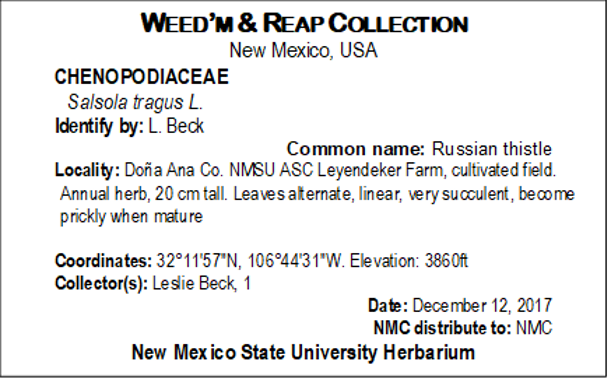
Include available information on the label and details about the setting or environment of the plant (Photo 7). Common ways of describing where a plant grows and how the plant is used include pasture, rangeland, intensively-managed agricultural crop (e.g., alfalfa, pecans), garden, landscape, turf, parks and recreation, roadway, gravel pit, grazed, non-grazed, dryland, irrigated land, wetland, submerged plants, heavy soil (e.g., clay), light soil (e.g., sand), gypsum soil, alkali soil, arroyo, mesa, playa, cliff, and other facts that make the setting desirable for the plant. Include all descriptive words that apply.

Photo 7. Example specimen label with key details.
Plants can also be submitted to the NMSU Plant Diagnostics Clinic with a downloadable submission form (https://aces.nmsu.edu/ces/plantclinic/documents/nmsu-pdc-form-012-001-plant-specimen-submission-form.pdf).
For Further Reading:
B-806: Brush and Weed Control on New Mexico Ranges
https://pubs.nmsu.edu/_b/b-806/
 Casey Spackman is an Assistant Professor and Extension Range Management Specialist at New Mexico State University. He earned his Ph.D. at Utah State University. His Extension efforts aim to assist producers, land managers, and agency personnel in monitoring and developing management objectives that maintain or improve natural resource health and sustainability.
To find more resources for your business, home, or family, visit the College of Agricultural, Consumer and Environmental Sciences on the World Wide Web at pubs.nmsu.edu
Contents of publications may be freely reproduced for educational purposes. All other rights reserved. For permission to use publications for other purposes, contact pubs@nmsu.edu or the Department of Extension Animal Sciences and Natural Resources at https://aces.nmsu.edu/ces/animal/ or (575) 646-3326.
New Mexico State University is an equal opportunity/affirmative action employer and educator. NMSU and the U.S. Department of Agriculture cooperating.
November 2023 Las Cruces, NM


